👏 HAPPY New Year 2019, many wishes and blessing to all.
This is a new project to combine key chain and light remote control.
Key chain was used with a remote control for entrance light control.
This is the current key chain and remote control configuration.
Remote control is on the right side, key chain is loop by key ring. All these are link to a hook clip.
The remote control is kept in a simple casing. It have a small flip off flap cover the remote control button.
👀 Work in progress . . . .
Update on 1st Jan 2019.. 👏
Happy New Year of 2019 and stay tune for more project.
Thank you for all the support and happy viewing. If you have any comment or suggestion you are most welcome.
Continue with project, it took a while for making adjustment as move forward to refine and make improvement.
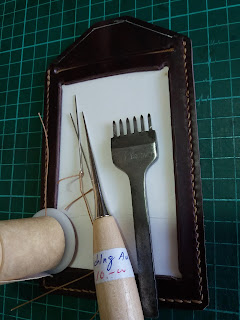
it is a challenge to sew this project as there are tight corner and tight space.
Sew one side for remote control, then the real challenge on the other side.
👀Tips: -The last edge to sew is challenge how we tried this work around by peel
part of the gule part and expose the
The rear portion is to add button and strap to connect to key chain body.
Preparation for connecting strap to key chain.
Strap to link with key chain.
Another view on how the strap is added.
👴 End of document. 👴
This is a new project to combine key chain and light remote control.
Key chain was used with a remote control for entrance light control.
This is the current key chain and remote control configuration.
Remote control is on the right side, key chain is loop by key ring. All these are link to a hook clip.
The remote control is kept in a simple casing. It have a small flip off flap cover the remote control button.
 |
| This is how to access the remote control key pad |
 |
| Overall view on "old" configuration for key and remote control |
 |
| Two piece remote control casing |
 |
| Bottom center is a paper cardboard |
 |
| Add a button to remote control casing |
👀 Work in progress . . . .
Update on 1st Jan 2019.. 👏
Happy New Year of 2019 and stay tune for more project.
Thank you for all the support and happy viewing. If you have any comment or suggestion you are most welcome.
Continue with project, it took a while for making adjustment as move forward to refine and make improvement.
it is a challenge to sew this project as there are tight corner and tight space.
Sew one side for remote control, then the real challenge on the other side.
| This is how we overcome the last edge to sew |
👀Tips: -The last edge to sew is challenge how we tried this work around by peel
part of the gule part and expose the
 |
| Remember to have long thread for this as it needs to extra thread length for this method. |
 |
| Punch hole for front part of remote control to sew edge |
The rear portion is to add button and strap to connect to key chain body.
Preparation for connecting strap to key chain.
Strap to link with key chain.
Another view on how the strap is added.
 |
| This how the two part are held together |
 |
| View from different angle on project |
 |
| Remote control casing |
 |
| Key chain |
 |
| Compare new(top) and old (below) remote control casing |
👴 End of document. 👴


