Showing posts with label Repair project. Show all posts

Repair a Heater water tank (Cygnet Tea Urn) - - 修理热水器水箱(小天鹅茶瓮)-- ヒーター水タンク(Cygnet Tea Urn)を修理する

 This water tank (tea urn) is declare defective for leakage issue initially. Gygnet Model U32, U34, U36 (non water level indicator, temperature controlled concealed element).

(Japanese translation)

この水タンク(茶壷)は当初、水漏れの問題で不良品と判定されていました。 Gygnet モデル U32、U34、U36 (非水位インジケータ、温度制御隠蔽要素)。

(Mandarin translation)

该水箱(茶瓮)最初被宣告为存在漏水问题。 Gygnet 型号 U32、U34、U36(非水位指示器、温控隐藏式元件)。


User manual for tea urn (water tank), Gygnet Model U32, U34, U36 (non water level indicator, temperature controlled concealed element)

(Japanese translation)
茶壺 (水タンク)、Gygnet モデル U32、U34、U36 (水位インジケーターなし、温度制御隠蔽要素) のユーザー マニュアル


(Mandarin translation)
茶瓮(水箱)用户手册,Gygnet型号U32、U34、U36(非水位指示器,温控隐藏式元件)


          But could not detect any water leakage when static test (pour full level of cold water into tank and use newspaper to test leakage was done, (after soaking it for about 3 hour) If there is any water leak the newspaper will have water mark, but in this case there is none.

しかし、静的テスト(タンクに冷水を満量入れ、新聞紙を使用して漏れテストを行った後、約3時間浸した後)では水漏れは検出できませんでした。水漏れがある場合、新聞紙に水跡が付きます。 しかし、この場合は何もありません。


Slowly add more cold water to check for leakage. Notice a new newspaper laid on table is to detect if there is any water mark or spot over time.

ゆっくりと冷水を加えて漏れがないか確認します。 新しい新聞をテーブルに置くと、時間の経過とともに水跡やシミがないかどうかが検出されることに注意してください。
After several hour sitting, top up more cold water

数時間座った後、さらに冷水を補充します
 
Check for any water mark on newspaper underneath tank

タンクの下の新聞紙に水跡がないか確認してください
No visible leakage

目に見える漏れはありません
Check around tea urn base, especially at the welding joint ,so far none

茶壷の底の周り、特に溶接接合部を確認してください。今のところ何もありません。


Fill more cold water until it is at top limit

上限まで冷水を注ぎます
Specification label,
Safe working pressure  = atmospheric
Volt = 240, Phase = 1, 
Loading = 3kW, frequency = 50 Hz, 

仕様ラベル、
安全作動圧力 = 大気圧
ボルト = 240、位相 = 1、
負荷 = 3kW、周波数 = 50 Hz、

Overall bottom view of water tank, the electrical wiring

水槽全体底面図、電気配線
Inspect wiring and screw status, verify any loose wire or connection.

配線とネジの状態を検査し、ワイヤや接続が緩んでいないか確認してください。


Found wire changes color at termination, inspect joint in greater details

発見されたワイヤは終端部で色が変わります。接合部をより詳細に検査してください

This indicate there is wiring connection safety issue which need to address


これは、配線接続の安全性に問題があり、対処する必要があることを示しています。
Poor workmanship on electrical wiring connection

電気配線接続の出来が悪い

Poor workmanship is observe, twisting wires together is not good way as it can cause fire safety. Notice the BROWN wire (Hot wire) already harden and insulation color change .

This show there is poor contact connection which result overtime localize heating effect take place.

This impact safety to product, immediate action to correct issue.

仕上がりが悪いことが観察され、ワイヤーをねじり合わせるのは火災安全を引き起こす可能性があるため、良い方法ではありません。 茶色のワイヤ (熱線) はすでに硬化しており、絶縁体の色が変化していることに注目してください。

これは、接触不良があり、その結果、時間の経過とともに局所的な加熱効果が発生していることを示しています。

これは製品の安全性、問題を解決するための即時措置に影響を与えます。


Close up view after repair is done, electrical wiring connection is check with DMM. Notice have use old electric iron outer insulation to minimize

修理完了後の拡大図。電気配線の接続をDMMで確認します。 最小限に抑えるために、古い電気アイロンの外側絶縁体を使用していることに注意してください。


* Note: I am trying use "Google Translate" application from English to Japanese, sorry if this translation is not suitable please do let me know and thank you.


* 注: 英語から日本語への「Google 翻訳」アプリケーションを使用しようとしています。この翻訳が適切でない場合は、申し訳ありませんが、お知らせください。ありがとうございます。


                                              👦  End of document   👷


Repair Cabinet door hinge problem ( キャビネットのドアのヒンジの問題を修理する )

 One of the kitchen cabinet door have issue, when close both door there are wide gap. This indicate one of the door hinge have an issue.

キッチンキャビネットのドアの1つに問題があり、両方のドアを閉めると大きな隙間があります。 これは、ドアのヒンジの 1 つに問題があることを示しています。


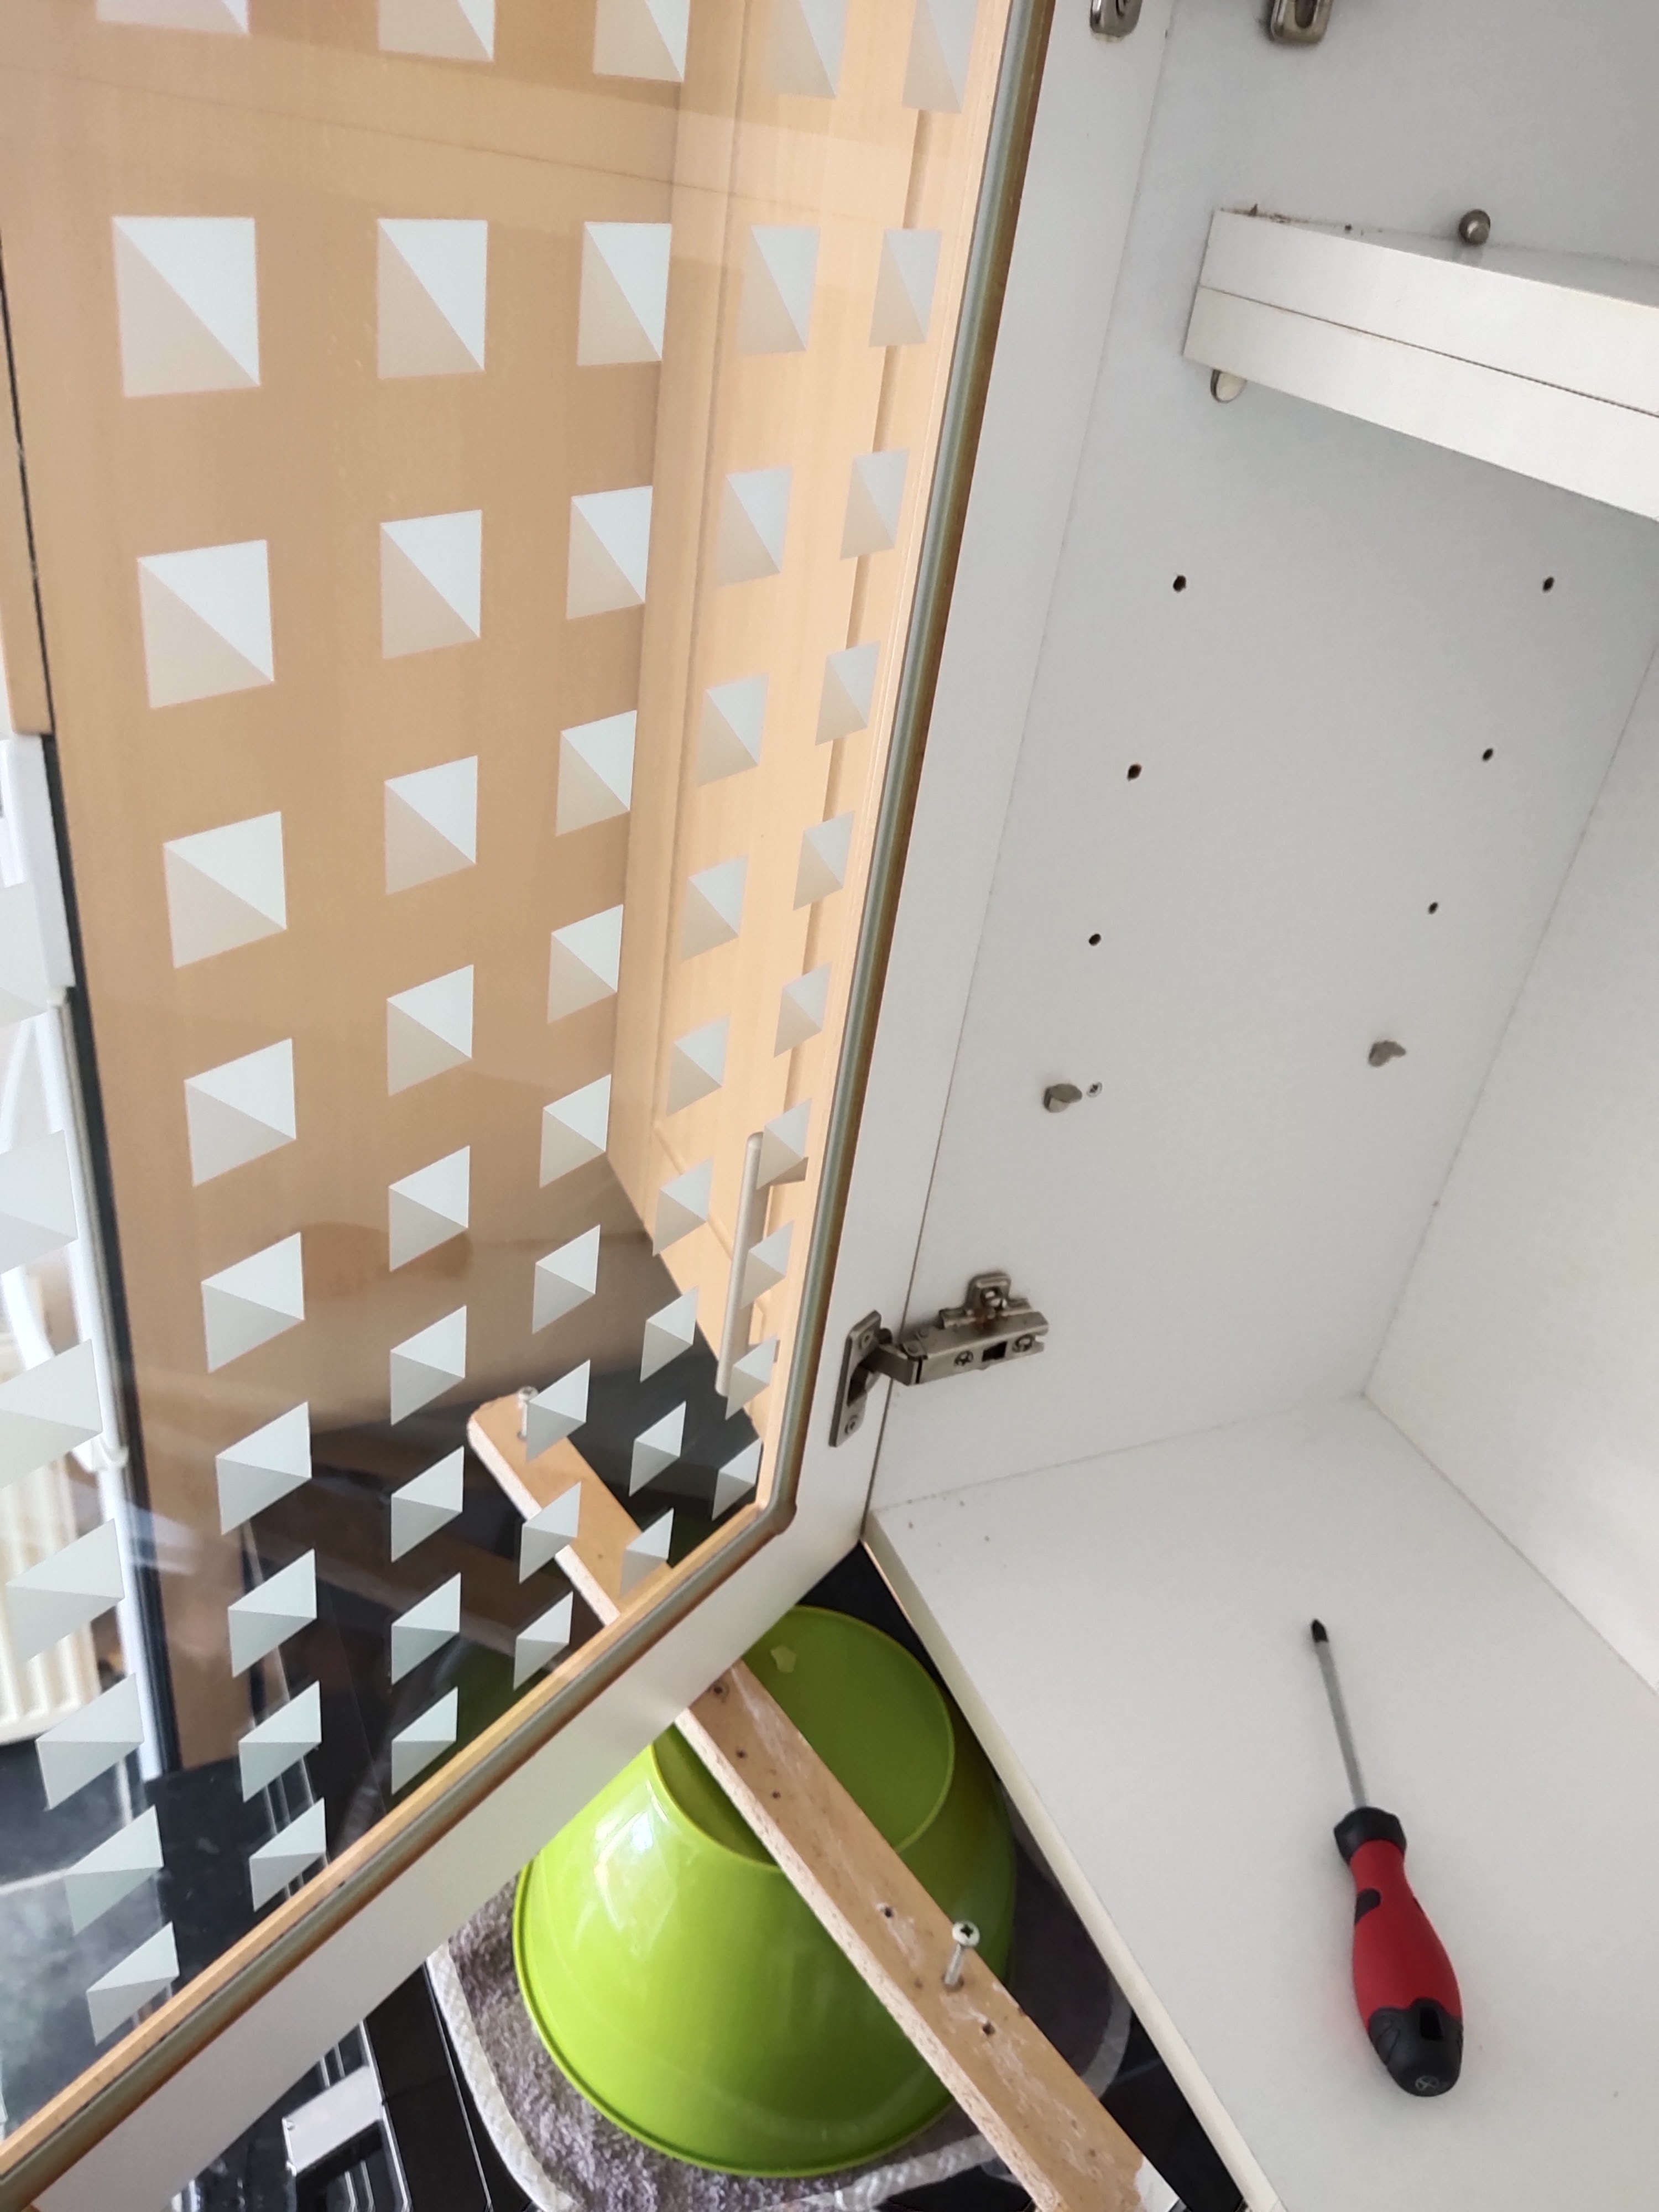
** the cabinet on the extreme left with issue on door panel of the left side **

General o
verall view of the kitchen cabinet lay out.

The cabinet of extreme left is with door on left panel is having issue cannot close properly. after troubleshooting, trail and error found the issue.

(  キッチンキャビネットのレイアウトの全体図。

一番左のキャビネットの左パネルにドアがあり、適切に閉まらない問題があります。 トラブルシューティングの後、追跡調査により問題が発見されました )


If you look closer and inspect the top two door panel edge have gap compare to the bottom edge.


( よく見て、上部 2 つのドア パネルの端が下端と比べて隙間があります。)


Fist time encounter so loosen all two hinge screws from door to inspect , do troubleshooting and verify. In this case the top hinge was faulty in the sense the metal plate "U" cut was out of position (see photo below)

(  初めての遭遇なので、ドアの 2 本のヒンジネジをすべて緩めて検査し、トラブルシューティングを行って確認します。 この場合、金属プレートの「U」字型のカットが位置からずれていたという意味で、上部のヒンジに欠陥がありました(下の写真を参照)。 )

A good hinge which is good, view of the under side of hinge

(  良いヒンジです。ヒンジの下側から見た図です。  )

See how to support door panel when try remove all screw on hinge.
** Note it is very important to take safety into consideration for any repair task.

(  ヒンジのネジをすべて外してみて、ドアパネルをサポートする方法を確認してください。
** 修理作業では安全を考慮することが非常に重要であることに注意してください。)


This is bad hinge incorrect way to set up, see the U shape cutting edge is on top or over the round metal.

(  これはヒンジの間違ったセットアップ方法です。U 字型の刃先が丸い金属の上または上にあることを確認してください。)
Verify issue is resolved or not 

(  問題が解決したかどうかを確認する )

Encounter another issue was the lower hinge screw was worn off. Try to repair on trail and error, but cannot recall method, to carry research to learn better way to fix issue.

(  もう一つの問題は、ヒンジの下側のネジが磨耗していることでした。 試行錯誤で修復を試みますが、方法を思い出せないため、問題を解決するより良い方法を学ぶために研究を続けます。)

* Note for some reason the original screw is big self tapping screw, review and use other type of suitable self tapping screw.

( * 何らかの理由で元のネジが大きなタッピングネジであることに注意してください。適切な他のタイプのタッピングネジを見直して使用してください。)


Please view You Tube from "Karlpopewoodcraft" channel he have very good way to resolved this issue with screw hole worn off .

(  「Karlpopewoodcraft」チャンネルから You Tube をご覧ください。彼はネジ穴が摩耗したこの問題を解決する非常に良い方法を紹介しています。)

His method is to drill a dove pin into the cabinet and seal it with wood glue. Once harden to cut off excess length and drill a small pilot hole to guide the screw head thread.

( 彼の方法は、キャビネットに鳩ピンをドリルで打ち込み、木工用接着剤で密閉することです。 硬化したら余分な長さを切り取り、ネジ頭のネジ山をガイドするために小さな下穴を開けます。)


Update on 6th Nov 2023, saw another video on You Tube on to fix the European hinge see below url link

How to fix bad Euro-style hinges [video 410]   by  Peter Millard

2023 年 11 月 6 日の更新、ヨーロッパのヒンジを修正するための別のビデオが YouTube にありました。以下の URL リンクを参照してください。

悪いユーロスタイルのヒンジを直す方法 [ビデオ 410] by Peter Millard


== == == == == == == == == == == == == == == ==

                                https://www.youtube.com/watch?v=7MuyTOlRR5o

Don't Let Loose Hinges Ruin Your Kitchen - Here's How to Fix Them

karlpopewoodcraft                        2,120 views  29 May 2023  

#kitchencabinets #diy #hinges

How to fix kitchen cabinet hinges, these are sometimes referred to as concealed hinges or European hinges. I also demonstrate how to align the doors and make the gaps around the doors even. This is definitely achievable by a diy enthusiasts enthusiasts.

=============== Update on 6 Nov 2023 another video =================

https://www.youtube.com/watch?v=Oh_xjMIRN7k

How to fix bad Euro-style hinges [video 410]

Peter Millard          211,207 views  17 Jul 2020    (minutes)

#euro #hinges #repair n this shorter video video I show how to #repair concealed (#euro-style) #hinges for DIY cabinet and wardrobe doors. Enjoy!

+++++++  My ‘social’ links in one place - http://bit.ly/10minute-links

== == == == ========================

* Note: I am trying use "Google Translate" application from English to Japanese, sorry if this translation is not suitable please do let me know and thank you.


* 注: 英語から日本語への「Google 翻訳」アプリケーションを使用しようとしています。この翻訳が適切でない場合は、申し訳ありませんが、お知らせください。ありがとうございます。

                                       👼 End of document 👴

Repair Lamp touch dimmer

 This repair is electrical device, hence be careful and take all necessary safety step.

Issue with this table lamp touch device does  not response to user touch, cannot turn on. check plug fuse, lamp bulb status is o\k.


Identify product model and specification.


Screen shot for the connection to compare with own wiring connection base on actual as per the wiring connection see below


Draw layout wiring diagram to remember on the wire color code and connection to where.


=======================

The brown wire is connected to chassis thru a component connected in series.

Bundle of wires termination
Four wires connection to ,module, 
1) Red wire from PCB to hot wire brown wire
2) Brown wire from PCB to chassis (ring lug) thru a few capacitor in series
3) Black wire from PCB to plug NEUTRAL
4) Blue wire from PCB to bulb connection (pass thru the TRIAC


View You Tube for assistance and check this out.

https://www.youtube.com/watch?v=UjeSBIepBGY&t=313s
Touch light reverse engineer and repair (Part 1)

Rice.Engineer                          19,524 views  15 Dec 2016
I reverse engineer a broken MT-1001 touch light controller to figure out how it works. I also debug the circuit and find a shorted component.

MT-1001 Schematic:
https://patrickrice.me/wp-content/upl...

============================================================
https://www.youtube.com/watch?v=YvGeKfQE9jE
Touch light reverse engineer and repair (Part 2)

Rice.Engineer                     4,732 views  22 Dec 2016
I complete the repair of the MT1001 touch light controller in the video.
PCB holder Link:
http://www.thingiverse.com/thing:378926

https://patrickrice.me/wp-content/upl.

========================

Found out it cheaper to buy the whole touch dimmer module than to do component repair as cost difference in gap for price is very low

Just received a replacement module ( four wire to PCB)

1) Red

2) White

3) Black

4) Yellow wire with ring lug

Tested ok and return to owner.


* Note: I am trying use "Google Translate" application from English to Japanese, sorry if this translation is not suitable please do let me know and thank you.


* 注: 英語から日本語への「Google 翻訳」アプリケーションを使用しようとしています。この翻訳が適切でない場合は、申し訳ありませんが、お知らせください。ありがとうございます。

                                                😄     End of document   👦


Repair Cabinet door Handle

 Today encounter one of the box cabinet door with it old leather strap handle broken. Good timing I have some old scrap or cut off leather and cloth to spare.


This old leather (veg tan) strap is broken thru wear and tear and aging factor.

The original old handle is wooden material, broken due to the inserted screw was loosen and worn off screw. Or the wooden handle crack up and other failure along the way. Hence decide to try out simple leather strap handle with cloth cover over leather strap.


Rear view of the cabinet door. This show how the rear end is terminated. Fold the end and stitch it.


Compare new replacement part length to old part.


Sew seam for cloth cover handle. Sew one edge end with about 5 mm seam allowance for both end.


Sew the other end with 5 mm seam allowance

Setting on sewing machine, tension = 4, stitch length 3 to 4. 


Then sew the side edge, than fold out the wrong side out. Double sew edge and trim any excess cloth material.


Next step to fold over the wrong side toward inside.


Use this simple tool to reverse the wrong side in.

Better use wooden or plastic tool and no sharp end.


Slip the new cloth cover over the leather strap.

Next step to insert both end to each cabinet door hole.


This is how ,both end are terminated. Use a cut off from round punch from leather project.


This complete the project on cabinet door handle repair.

Hope this new handle is more durable..


End of document 😎

Year 2024 HAPPY Winter Solstice

 Year 2024 HAPPY Winter Solstice * Note: This is trail use of "Google Translate" application from ENGLISH to JAPANESE, sorry if th...