Showing posts with label ID tag. Show all posts

Badge Tag post #4 (request)

                  Special request for badge ID tag holder post#4

This is request for an odd size ID badge (plastic seal tag), dimension of 12.5 cm height and 8 cm width. This company have large and odd size for user.

Measurement taken on odd size ID plastic pouch.

8 cm width
12.5 cm height


Create template for badge

Tools for project


Cut round corner

Use oblong punch for slot


Apply gule and wait for curing

Trim edge with beveler tool

Punch hole along edge


Rear view

Finish project front view

Rear view of project


Update 30th Dec 2018
Visit relative house to confirm ID badge size and fitness.
After reviewing and verify the actual size of badge is different (smaller size is required).
Actual ID laminated size is width 7.2 cm and height is 10.7 cm, after remove from plastic pouch. ✋ Hence need to redo a new badge holder base on this measurement.

Another pointer is for rear pocket higher and add button for security for money safe keeping.

Work in progress.


         = = = = = = = = End of document = = = = = = = =

Badge Tag post #3

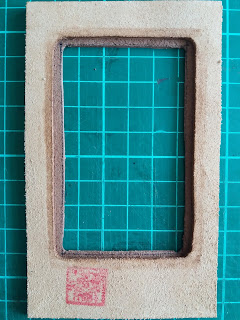
   Try another ID tag project, this round use a thicker leather and cut a hole for ID tag to sit inside.
The idea of this concept was to allow the ID tag to fit and sit in this position.


 Use an ID badge to cut this hole on a leather piece of size 12.5 cm x 7.5 cm.
 Use a fixture (bamboo chop stick)  to hold the soft edge part of project to burnish the edge of ID tag hole .


 Attach a softer leather material in front.
Note have place an aluminum sheet when perform guling process. So that the gule does not spread on cutting matt surface.

Cut the center part base on line drawn. ensure the cutting knife is sharp to get clean cut edge.
 Cut center part off.
Use an ID badge to confirm it sit and fit on this ID badge.


View of cut off for the ID card to sit in.


Show the front layer (top) to middle layer (bottom)
Position the rear pocket relative to the ID card
template
 Rear view, add a pocket behind badge tag.
 View of the badge front.

This is to show how stitching the ID tag


Update on 3rd Dec 2018.

End product for badge tag or ID and holder with added hook.


The hook is attached to a more rigid layer (rear layer) and give it added support.


= = = = = =  End of Document = = = = = =

Badge Tag post #2

Continue with badge tag or ID tag project.


Sharing some completed project for badge tag or ID tag.

Best practice and tips on project which two different type of leather. A softer leather will produce strange result, where by the softer leather surface will wrinkle or uneven surface. Hence it need care during stitching phase.

 A friend share one commercial badge tag for comparison and try to improve or incorporate feature such as simple and quick design.
The idea is to customize for each individual needs and requirement.
One user prefer just the badge tag with following feature.
1) Sturdy strap leads
2) Have additional pocket for daily credit card or loyalty card, access card.
3) Some like a more broader base badge tag
4) Other like to incorporate link to rectardable layward hook up.
5) Other like a simple key ring termination.


Side by side comparison and get estimate dimension for badge tag.


Comparison and take note to add a rear pocket for holding credit card or access card.


Year 2024 HAPPY Winter Solstice

 Year 2024 HAPPY Winter Solstice * Note: This is trail use of "Google Translate" application from ENGLISH to JAPANESE, sorry if th...