Showing posts with label Key Chain design. Show all posts

Key Chain #10

 This is new design for own key chain as the old unit have some issue.


This key chain have issue.
1) It is very bulky due to the additional padding.
2) The ring to hold the key tag encounter
the sensor plate cannot detect.
3) The pocket and elastic band is required.
4. The outside leather is cracking due to use hand sanitizer solution. Hence result in the surface is cracking and peeling off.
5. The extra post is not use.
6. Snap on button is wear and tear hence at time cannot click on. 


Next key chain design , by trying out new idea, but noted it have issue when using it.

Reason the keys being at left side and the strap is too long. This result is the key tendency to become loose.

This result in the keys moves and disturb when closing or opening door .


Re design a key chain holder, use the idea to push and pull concept.


= = = = = = = = = = = = = = = = = = = = = = = = 

I design and customize this key chain base on the type, shape, thickness, materials of keys and etc I am using.

Hence the size and dimension of material used here might be applicable to your needs. However the design shared might not be suitable BUT hope it open to other option to your own key chain holder to fit your own needs.


= = = = = = = = = = = = = = = = = = = = = = = = 


Completed project, to retrieve key, first unfasten the strap and slowly push the base of (b)


                                πŸ‘·  End of document πŸ‘΄


Key Chain #09 (Key Chain and holder design)

 Key Chain #09 (Key Chain design) * update 30th Dec 2020

Experiment on new design key chain and customize for a few keys. 

The center layer is make up of two layer, one is a lining leather with interface to give support. The other outer side for center is old jean cloth with interface added.

The outer jean center piece is to support rivet to hold four key head .


Use a press machine to emboss logo on outside surface of leather.
It need to wet the area surface and allow it to soak in Then leave it for about 2 hour.

This embossing machine handle I have use a leather strap to maintain tension.

Tips:- I leave for about half a day for leather that is hard in texture.So the duration to press depend on the texture of leather materials.


Measure center piece match with key holder height


Tools to skive both side of center layer to be folded

Use center layer to jean material as template
Add interface to support jean material.


Attach both center layer after install rivet to key head.

Attached the center layer use glue. Prepare for punching hole to do stitching on both top and bottom edge.


Finish project for key holder.


Update 30th Dec 2020.

Key chain for 4 head project.

 
Use a small jean cloth material and wrap around a harder base.
The base is a 2mm paper base materials.


Glue the four edge, the longest path is warp around the paper base.

Apply glue, try not to pull too hard as cloth material is flexible and cause uneven surface if pull to hard.

Just sufficient folding to warp over, with both edge meet at approximately center.


Trim all four corner and fold both end .


Prepare key chain head and 7 mm rivet. Remember to allow a seam space for punch hole to key chain main body leather.


Next to stitch the center jean material with leather layer. The purpose is to prevent the jean edge from fraying and give better support for the center part.

Do take note when stitching two layer together it need care when punch hole.

In this case use a 4 mm punch spacing.


First way to mount jean layer, stitch both side but not complete stitch from top to bottom.


Second way to mount jean layer and stitches on both longest side from top to bottom.


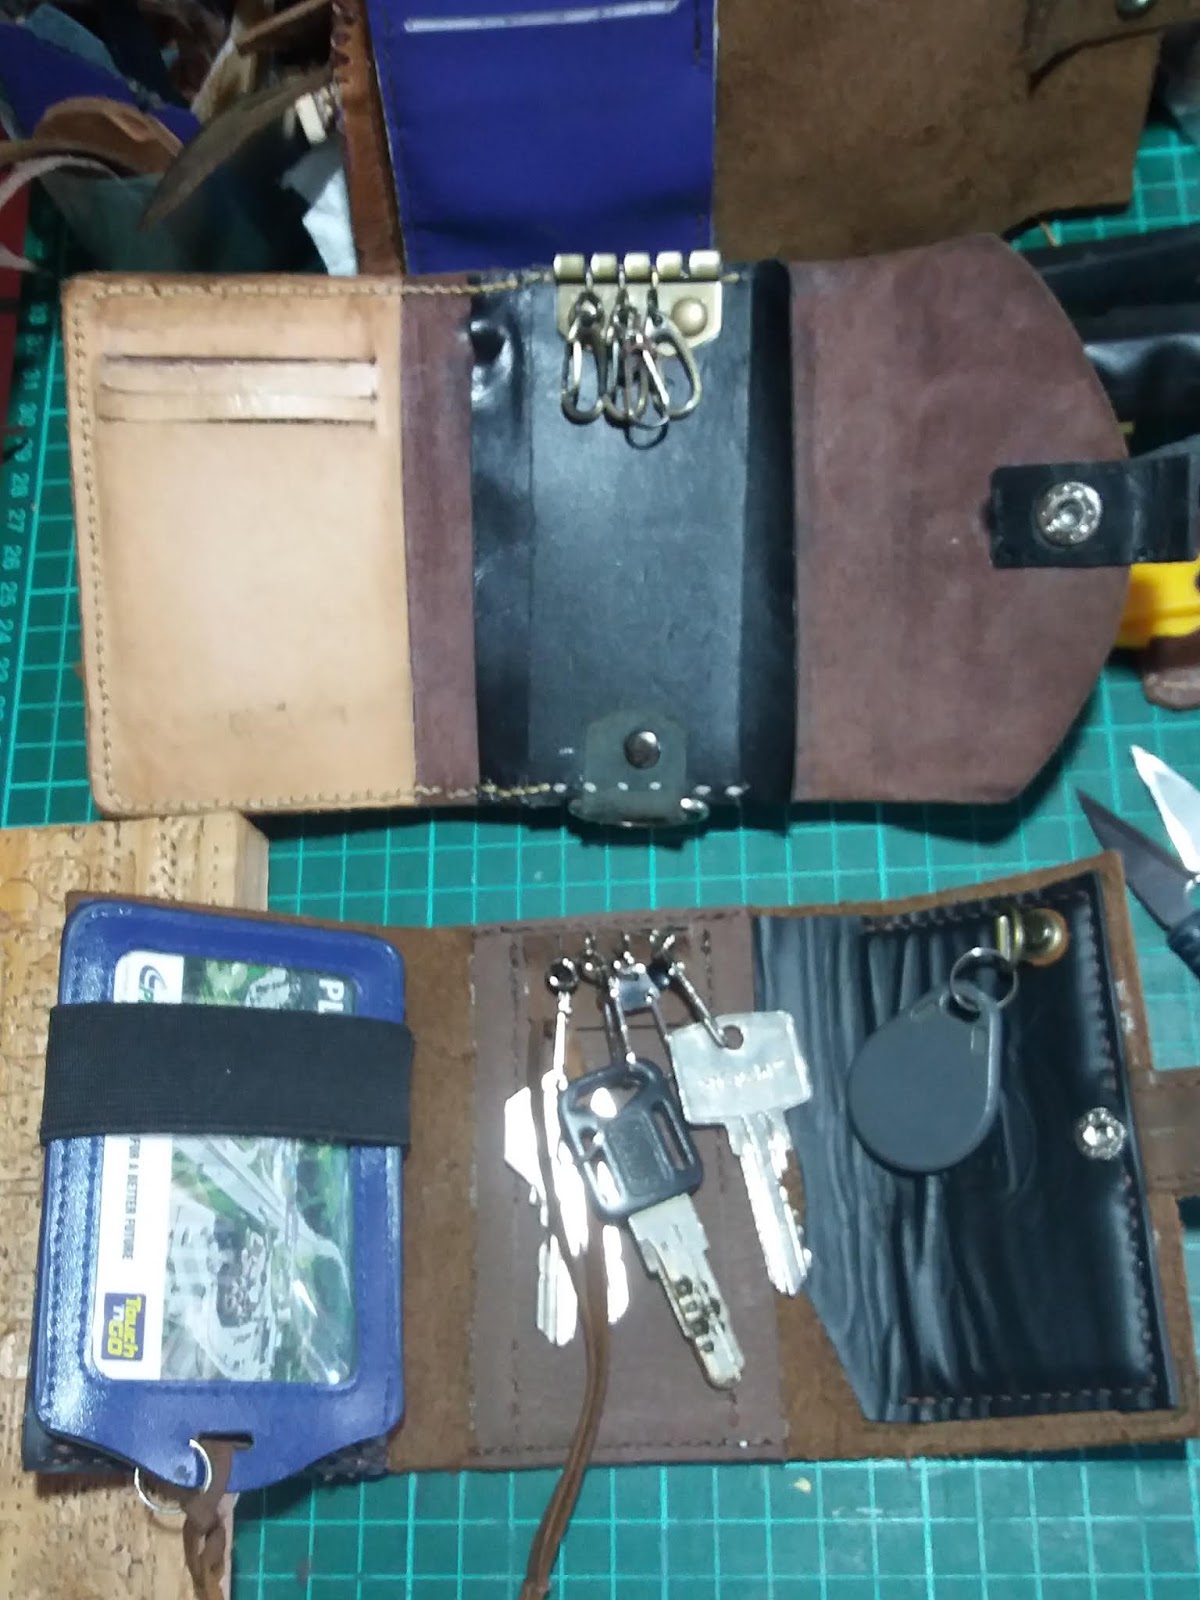
Compare both key chain / holder project. Note both project yet to mount the button.

Note the left picture the button handle on the right side, the right picture with button on the left side.


                               πŸ‘Ά πŸ‘Ά  End of document  πŸ‘΄

Key Chain #08 (Key Chain upgrade)

 Key Chain #08 (Key Chain upgrade).

 One of the old key chain holder need to upgrade, as some of the feature are not functioning or not serve it purpose.


This is an old key chain holder.

There is a remote control module is no longer use. It is light on/off control module.

The veg tan leather is too soft and there is limited "Support" for key holder.

This is an end product of key holder.

With it middle pad to give support and make center layer a rigid support


The VT2 button is hidden tag version.

This is the approximate size of leather 11.5 cm x 21.5 cm.

The center piece is base on four key head.


How to fabricate tag for hiding VT2 button head.


Tools required for tag.

In this case tag is about 2 cm width and the length can be adjusted depend on the design needed.

You will notice VT2 button head should position about mid point between the layer outer edge to the cut slot line.

The 2cm straight line hole is about 2cm from the edge.

Notice certain part of surface is clean or make rough before glue is apply

This is how a strip is inserted into 2 cm hole

This is to show the strip is glue to the layer. Remember to check the correct orientation of the strip.


Once the tag is glued it is time to punch hole for stitching work.
The purpose is to ensure the tag is secured properly when user pull tag to open key chain holder. 

You will notice it this case a wooden piece is use close to it edge as the VT2 button is close by.
This is one way to verify the other button position match


Verify position before proceed to apply glue.
This step is important to check to confirm , especially the button position to allow stitching start


Insert one end of tag into a cut slot line

Pull the end into position

Apply glue 
Allow glue to dry


Out side view of key holder

Inside view of tag where part of button is hidden.


                            End of document  πŸ‘΄πŸ‘΄


Key Chain #07 (Key Chain improvement)

             Key Chain #07 (Key Chain improvement)

See difference between previous key chain with newer design version.


Compare the older key chain version to current design.


Add an elastic band to hold additional card.

stitch one end of strap, fold the end before stitching to key chain


Add a strap elastic band to hold Touch N Go card


Top view with flap close

Option to add a place to hold key tag item.

Final new version of key chain with 4 head, one key tag hook, Touch N Go card with strap to swipe card at toll plaza.


                       End of document πŸ‘΄

Year 2024 HAPPY Winter Solstice

 Year 2024 HAPPY Winter Solstice * Note: This is trail use of "Google Translate" application from ENGLISH to JAPANESE, sorry if th...