Water bottle strap holder - - ウォーターボトルストラップホルダー

     Saw grand daughter bottle she carry have broken /missing strap. She have to hold the bottle with her bare hand on the nozzle head. 彼女が運んでいる孫娘のボトルにストラップが壊れているか紛失しているのを見ました。 彼女はノズルヘッドを素手でボトルを保持しなければなりません。

Hence decide to make a simple strap holder for this plastic bottle of about 7  cm diameter.  そこで、この直径約7cmのペットボトル用の簡単なストラップホルダーを作ってみることにしました。

Instead of using leather material, try hand with some scrap left over from previous project canvas material. 革素材を使用する代わりに、以前のプロジェクトのキャンバス素材から残った端材を使って手作りしてみてください。

Did some idea to this project, want to add id name on strap for ease to track and find her bottle, light strap to compliment the bottle, ease to install strap to bottle by use elastic band to grip on bottle, use snap hook to attach to bottle strap , a simple strap shoulder pad to suit kid size.  

このプロジェクトにアイデアを出しました。ボトルの追跡と検索を容易にするためにストラップに ID 名を追加したいと考えました。ボトルを引き立てる軽いストラップ、ゴムバンドを使用してボトルをグリップし、スナップ フックを使用してストラップをボトルに簡単に取り付けることができます。 ボトルストラップに、キッズサイズに合わせたシンプルなストラップショルダーパッド。


Check on bottle design, shape, size to determine best place to locate the strap around bottle .
It best placement is around the bottle where the original strap or two ear protrude at both side.  
Use canvas material to make some basic measurement, To decide the length for canvas and flexible elastic band to have sufficient grip on bottle.
ボトルのデザイン、形状、サイズを確認して、ボトルの周囲にストラップを取り付ける最適な場所を決定します。
最適な配置は、元のストラップまたは 2 つの耳が両側に突き出ているボトルの周囲です。  
キャンバス素材を使用して基本的な測定を行い、ボトルを十分にグリップできるキャンバスと柔軟なゴムバンドの長さを決定します。


Watch a short video clip on how to set up the SINGER model 2250 for embroidery pattern stitching.

 - https://www.youtube.com/watch?v=qYyWkoyL6lo

By Singer Dream Zone. SINGER モデル 2250 をセットアップして刺繍パターンをステッチする方法についての短いビデオクリップをご覧ください。

  - https://www.youtube.com/watch?v=qYyWkoyL6lo

歌手ドリームゾーンによる。


Need do some practice and setting on sewing machine to optimize result. Play attention to your needle, quality size and thread type and size, quality, fabric properties and etc. 結果を最適化するには、練習とミシンの設定を行う必要があります。 針、品質のサイズ、糸の種類とサイズ、品質、生地の特性などに注意してください。


End of project and have grand daughter try out, happy day for all. プロジェクトが終了し、孫娘に試してもらいました。皆さんにとって幸せな一日になりました。

                  == == == == ========================  == == == == =

* Note: I am trying use "Google Translate" application from English to Japanese, sorry if this translation is not suitable please do let me know and thank you.

* 注: 英語から日本語への「Google 翻訳」アプリケーションを使用しようとしています。この翻訳が適切でない場合は、申し訳ありませんが、お知らせください。ありがとうございます。

                                       👼 End of document 👴 


                                                 👷  End of document 👴


Repair broken snap on fastener for wallet - 壊れた財布のスナップボタンを修理します

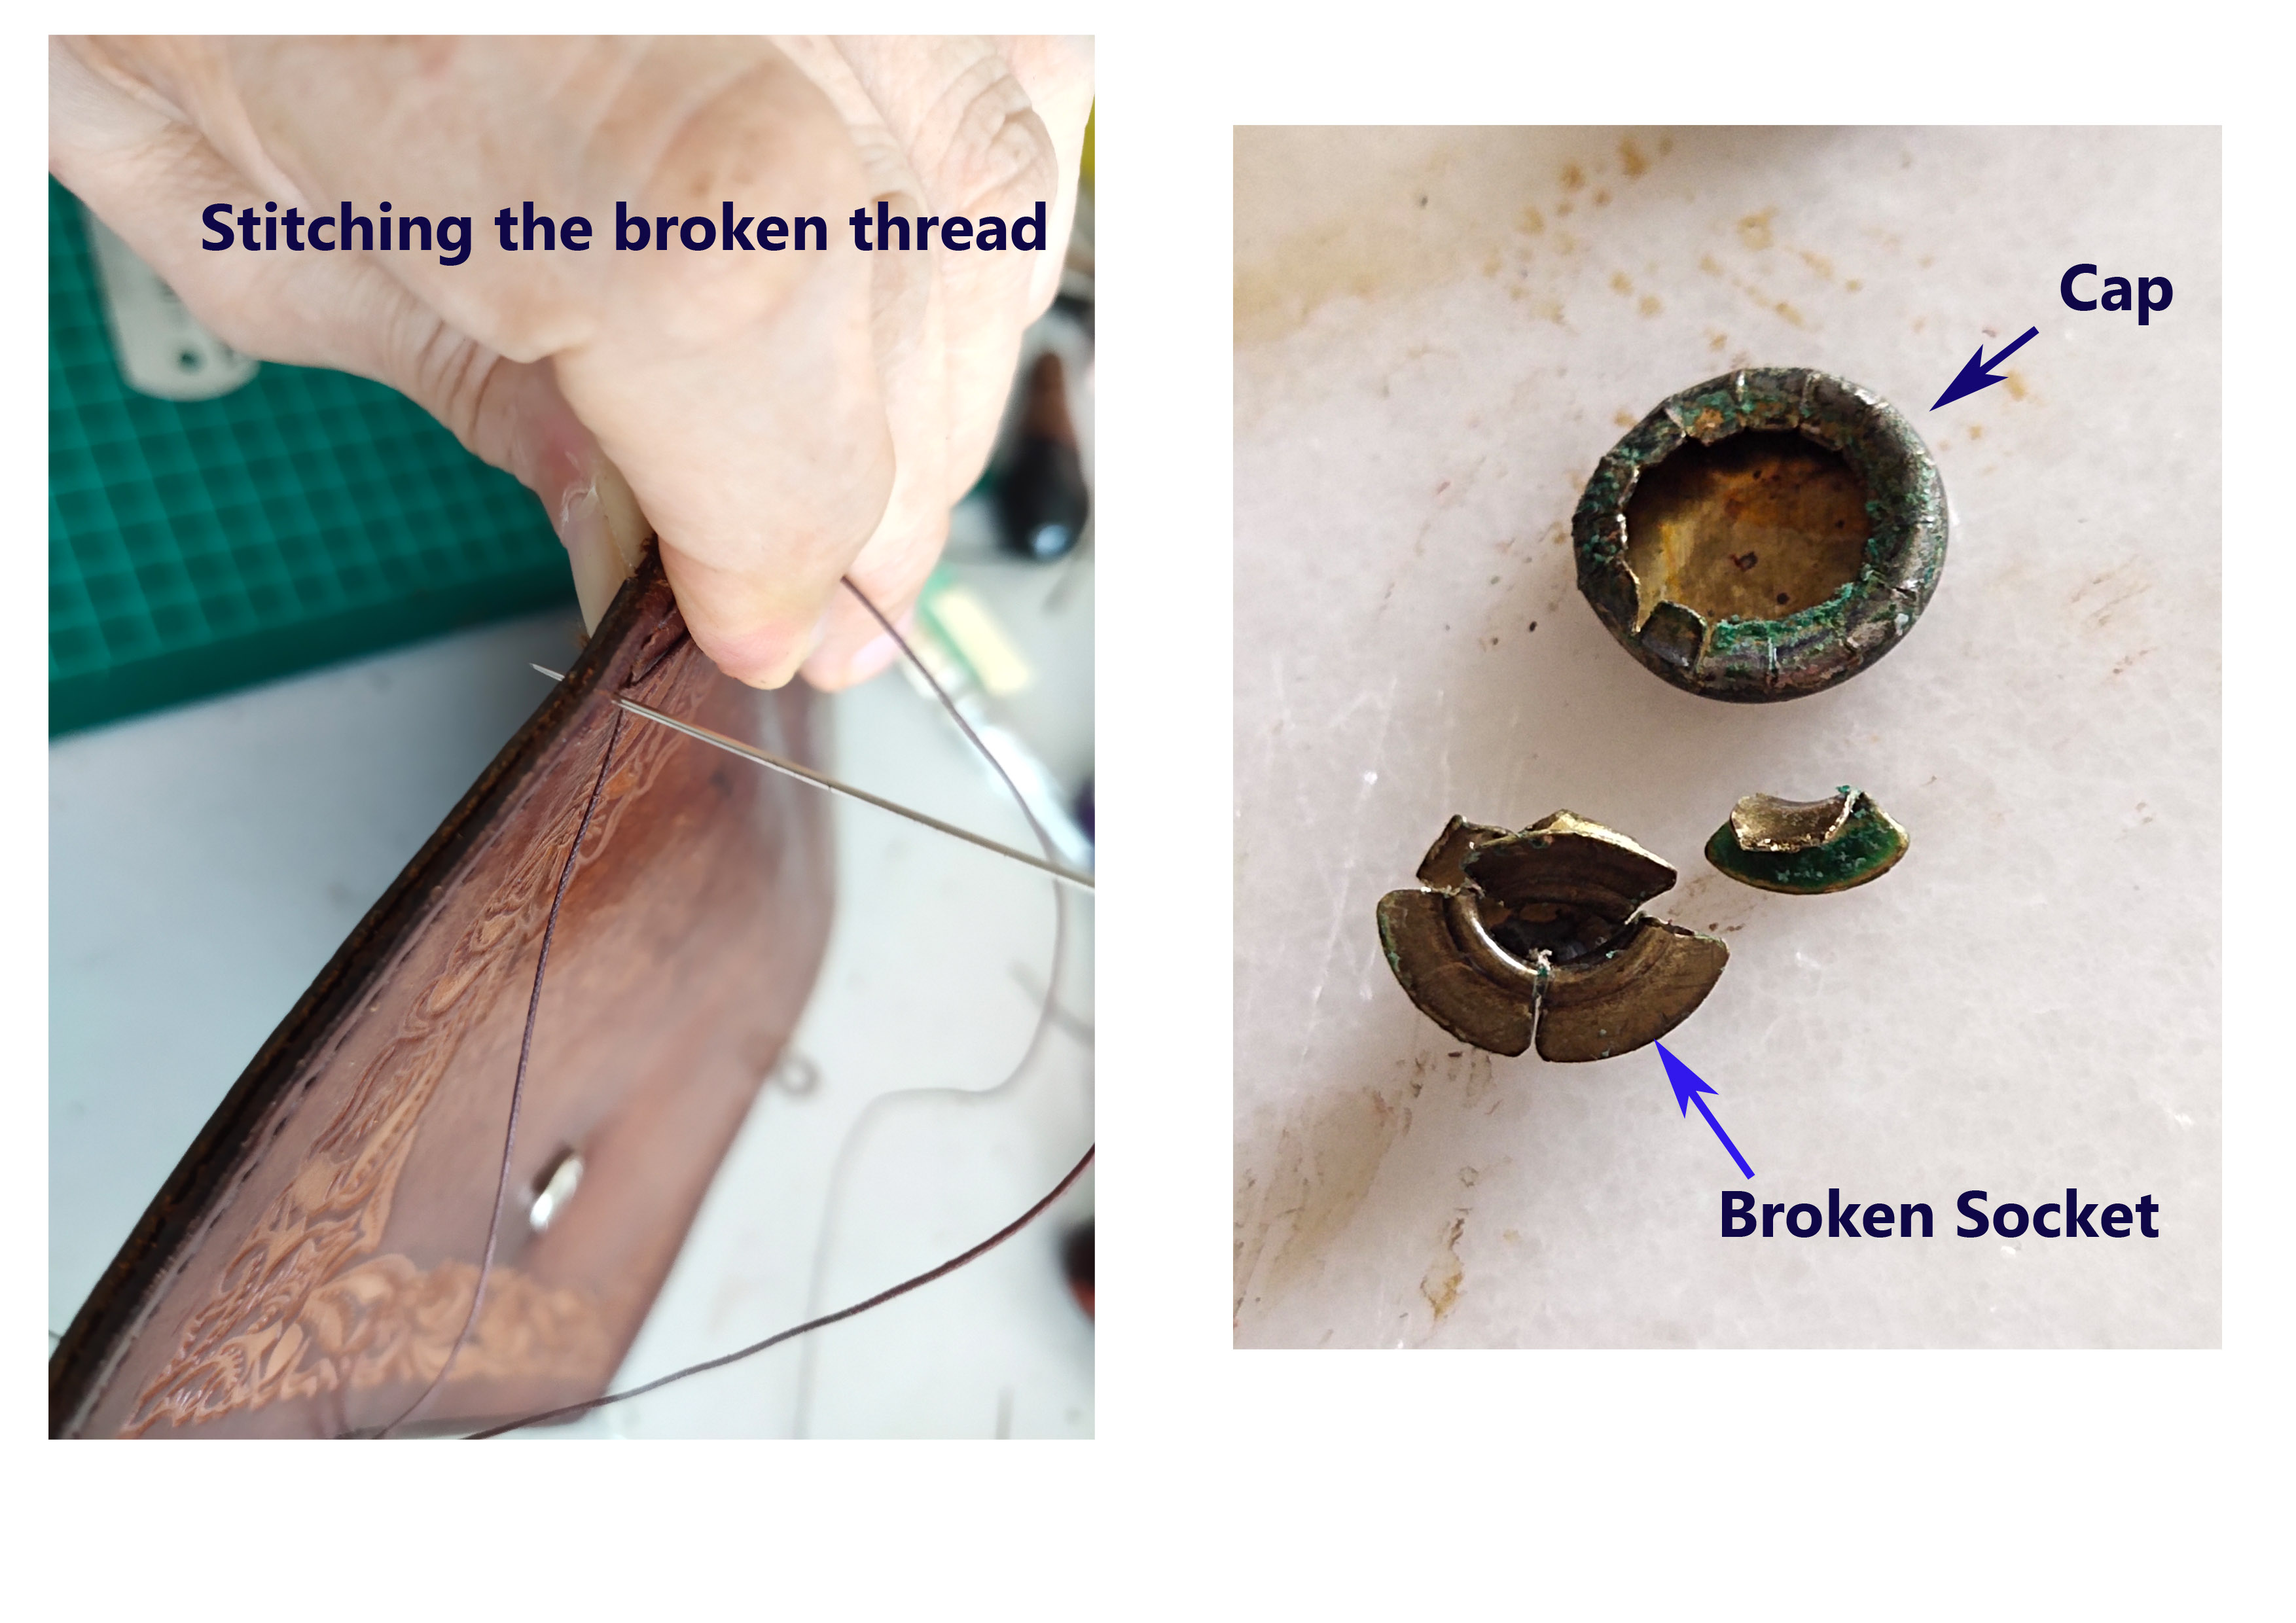
 This lady wallet have two snap on fastener loosen (wear and tear) and need replacement. Also certain part of stitches are broken. 彼の女性の財布にはスナップボタンの留め具が 2 つ緩んで (磨耗して) 交換が必要です。 また、ステッチの一部が切れています。

Verify both snap on is VT5 button size. 両方のスナップオンが VT5 ボタン サイズであることを確認します。


The socket is broken, hence the snap on fastener is weak to hold it on position. ソケットが壊れているため、スナップオンファスナーが弱く、所定の位置に保持できません。

Noted some part of stitch have broken thread.  ステッチの一部に糸が切れていることに気付きました。


After repair was done, use some olive oil and rub on wallet surface. 修理が完了したら、オリーブオイルを少し塗って財布の表面をこすってください。


 == == == == ========================  == == == == =

* Note: I am trying use "Google Translate" application from English to Japanese, sorry if this translation is not suitable please do let me know and thank you.

* 注: 英語から日本語への「Google 翻訳」アプリケーションを使用しようとしています。この翻訳が適切でない場合は、申し訳ありませんが、お知らせください。ありがとうございます。

                                       👼 End of document 👴 


                    👀  End of document 😎

Key Chain #10

 This is new design for own key chain as the old unit have some issue.


This key chain have issue.
1) It is very bulky due to the additional padding.
2) The ring to hold the key tag encounter
the sensor plate cannot detect.
3) The pocket and elastic band is required.
4. The outside leather is cracking due to use hand sanitizer solution. Hence result in the surface is cracking and peeling off.
5. The extra post is not use.
6. Snap on button is wear and tear hence at time cannot click on. 


Next key chain design , by trying out new idea, but noted it have issue when using it.

Reason the keys being at left side and the strap is too long. This result is the key tendency to become loose.

This result in the keys moves and disturb when closing or opening door .


Re design a key chain holder, use the idea to push and pull concept.


= = = = = = = = = = = = = = = = = = = = = = = = 

I design and customize this key chain base on the type, shape, thickness, materials of keys and etc I am using.

Hence the size and dimension of material used here might be applicable to your needs. However the design shared might not be suitable BUT hope it open to other option to your own key chain holder to fit your own needs.


= = = = = = = = = = = = = = = = = = = = = = = = 


Completed project, to retrieve key, first unfasten the strap and slowly push the base of (b)


                                👷  End of document 👴


Glass Container protector - - ガラス容器プロテクター

 This project is to fabricate glass bowl container for three sizes.

1. Large bowl is 47oz/ 1.38 Liter

2. Medium bowl is 27 oz / 0.8 Liter

3. Small bowl is 16 oz / 0.47 Liter 


このプロジェクトは、3 つのサイズのガラスボウル容器を製作することです。

1. 大きなボウルは 47 オンス/1.38 リットルです。

2. 中くらいのボウルは 27 オンス / 0.8 リットルです。

3. 小さなボウルは 16 オンス / 0.47 リットルです。


Trail version using cardboard and wrap around glass bowl to get a feel of the project.

プロジェクトの雰囲気をつかむために、厚紙を使用しガラスボウルに巻き付けるトレイルバージョン。


Glue a PA foam layer for insulation purpose.

断熱目的でPAフォーム層を接着します。


Add a foil layer on top of foam with card board.

The use of cup board was to give the form of shape, while the foam and foil is for insulation layer of body.

フォームの上に厚紙でホイル層を追加します。


食器棚は形を整えるために使用され、フォームとフォイルは本体の断熱層として使用されます。


Add strips of foam for better insulation result , instead of one big piece.

より良い断熱効果を得るには、大きな 1 つの部分ではなく、フォームのストリップを追加します。


Check on of leather thickness and skive to desired thickness for strap use.

革の厚さを確認し、ストラップに使用する好みの厚さに削ります。


Check the container fit each glass bowl size.

各ガラスボウルのサイズに適合する容器を確認してください。
Punch hole on leather edge seam.

革の端の縫い目にパンチ穴をあけます。

The first idea was for both end of the casing was to be close with an end cover.

This idea was not user friendlier to "put in" and too much work to take it out.

最初のアイデアは、ケーシングの両端をエンド カバーで閉じることでした。

このアイデアは、「入れる」のはユーザーフレンドリーではなく、取り出すのは手間がかかりすぎます。


Use paper template to verify design for both end of container.

First prototype version was stop during trail phase.
The idea was not user friendlier.
Decided to stop and start thinking for another design, simple to insert glass container and ease to remove it.


t最初のプロトタイプバージョンはトレイルフェーズ中に停止されました。
このアイデアはユーザーフレンドリーではありませんでした。
立ち止まって、ガラス容器を簡単に挿入でき、簡単に取り外せる別のデザインを考え始めることにしました。
This idea and prototype was stop and removed.

このアイデアとプロトタイプは停止され、削除されました。

Use a nylon webbing strap .

ナイロンウェビングストラップを使用.
Cut strap to match nylon webbing strap size.

Note the small leather strap is to support holding the nylon webbing.
The longer leather strap is sitting the outer surface while the smaller strap is position on the inner surface.

ナイロンウェビングストラップのサイズに合わせてストラップをカットします。

小さな革ストラップはナイロン ウェビングの保持をサポートするためのものであることに注意してください。
長い革ストラップは外側に配置され、小さいストラップは内側に配置されます。


Cut the desire nylon webbing strap length for each glass container size.

各ガラス容器のサイズに合わせて、希望の長さのナイロン ウェビング ストラップをカットします。

Note the desire nylon webbing should be match with each glass container size to have correct tension when it is inserted.

挿入時に適切な張力が得られるように、必要なナイロン ウェビングが各ガラス容器のサイズに一致している必要があることに注意してください。
This is how a glass container is inserted,

ガラス容器を差し込むとこんな感じになります。


Method to punch hole on leather with nylon webbing strap for better secure and stronger support when stress to tension.

ナイロンウェビングストラップで革に穴を開ける方法で、張力がかかったときにより安全で強力なサポートを提供します。


 End of document 😎


Hush Puppies 35mm belt - ハッシュパピー 35mm ベルト

 Fabricate a new Hush Puppies 35mm belt, as old belt strap is worn off, but buckle is in good state. 古いベルトストラップは摩耗していますが、バックルは良好な状態であるため、新しい Hush Puppies 35mm ベルトを製作します。

First hole from buckle (reference edge) is about 78.5 cm , spacing between hole is about 2.5 cm and there are five hole.. Belt length is about 98.5 cm (end to end). バックルから最初の穴(基準端)は約78.5cm、穴の間隔は約2.5cmで、穴は5つあります。ベルトの長さは約98.5cm(端から端まで)です。


Show the old belt which is worn off and need to replace with new belt strap. 摩耗して新しいベルトストラップに交換する必要がある古いベルトを表示します。


To remove buckle is to pull in the direction as shown. There is a spring action from a screw at center (inside). バックルを外すには、図の方向に引っ張ります。中央(内側)のネジからバネの作用があります。


The buckle is Clip on buckle or Ratchet buckle. バックルはクリップオンバックルまたはラチェットバックルです。


Measure buckle pin size, so it can push thru the belt holder strap, it is about 4.2 mm. バックルピンのサイズを測って、ベルトホルダーストラップに押し込むことができるようにすると、約 4.2 mm になります。


Leather use is a pre cut , use edge beveller #2 size on all edge of belt strap.


Apply chemical TOKONOLE to belt edge for burnishing.


Burnishing edge with wooden slicker.


Use sand paper to smoothen edge

Apply chemical TOKONOLE to other side of belt edge.


Use sand paper to smoothen bevel edge 


Cut the end of belt and punch hole, install new belt to buckle.


Cut a 15 cm strap as belt keeper, marking for preparation to punch hole size 9mm (for hanger hook) and 4 mm (belt buckle pin).


Use round punch hole tools, this size is for hanger hook. I use a small straight punch (size 11mm) at the lower edge of round hole. 丸い穴あけパンチツールを使用します。このサイズはハンガーフック用です。丸い穴の下端には、小さな直線パンチ (サイズ 11 mm) を使用します。


The reason for this is to allow easier to hook and hang belt keeper. ベルトキーパーを引っ掛けたり吊り下げたりするのが簡単になるからです。


Tools use for belt keeper project. ベルト キーパー プロジェクトで使用するツール。


How to open jaw of buckle. バックルのあごの開け方。


The buckle is Clip on buckle or Ratchet buckle. バックルはクリップオンバックルまたはラチェットバックルです。


Complete project of belt and belt holder keeper. ベルトとベルトホルダーキーパーのプロジェクトを完了しました。


                                      👀  End of document 😎


2026 Mid Autumn Festival in Malaysia, Penang -2026年 マレーシア・ペナンの中秋節

 This is (25th September 2026) Mid Autumn Festival time of the year...Time do fly fast is relative to each person. Wishing a blessing and ma...