Speed stacks casing holder.
Try out a new project for grandson's speed stacks cup casing holder.
This casing holder to be protect the speed stacks cups, stem holder inside and have a small window to view and see what inside.
Height is about 30 cm (include a stem holder inserted) and base diameter is about 9 cm.
Cup diameter is about 9 cm.
A close up measurement on cup mouth , which is approximately 8 cm diameter.
Cup bottom base diameter is about 5.5 cm
Quick stem measurement of height is about 21 cm and stem size is 2 cm
Measure cup up diameter to verify clearance, is about 1 cm.
This to provide sufficient clearance between cup surface and speed stacks holder leather layer.
Draw outline on leather surface. to cut another leather base to enhance better bottom support.
Verify position location to stitch the loop for quick stem holder on one side of casing layer.
Apply glue to edge of window.
Prepare strip to support the edge of window.
Punch hole for strip, do note did not punch hole all around.
Prepare by remove leather surface of edge to be glue.
Stitch one side of casing first from bottom to top.
Do take note the corner edge is to allow the bottom edge to fold over and stitch to base bottom layer.
Pre punch hole for both side of edge.
Stitch the lower bottom and stop half way
Stitch the base bottom edge around the side layer
Once it completed one loop it is terminated.
To be continue .... trying to think of way to make a cover or way to latch the entrance with handle.
Taking a break for now.
= = = = = = = = Update 13th July 2022. = = = = =
Finally completed the project after thinking over alternative to add device to project .
Summary on this update , 1) add the initial label, 2) magnetic button clasp snap 3) handle shape and VT2 button.
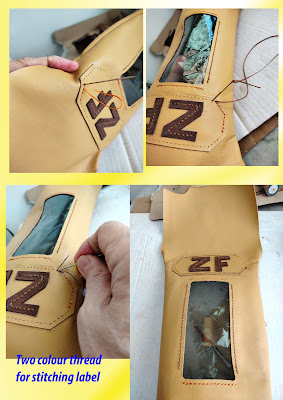
1) For ease of identification purpose have add the label with user initial.
2) A magnetic button clasp snap was to prevent the speed stacks cup are secure inside holder.
3) Cut hand shape to act as handle with VT2 button to secure the handle in position.
Once the bottom layer and two side layer are up. The next phase is to add an initial label to project.
This image shows the close up zoom on the window, can see items inside speed stacks holder.
Use paper template drawing to decide font type, size of font.
Some basic tools required for this job.
Note use a scrap leather from this project from the "window". It just fit in for this project.
Use a divider to trace a line at edge of label in preparation for punch hole.
Draw a center line on each character in preparation for
punch hole and do stitching.


No comments:
Post a Comment