Today is Merdeka day (independence on Aug 31,1957) for Malaysia!! * timezone difference when publish on blogspot.
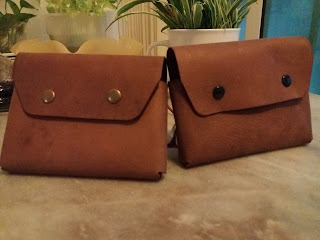
New project on credit card case holder.
Something new to try out after encounter with a friend from Singapore, visiting Malaysia recently.
First attempt was to get estimate measurement of the product, use a coin purse as a way to get the dimension.
The best measurement on this project is 11.5cm x 8.5cm x 2 cm sample template size.
Base on this data we start to create a paper cardboard version to transfer to leather. This way we can think on possible design.
Aim to try out some practical design to suit this project.
= = = = = * * Next step * * = = = = =
= = = = = * * Next step is prepare material ** = = = = =
This step is carried out to mark where to punch hole for button to attached.
The card board template is use to position project and marking place to cut and punch hole for button.
* * * * Another credit card case holder project but different design on the flap , hidden behind.
👶 End of document
New project on credit card case holder.
Something new to try out after encounter with a friend from Singapore, visiting Malaysia recently.
First attempt was to get estimate measurement of the product, use a coin purse as a way to get the dimension.
 |
| Compare the size and possible position to use. |
 |
| Another position to have rough esitmate |
 |
| Another way to estimate project measurement |
The best measurement on this project is 11.5cm x 8.5cm x 2 cm sample template size.
Base on this data we start to create a paper cardboard version to transfer to leather. This way we can think on possible design.
Aim to try out some practical design to suit this project.
= = = = = * * Next step * * = = = = =
 |
| Make a model of product with cardboard as template |
 |
| Use the card board paper template for leather positioning , size, shape of pattern, and etc to take into consideration |
= = = = = * * Next step is prepare material ** = = = = =
This step is carried out to mark where to punch hole for button to attached.
 |
| Making adjustment and measurement |
 |
| Marking to punch hole at corner |
 |
| After punch hole and remove apart to prepare for stitching step |
 |
| Other side with punch mark to stitch. The side layer is on top of the rear layer. |
 |
| Manually perform stitching |
 |
| Saddle stitching in progress |
 |
| Punch hole on flap to attach post and receiver part. |
 |
| View of project done |
 |
| This is how it looks like end product from this angle |
* * * * Another credit card case holder project but different design on the flap , hidden behind.
 |
| Draw outline to cut to measurement |
 |
| Mark position for hole to corner |
 |
| Cut off to measurement needs |
 |
| Prepare to gule flap to outer layer |
 |
| Punch hole for button |
 |
| Use diamond punch hole for saddle stitch |
 |
| Finish project on credit card case |
 |
| Another view on finish project |
 |
| View on stitch area on rear, one on top while another behind |
👶 End of document


No comments:
Post a Comment