How to Trim leather belt to size ( 革ベルトのサイズを調整する方法 )

 A request from a friend with leather belt, need to trim to size.

                     This friend lady belt purchase from Italy , Quelli della Pelle. Hand Made in BELLAGIO. ITALY. 

Specification :- Length 105 cm thickness 3.2mm , width 20mm. One prong buckle (prong pin is 4 mm diameter), 


革ベルトを使用している友人からのリクエストで、サイズに合わせてトリミングする必要があります。

                      この友人の女性のベルトはイタリアの Quelli della Pelle から購入しました。 BELLAGIO でハンドメイドで作られています。 イタリア。

仕様:- 長さ105cm、厚さ3.2mm、幅20mm。 1 本爪バックル (爪ピンは直径 4 mm)


For this belt trimming case, have propose four options .

** Please view attached document (one page) with drawing and information to decide better.

Option #1 – punch additional hole towards the buckle direction and make one new belt keeper/loop. Retain original buckle and belt keeper/loop. Belt overall length is maintain at 105cm

Option #2 – Trim off part the leather end towards the buckle, then fold that end and stitch to hold the belt keeper/loop. Hence the belt is shorter and need to punch holes additional towards the tips. Belt overall length is shorter approx 93cm

Option #3 - Trim off part the leather end towards the buckle, but buy a new clip on / ratchet buckle that fit the size (20mm width with prong diameter of 4 mm). Belt overall length is shorter approx 98cm

Option #4 - Trim off part the leather end towards the buckle. Get another leather strap of 20mm width to attached to belt end that was trim off. Stitch new leather strap to belt and retain old belt keeper/loop, retain original buckle. Belt overall length is shorter approx 100cm.

Provide these option for end user to decide on how to approach this case.

* note :- have highlight to owner the original belt have two snap on button which is difficult to remove and reuse then. Also at this point in time cannot source locally for similar snap on button type, size, material. Hence have recommend to use thread stitching after trimming belt (applicable for option #3 and #4 only).

 This is my trail and error project.. Any suggestion is most welcome ok?


** より適切に判断するには、図面と情報を含む添付文書 (1 ページ) を参照してください。


オプション #1 – バックルの方向に向かって追加の穴をあけ、新しいベルト キーパー/ループを 1 つ作成します。 元のバックルとベルトキーパー/ループは保管しておいてください。 ベルト全長は105cmを維持


オプション#2 – バックルに向かって革の端の一部を切り取り、その端を折り、ベルトキーパー/ループを保持するようにステッチします。 したがって、ベルトが短くなり、先端に向かって追加の穴を開ける必要があります。 ベルト全長は短めの約93cm


オプション #3 - バックルに向かって革の端の一部を切り取りますが、サイズ (幅 20 mm、プロング直径 4 mm) に合う新しいクリップオン / ラチェット バックルを購入します。 ベルト全長は短めの約98cm

オプション #4 - バックルに向かって革の端の一部を切り取ります。 切り落としたベルトの端に20mm幅の革紐をもう一本取り付けます。 新しいレザーストラップをベルトに縫い付け、古いベルトキーパー/ループと元のバックルを保持します。 ベルト全長は約100cm短くなります。

エンド ユーザーがこのケースにどのようにアプローチするかを決定できるように、これらのオプションを提供します。

* 注: - オリジナルのベルトの所有者には、取り外して再利用するのが難しい 2 つのスナップオンボタンが付いていることを強調します。 また、現時点では、同様のスナップオン ボタンのタイプ、サイズ、素材を現地で調達することはできません。 したがって、ベルトをトリミングした後に糸ステッチを使用することをお勧めします (オプション #3 と #4 にのみ適用されます)。

  これは私の試行錯誤プロジェクトです。何か提案は大歓迎です。

You Tube link

How to cut a Fort Belvidere Belt To Size & Exchange Belt Buckles. 

7 Apr 2020 , (3:49 minutes). By Fort Belvidere

= = = = = = = = = = = = = = = = = = = = = = = = = = = =

https://kangaroobeltcon.com.au/pahrd/how-to-shorten-a-leather-belt.  

How to shorten a leather belt.

= = = = = = = = = = = = = = = = = = = = = = = = = = = =

https://www.buttonandsnap.com/tutorial-best-way-to-shorten-a-belt/.  

Tutorial :The best way to shorten a belt (9 Dec 2014), by XXX

= = = = = = = = = = = = = = = = = = = = = = = = = = = =

Shortening a leather belt from the other end. 

10 Jun 2019, (3:49 minutes)   By PatonHaus.

 = = = = = = = = = = = = = = = = = = = = = = = = = = = =

How to cut leather belt to size. No special tools are required. 

25 Apr 2022, (3:25 minutes).   By Md. Mridul Kabiraz

= = = = = = = = = = = = = = = = = = = = = = = = = = = =

How to Shorten Our Leather Belts.

19 May 2018. (5:11 minutes)  By TomDickand Harry

= = = = = = = = = = = = = = = = = = = = = = = = = = = =

How to Shorten A Non-Stitched Hanks Belt. 

7 Sept 2020 , (12:29 minutes).

By Hanks Belts

= = = = = = = = = = = = = = = = = = = = = = = = = = = =

Allen Edmonds-Belt Shortening. 

9 Sept 2020, (29:19 minutes) . By Cobblers Plus 

= = = = = = = = = = = = = = = = = = = = = = = = = = = =

The Process of Making a Japanese Leathers Belt-Japanese Leather Belt Workshop

19 Mar 2022, (12:23 minutes), By The Process Japan.

= = = = = = = = = = = = = = = = = = = = = = = = = = = =

= = = = = = = = = = = = = = = = = = = = = = = = = = = =
                                     End of document 😎


Repair Cabinet door hinge problem ( キャビネットのドアのヒンジの問題を修理する )

 One of the kitchen cabinet door have issue, when close both door there are wide gap. This indicate one of the door hinge have an issue.

キッチンキャビネットのドアの1つに問題があり、両方のドアを閉めると大きな隙間があります。 これは、ドアのヒンジの 1 つに問題があることを示しています。


** the cabinet on the extreme left with issue on door panel of the left side **

General o
verall view of the kitchen cabinet lay out.

The cabinet of extreme left is with door on left panel is having issue cannot close properly. after troubleshooting, trail and error found the issue.

(  キッチンキャビネットのレイアウトの全体図。

一番左のキャビネットの左パネルにドアがあり、適切に閉まらない問題があります。 トラブルシューティングの後、追跡調査により問題が発見されました )


If you look closer and inspect the top two door panel edge have gap compare to the bottom edge.


( よく見て、上部 2 つのドア パネルの端が下端と比べて隙間があります。)


Fist time encounter so loosen all two hinge screws from door to inspect , do troubleshooting and verify. In this case the top hinge was faulty in the sense the metal plate "U" cut was out of position (see photo below)

(  初めての遭遇なので、ドアの 2 本のヒンジネジをすべて緩めて検査し、トラブルシューティングを行って確認します。 この場合、金属プレートの「U」字型のカットが位置からずれていたという意味で、上部のヒンジに欠陥がありました(下の写真を参照)。 )

A good hinge which is good, view of the under side of hinge

(  良いヒンジです。ヒンジの下側から見た図です。  )

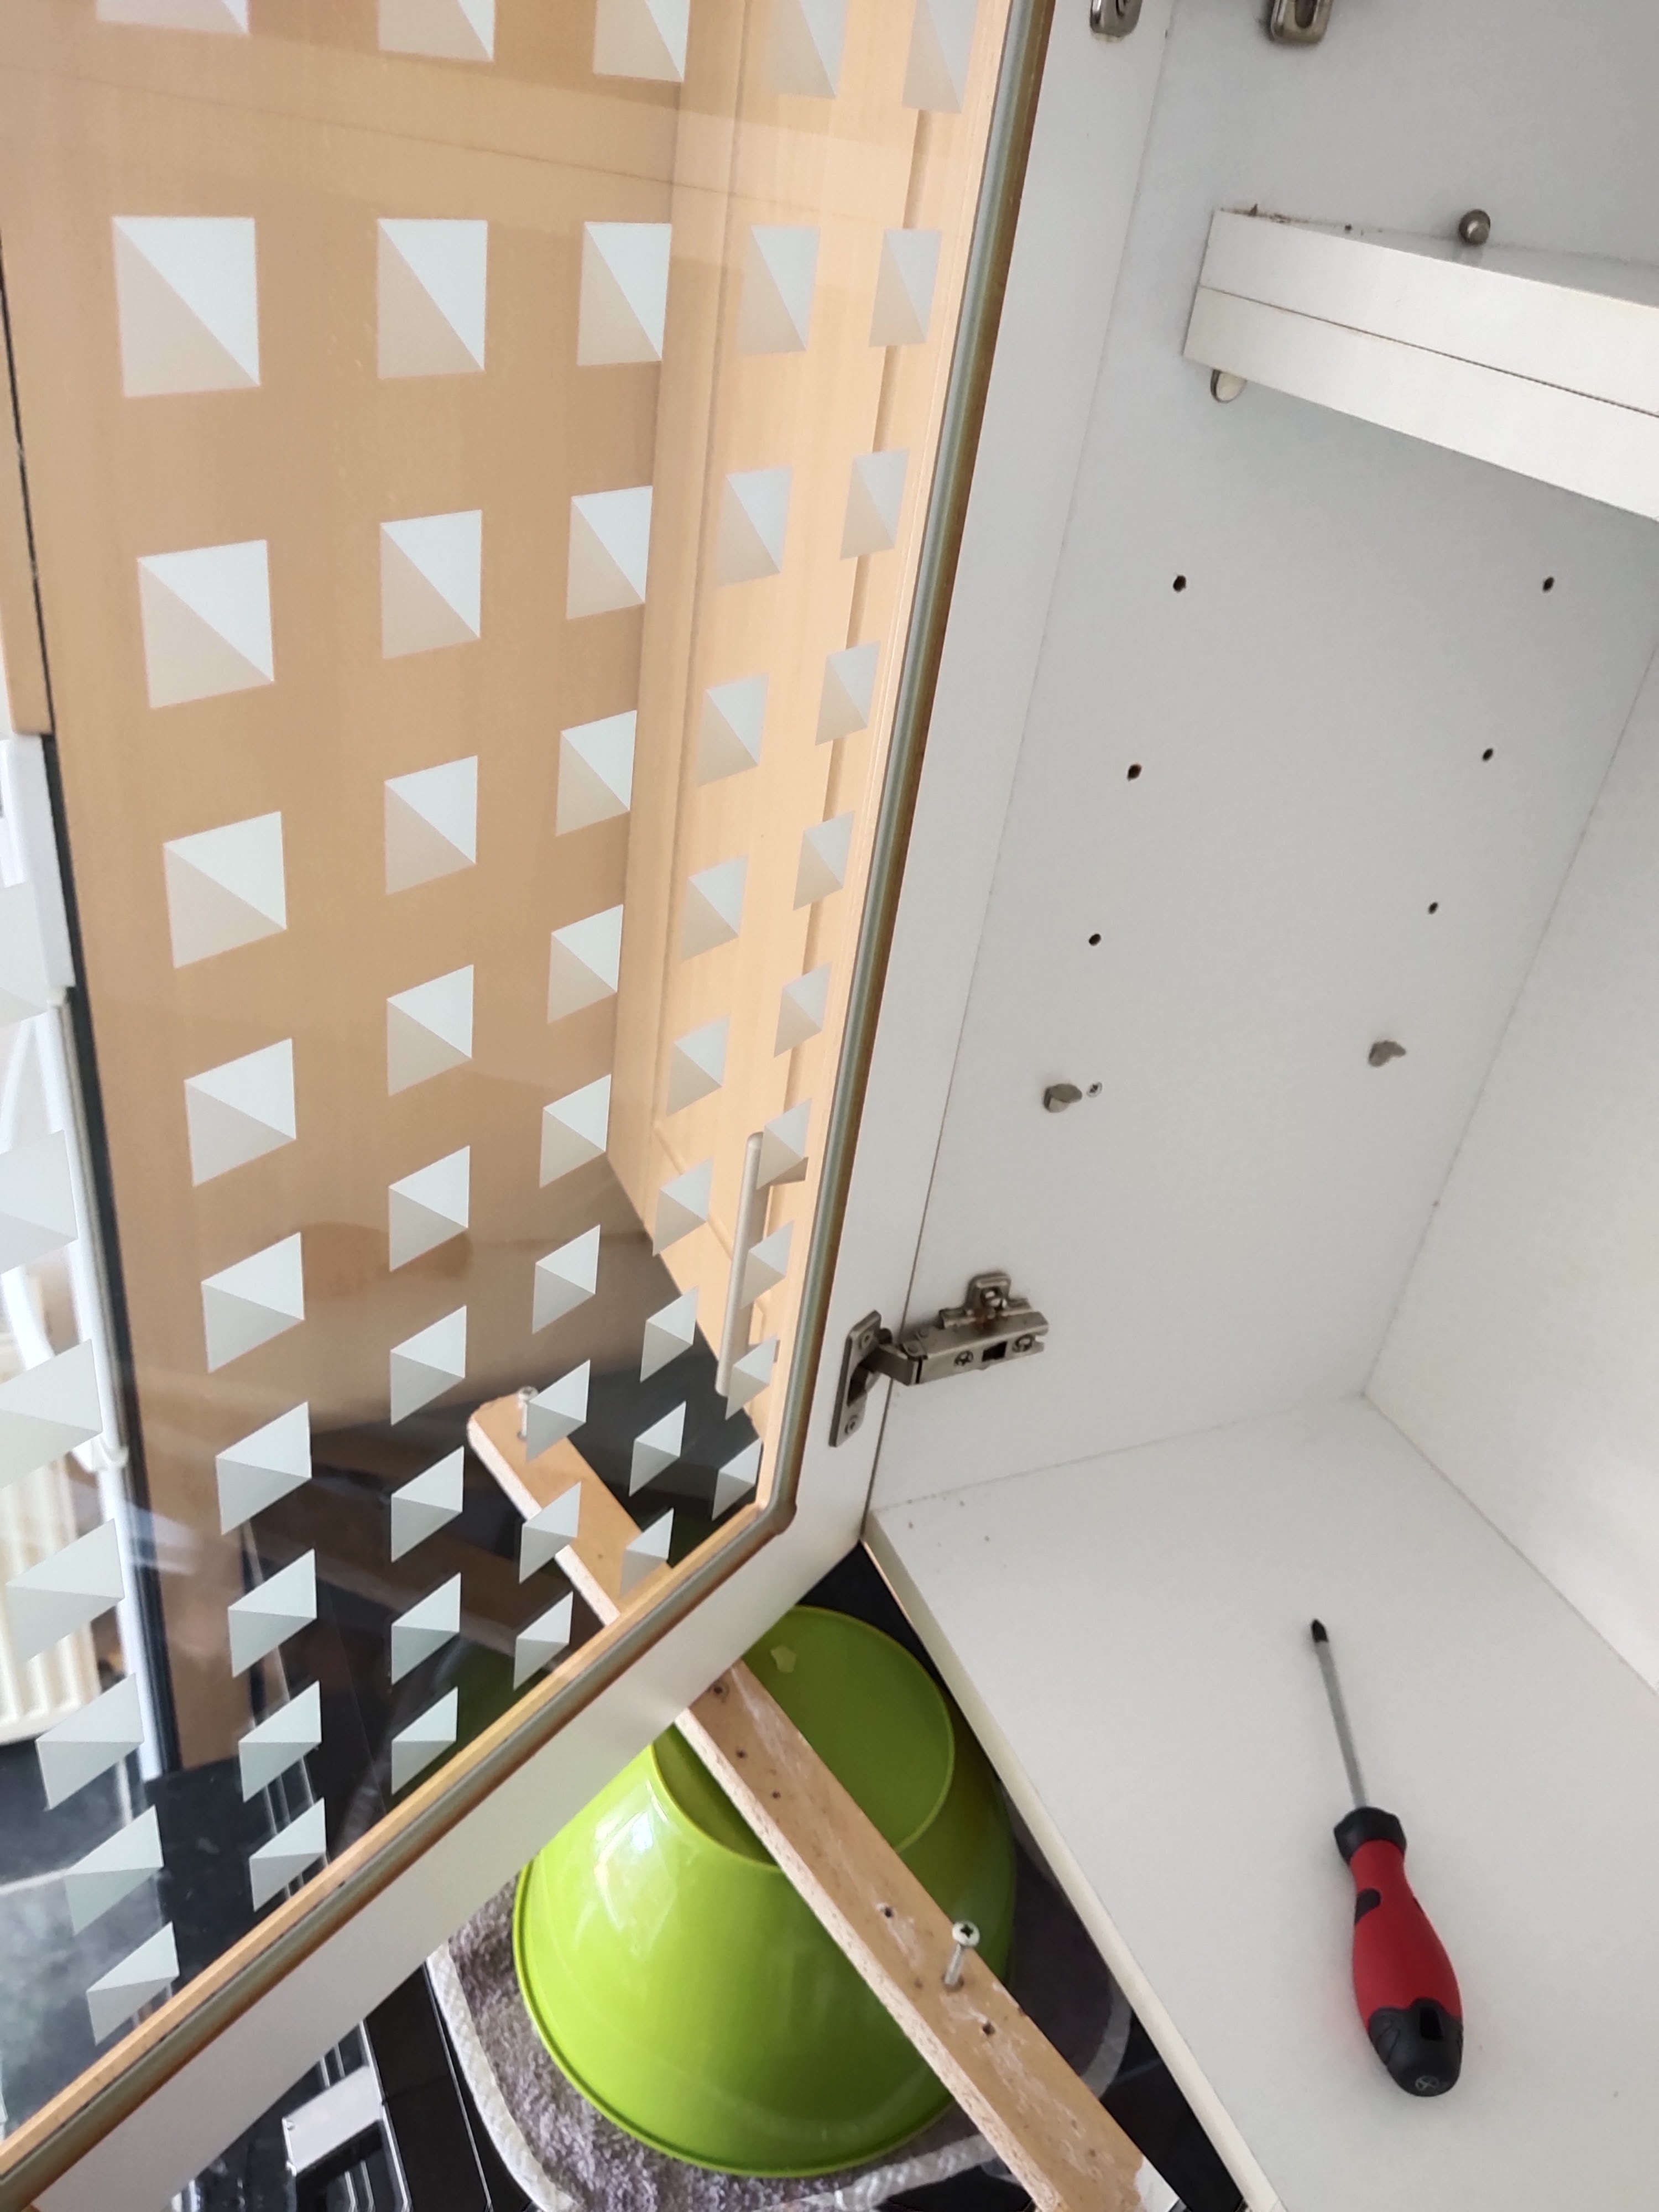
See how to support door panel when try remove all screw on hinge.
** Note it is very important to take safety into consideration for any repair task.

(  ヒンジのネジをすべて外してみて、ドアパネルをサポートする方法を確認してください。
** 修理作業では安全を考慮することが非常に重要であることに注意してください。)


This is bad hinge incorrect way to set up, see the U shape cutting edge is on top or over the round metal.

(  これはヒンジの間違ったセットアップ方法です。U 字型の刃先が丸い金属の上または上にあることを確認してください。)
Verify issue is resolved or not 

(  問題が解決したかどうかを確認する )

Encounter another issue was the lower hinge screw was worn off. Try to repair on trail and error, but cannot recall method, to carry research to learn better way to fix issue.

(  もう一つの問題は、ヒンジの下側のネジが磨耗していることでした。 試行錯誤で修復を試みますが、方法を思い出せないため、問題を解決するより良い方法を学ぶために研究を続けます。)

* Note for some reason the original screw is big self tapping screw, review and use other type of suitable self tapping screw.

( * 何らかの理由で元のネジが大きなタッピングネジであることに注意してください。適切な他のタイプのタッピングネジを見直して使用してください。)


Please view You Tube from "Karlpopewoodcraft" channel he have very good way to resolved this issue with screw hole worn off .

(  「Karlpopewoodcraft」チャンネルから You Tube をご覧ください。彼はネジ穴が摩耗したこの問題を解決する非常に良い方法を紹介しています。)

His method is to drill a dove pin into the cabinet and seal it with wood glue. Once harden to cut off excess length and drill a small pilot hole to guide the screw head thread.

( 彼の方法は、キャビネットに鳩ピンをドリルで打ち込み、木工用接着剤で密閉することです。 硬化したら余分な長さを切り取り、ネジ頭のネジ山をガイドするために小さな下穴を開けます。)


Update on 6th Nov 2023, saw another video on You Tube on to fix the European hinge see below url link

How to fix bad Euro-style hinges [video 410]   by  Peter Millard

2023 年 11 月 6 日の更新、ヨーロッパのヒンジを修正するための別のビデオが YouTube にありました。以下の URL リンクを参照してください。

悪いユーロスタイルのヒンジを直す方法 [ビデオ 410] by Peter Millard


== == == == == == == == == == == == == == == ==

                                https://www.youtube.com/watch?v=7MuyTOlRR5o

Don't Let Loose Hinges Ruin Your Kitchen - Here's How to Fix Them

karlpopewoodcraft                        2,120 views  29 May 2023  

#kitchencabinets #diy #hinges

How to fix kitchen cabinet hinges, these are sometimes referred to as concealed hinges or European hinges. I also demonstrate how to align the doors and make the gaps around the doors even. This is definitely achievable by a diy enthusiasts enthusiasts.

=============== Update on 6 Nov 2023 another video =================

https://www.youtube.com/watch?v=Oh_xjMIRN7k

How to fix bad Euro-style hinges [video 410]

Peter Millard          211,207 views  17 Jul 2020    (minutes)

#euro #hinges #repair n this shorter video video I show how to #repair concealed (#euro-style) #hinges for DIY cabinet and wardrobe doors. Enjoy!

+++++++  My ‘social’ links in one place - http://bit.ly/10minute-links

== == == == ========================

* Note: I am trying use "Google Translate" application from English to Japanese, sorry if this translation is not suitable please do let me know and thank you.


* 注: 英語から日本語への「Google 翻訳」アプリケーションを使用しようとしています。この翻訳が適切でない場合は、申し訳ありませんが、お知らせください。ありがとうございます。

                                       👼 End of document 👴

Repair Lamp touch dimmer

 This repair is electrical device, hence be careful and take all necessary safety step.

Issue with this table lamp touch device does  not response to user touch, cannot turn on. check plug fuse, lamp bulb status is o\k.


Identify product model and specification.


Screen shot for the connection to compare with own wiring connection base on actual as per the wiring connection see below


Draw layout wiring diagram to remember on the wire color code and connection to where.


=======================

The brown wire is connected to chassis thru a component connected in series.

Bundle of wires termination
Four wires connection to ,module, 
1) Red wire from PCB to hot wire brown wire
2) Brown wire from PCB to chassis (ring lug) thru a few capacitor in series
3) Black wire from PCB to plug NEUTRAL
4) Blue wire from PCB to bulb connection (pass thru the TRIAC


View You Tube for assistance and check this out.

https://www.youtube.com/watch?v=UjeSBIepBGY&t=313s
Touch light reverse engineer and repair (Part 1)

Rice.Engineer                          19,524 views  15 Dec 2016
I reverse engineer a broken MT-1001 touch light controller to figure out how it works. I also debug the circuit and find a shorted component.

MT-1001 Schematic:
https://patrickrice.me/wp-content/upl...

============================================================
https://www.youtube.com/watch?v=YvGeKfQE9jE
Touch light reverse engineer and repair (Part 2)

Rice.Engineer                     4,732 views  22 Dec 2016
I complete the repair of the MT1001 touch light controller in the video.
PCB holder Link:
http://www.thingiverse.com/thing:378926

https://patrickrice.me/wp-content/upl.

========================

Found out it cheaper to buy the whole touch dimmer module than to do component repair as cost difference in gap for price is very low

Just received a replacement module ( four wire to PCB)

1) Red

2) White

3) Black

4) Yellow wire with ring lug

Tested ok and return to owner.


* Note: I am trying use "Google Translate" application from English to Japanese, sorry if this translation is not suitable please do let me know and thank you.


* 注: 英語から日本語への「Google 翻訳」アプリケーションを使用しようとしています。この翻訳が適切でない場合は、申し訳ありませんが、お知らせください。ありがとうございます。

                                                😄     End of document   👦


Trip to Car Boot Sales in HULL at Walton Street - - ウォルトンストリートのハルでのカーブートセールへの旅行

 This car boot sale (Walton Street, Walton St. Hull HU3, UK) is very popular event in all part of UK, they are held during weekend only (not sure does it open  during public holiday).

Anyway there is a lot of stall set up and start to arrive at site as early as 6:30am LOCAL TIME, MORE stall open up as it progresses. Typically it end around noon, it also depend on each stall owner to decide their closing time

Use Google translation to help communicate in another language. Please excuse me if it is incorrect translation, thank you.

このカーブートセール (イギリス、ウォルトン ストリート、ウォルトン セント ハル HU3) はイギリス全土で非常に人気のあるイベントで、週末のみ開催されます (祝日に開催されるかどうかはわかりません)。

とにかくたくさんの屋台が準備されており、現地時間の午前6時30分には早くも会場に到着し始め、進行するにつれてさらに多くの屋台がオープンします。 通常は正午頃に終了しますが、閉店時間は各屋台の所有者によって決まります。


This kind gentlemen allow me to take photo on his ware for sale 

All kind of lathe accessories tools of numerous type, shape kind.


この親切な紳士たちは、販売する彼の商品の写真を撮らせてくれました。

あらゆる種類の旋盤アクセサリ ツール、さまざまな種類、形状の種類。


This is one example of item sold by stall, multiple plug head, open end spanner, allen key and etc for one pound.

これは、露店、マルチプラグヘッド、オープンエンドスパナ、六角レンチなどで 1 ポンドで販売されているアイテムの一例です。
 
 A partials view on car boot sale
車のブートセールの一部のビュー


Not fully open for some stall

一部の屋台は完全に開いていません


Still early not many stall are ready


まだ早いですが、準備が整った屋台があまり多くありません

Some other tool purchase for project, and purchase for toolkit for family member

プロジェクト用にその他のツールを購入、家族用のツールキットとして購入


some tools for bicycle repair


leather goods


Wood material odd size and type

Odd and end material


Video , overall view of site car boot sales

ビデオ、カーブーツ販売サイトの全体図


Overall view of car boot sales

カーブーツ販売全体図


WORK IN PROGRESS.. and stay tune

* Note: I am trying use "Google Translate" application from English to Japanese, sorry if this translation is not suitable please do let me know and thank you.


* 注: 英語から日本語への「Google 翻訳」アプリケーションを使用しようとしています。この翻訳が適切でない場合は、申し訳ありませんが、お知らせください。ありがとうございます。

                  End of Document 👲

Scissor Sheath Design - -シザーシースの設計

 Scissor Sheath Design - はさみ鞘のデザイン

  There are so many scissor type, kind and design, different style-shape-functionality to suit world wide customer for some is very specific application.

WHY there is so many design, it most likely each and every individual are unique, could be for specific industries to meet very wide client demand and in term of application id general or specific in special environment 


非常に多くのハサミの種類、種類、デザイン、さまざまなスタイル、形状、機能があり、世界中の顧客、一部の非常に特殊な用途に適しています。

なぜこれほど多くのデザインが存在するのか、それはおそらくそれぞれがユニークであり、特定の業界が非常に広範なクライアントの需要を満たすためであり、特殊な環境における一般的または特定のアプリケーション ID の観点からである可能性があります。


If we goes into specific design there are several factors also create a different demand for a specifics shape, size, cutting edge for certain special application. The list goes on and on. 具体的なデザインに目を向けると、特定の用途に合わせて、特定の形状、サイズ、刃先に対するさまざまな需要を生み出す要因がいくつかあります。リストは延々と続きます。

My view and opinion there is a very very wide range of scissor sheath you could imagine, or another way one type of scissor you create several design to be user friendlier. 私の見解と意見では、想像できるハサミの鞘は非常に多岐にわたります。あるいは、1 種類のハサミで、ユーザーフレンドリーになるように複数のデザインを作成することもできます。


Close up view


Close up view

If you have other inform to share with us we really appreciate it..Merry Christmas. 他にも情報がありましたら、ぜひ教えてください。メリークリスマス

It is very challenging to be an expert on SCISSOR if the topic on scissor are shared among us we can also learn from one and anther. Thank you for supporting us this effort.. Take care and HAPPY NEW YEAR 2023. シザーの専門家になるのは非常に難しいことですが、シザーに関する話題を私たち同士で共有すれば、お互いに学ぶこともできます。この取り組みをサポートしていただき、ありがとうございます。お元気で、2023年明けましておめでとうございます


                                                                 End of document


Repair project - torn sport pant - 修理プロジェクト - 破れたスポーツパンツ

             This is a "special "request from a friend to repair the sport pants with several places with torn /wear out seam (about 10cm) and broken thread holding elastic band and loosen thread at selected section near the bottom of sport pant..

This repair is a very basic sewing skill, no complex action required and the material required is everyday items. Of course if you are novice is best to practice and listen ,watch an expert at work or get a professional ,seek timely advice from experience sewing guy/lady.

The challenge is finding the correct material, colour matching, strength of material, right type of thread, colour, thickness and other relevant specification to function what it is intended.

Have view a few You Tube video to understand the skill required to perform this task, it looks simple but still need to take several considerations. See attached tutorial from You Tube related to this project.


これは友人からの「特別な」依頼で、縫い目が数か所破れたり摩耗したり(約10cm)、ゴムバンドを保持する糸が切れたり、スポーツパンツの裾近くの選択された部分の糸が緩んだりしているスポーツパンツを修理してほしいというものです。

この修理は非常に基本的な縫製スキルであり、複雑な操作は必要なく、必要な材料は日用品です。 もちろん、初心者の場合は、練習して聞いたり、専門家の仕事を観察したり、専門家に相談したり、経験豊富な縫製者/女性からタイムリーなアドバイスを求めるのが最善です。

課題は、意図したとおりに機能するための正しい素材、色のマッチング、素材の強度、正しい糸の種類、色、太さ、その他の関連仕様を見つけることです。

このタスクを実行するために必要なスキルを理解するには、いくつかの YouTube ビデオをご覧ください。簡単そうに見えますが、いくつかの考慮事項が必要です。 このプロジェクトに関連する YouTube の添付チュートリアルを参照してください。


Expose underneath seam for holding elastic band in place.
Noted the thread give way and hence it resulted on this section. Very simple solution is use pin or clip to hold in position and sew over.

ゴムバンドを所定の位置に保持するために縫い目の下を露出させます。
スレッドが道を譲ったため、このセクションに結果が生じたことに注目しました。 非常に簡単な解決策は、ピンまたはクリップを使用して所定の位置に保持し、縫い付けることです。


Torn section of approximately 10cm,close to seam joint, there are few way to fix this problem. As each method have it pro and con. .After watching several video notice there several way to tackle this issue.

縫い目付近に約10cmの破れがあり、修復方法はほとんどありません。 それぞれの方法には長所と短所があります。 いくつかのビデオを見た後、この問題に対処する方法がいくつかあることに気づきました。
Tools and material to repair. use a black cotton material, cut to appropriate size to cove the torn area.

修理するための工具と材料。 黒い綿素材を使用し、破れた部分をカバーする適切なサイズにカットします。
Check on tear start to end and ensure to cut patch material with sufficient allowance.
Use mark pen to mark carefully to ensure proper coverage of material on defective area.


破れの始まりと終わりを確認し、十分な余裕を持ってパッチ素材をカットしてください。
マークペンを使用して慎重に印を付け、欠陥領域に材料が適切に塗布されるようにします。
 

Use clip to hold part in place in preparation for sewing.

縫製の準備としてクリップを使用してパーツを所定の位置に保持します
This case the bottom section with several place with sign of broken thread and stress mark is very obvious. There are several way to handle this case, it base on individual skill set and knowledge will help you better decide the appropriate solution base on each case. 

この場合、底部には糸が切れた跡とストレスマークが数か所あり、非常に明白です。 このケースを処理するにはいくつかの方法があり、個々のスキルセットと知識に基づいて、各ケースに基づいて適切な解決策をより適切に決定するのに役立ちます。


This how I try a simple and not so elaborate as per You Tube tutorial.

これは、Youtube チュートリアルに従って、シンプルでそれほど複雑ではない方法を試してみたものです。


For bottom area just use a fabric to fold over and stitch, with double stitches


下の部分は生地を折り重ねてダブルステッチで縫います。


https://www.youtube.com/watch?v=zkyl9REo_wc

ジーンズ専門の直し屋が教える膝の穴塞ぎの基本

I want to repair a hole in my jeans!

64,642 views  23 Jan 2022 (18:01 minutes)

ジーンズの膝に開いた穴は簡単に塞げます。 熟練の技術は要さないので、是非試してみてください。

※糸の色選びはチョット熟練度が必要ですが…。  重要なのは、当て布である接着芯の選び方と当て方

きちんと用途に合った接着芯を使用して、きちんと当ててあげれば歪みは少なく直せます。

是非トライしてみてください!!

動画内で使用している接着芯は実際にお客さんからお預かりしたデニムを直す際に使用しているモノです。こちらは50㎝から販売していますので、興味のある方は下記リンク先ページからご購入下さい。

接着芯は種類が多く、中々目的に合ったモノを探し出すことは難しいと思います。

是非お試しくださいな~

https://goegoe.ocnk.net/product-list/39

ジーンズリペアの見積依頼等はウェブページをご覧になってくださいね。

https://jeansrepair.ocnk.net/

Jeans Repair GOEMON

 = = = = = = = = = = = = = = = = = = = = = = = = = = = = = = = = = = = = = = = = = = = = = = = = = = =

Amazing Japanese Repairmen #11 'Jeans' English subtitles

 149,458 views                      20 Sept 2017        (10:37 minutes)     By Shuuri Misemasu Fansub

 Wiiの間:修理、魅せます。 #011「ジーンズ」

Wii Room: The Fascinating Repairmen. #011 "Jeans"

Repairman: 石井 直人 Ishii Naoto

http://webstore.berberjin.com/

How to use overcast presser feet to make overcasting stitches

 = = = = = = = = = = = = = = = = = = = = = = = = = = = = = = = = = = = = = = = = = = = = = = = = = = = = = = =

 https://www.youtube.com/watch?v=OS7FB5-6AhI

When, Why and How to Clip, Trim, Notch and Grade Seam Allowances when sewing

18,663 views  25 Aug 2019   (9:23 minutes) Read on Tues 15 Nov 2022  By Londa Rohlfing

Londa clearly explains everything about clipping, trimming, notching and grading of seam allowances while sewing so that you truly understand the 'engineering' of these sewing tasks important to achieve professional results.  

Links to Sewing Notions as shown in video: 

Kai 5135 Scissors:   https://www.londas-sewing.com/product...

Point Turner SeamCreaser from Collins ; https://www.londas-sewing.com/product...

Ball Point Bodkin https://www.londas-sewing.com/product..

= = = = = = = = = = = = = = = = = = = = = = = = = = = = = = = = = = = = = = = = = = = = = = = = = = = = = = =

* Note: I am trying use "Google Translate" application from English to Japanese, sorry if this translation is not suitable please do let me know and thank you.

* 注: 英語から日本語への「Google 翻訳」アプリケーションを使用しようとしています。この翻訳が適切でない場合は、申し訳ありませんが、お知らせください。ありがとうございます。


                                      End of document

= = = = = = = = = = = = = = = = = = = = = = = = = = = = = = = = = = = = = = = = = = = = = = 

* Note: I am trying use "Google Translate" application from English to Japanese, sorry if this translation is not suitable please do let me know and thank you.


* 注: 英語から日本語への「Google 翻訳」アプリケーションを使用しようとしています。この翻訳が適切でない場合は、申し訳ありませんが、お知らせください。ありがとうございます。

Repair - Restore old leather belt - -修理 - 古い革ベルトを修復する

 Restore leather leather.

Saw a few video from You Tube channel on how to restore worn off belt. 

Some of the materials suggested or recommended is not easily available locally. Hence looks for some other alternative material.

Decide to try out restore a family member leather belt with sign of worn off marking, like crack line, scratch marks, discoloration patches , rough surface, feel dry to touch.


革の革を復元します。

You Tube チャンネルから、摩耗したベルトを元に戻す方法に関するビデオをいくつか見ました。

提案または推奨される材料の中には、地元では簡単に入手できないものもあります。 したがって、他の代替素材を探します。

ひび割れ線、引っかき傷、変色斑点、ざらざらした表面、触ると乾燥した感触など、摩耗した痕跡がある家族の革ベルトを修復してみることにしました。


Compare the end result of this restoration effort.

この修復作業の最終結果を比較してください。


Some of the worn out area marks on belt. This belt have an early sign of getting worn off. Hence after learning some of technique to restore old belt.


ベルトに磨耗した跡がいくつかあります。 このベルトには摩耗の兆候が見られます。 したがって、古いベルトを修復する技術をいくつか学んだ後。


Some of chemical item was used for this project. From the left is PowerMax leather restorer, Tokonole , Old expire olive oil.


このプロジェクトでは一部の化学品が使用されました。 左からパワーマックス革修復剤、トコノール、古い期限切れオリーブオイルです。

Spray olive oil on both side (front, rear and buckle head of belt)
Let is soak a much of olive oil and let is rest over night.


オリーブオイルを両面(ベルトの前後とバックルの頭)にスプレーします。
オリーブオイルをたっぷり含ませて一晩寝かせます。


Apply a layer of paint on edge and let it dry and apply several layer to meet required result.


エッジにペイントの層を塗布し、乾燥させてから、必要な結果に合わせて複数の層を塗布します。

Close up view of work to apply paint at edge, in this case using an awl tool.

エッジにペイントを適用する作業の拡大図。この場合は千枚通しツールを使用します。


Compare the edge with (right side) and without paint (left side)

塗装あり(右側)と塗装なし(左側)のエッジを比較してください。

After the paint is dried, apply tokonole to edge and burnishing.

塗料が乾燥した後、コバ部分にトコノールを塗布し、バニシングを施します。
Clean leather surface with Power Max leather restorer.

Power Max 革修復剤を使用して革の表面をきれいにします。

Burnish the edge for buckle head end.


バックルヘッドエンドのエッジを研磨します
End result of restoration done.

復元の最終結果が完了しました。

* Note: I am trying use "Google Translate" application from English to Japanese, sorry if this translation is not suitable please do let me know and thank you.


* 注: 英語から日本語への「Google 翻訳」アプリケーションを使用しようとしています。この翻訳が適切でない場合は、申し訳ありませんが、お知らせください。ありがとうございます。

                                End of document 😎


Repair rice cooker

 Was given a small rice cooker HANABISHI model HA1330, with problem cannot turn. Found this unit is due to power cord is defective (discover...