Repair - Restore old leather belt - -修理 - 古い革ベルトを修復する

 Restore leather leather.

Saw a few video from You Tube channel on how to restore worn off belt. 

Some of the materials suggested or recommended is not easily available locally. Hence looks for some other alternative material.

Decide to try out restore a family member leather belt with sign of worn off marking, like crack line, scratch marks, discoloration patches , rough surface, feel dry to touch.


革の革を復元します。

You Tube チャンネルから、摩耗したベルトを元に戻す方法に関するビデオをいくつか見ました。

提案または推奨される材料の中には、地元では簡単に入手できないものもあります。 したがって、他の代替素材を探します。

ひび割れ線、引っかき傷、変色斑点、ざらざらした表面、触ると乾燥した感触など、摩耗した痕跡がある家族の革ベルトを修復してみることにしました。


Compare the end result of this restoration effort.

この修復作業の最終結果を比較してください。


Some of the worn out area marks on belt. This belt have an early sign of getting worn off. Hence after learning some of technique to restore old belt.


ベルトに磨耗した跡がいくつかあります。 このベルトには摩耗の兆候が見られます。 したがって、古いベルトを修復する技術をいくつか学んだ後。


Some of chemical item was used for this project. From the left is PowerMax leather restorer, Tokonole , Old expire olive oil.


このプロジェクトでは一部の化学品が使用されました。 左からパワーマックス革修復剤、トコノール、古い期限切れオリーブオイルです。

Spray olive oil on both side (front, rear and buckle head of belt)
Let is soak a much of olive oil and let is rest over night.


オリーブオイルを両面(ベルトの前後とバックルの頭)にスプレーします。
オリーブオイルをたっぷり含ませて一晩寝かせます。


Apply a layer of paint on edge and let it dry and apply several layer to meet required result.


エッジにペイントの層を塗布し、乾燥させてから、必要な結果に合わせて複数の層を塗布します。

Close up view of work to apply paint at edge, in this case using an awl tool.

エッジにペイントを適用する作業の拡大図。この場合は千枚通しツールを使用します。


Compare the edge with (right side) and without paint (left side)

塗装あり(右側)と塗装なし(左側)のエッジを比較してください。

After the paint is dried, apply tokonole to edge and burnishing.

塗料が乾燥した後、コバ部分にトコノールを塗布し、バニシングを施します。
Clean leather surface with Power Max leather restorer.

Power Max 革修復剤を使用して革の表面をきれいにします。

Burnish the edge for buckle head end.


バックルヘッドエンドのエッジを研磨します
End result of restoration done.

復元の最終結果が完了しました。

* Note: I am trying use "Google Translate" application from English to Japanese, sorry if this translation is not suitable please do let me know and thank you.


* 注: 英語から日本語への「Google 翻訳」アプリケーションを使用しようとしています。この翻訳が適切でない場合は、申し訳ありませんが、お知らせください。ありがとうございます。

                                End of document 😎


Repair Cabinet door Handle

 Today encounter one of the box cabinet door with it old leather strap handle broken. Good timing I have some old scrap or cut off leather and cloth to spare.


This old leather (veg tan) strap is broken thru wear and tear and aging factor.

The original old handle is wooden material, broken due to the inserted screw was loosen and worn off screw. Or the wooden handle crack up and other failure along the way. Hence decide to try out simple leather strap handle with cloth cover over leather strap.


Rear view of the cabinet door. This show how the rear end is terminated. Fold the end and stitch it.


Compare new replacement part length to old part.


Sew seam for cloth cover handle. Sew one edge end with about 5 mm seam allowance for both end.


Sew the other end with 5 mm seam allowance

Setting on sewing machine, tension = 4, stitch length 3 to 4. 


Then sew the side edge, than fold out the wrong side out. Double sew edge and trim any excess cloth material.


Next step to fold over the wrong side toward inside.


Use this simple tool to reverse the wrong side in.

Better use wooden or plastic tool and no sharp end.


Slip the new cloth cover over the leather strap.

Next step to insert both end to each cabinet door hole.


This is how ,both end are terminated. Use a cut off from round punch from leather project.


This complete the project on cabinet door handle repair.

Hope this new handle is more durable..


End of document 😎

Glass container protector (new materials) for improvement - ガラス容器プロテクター(新素材)改良品

   Please refer to previous post - title "Glass container protector" dated 25th Aug 2022.

This original project does not have any exterior material on the paper base cardboard, it is expose. The other changes was the material used to hold in place the elastic band across is 1) attached is either as straight elastic band or 2) mixture of part leather strap / cloth strap and elastic band.

Pro and Con on strap across the top edge is as per observation.

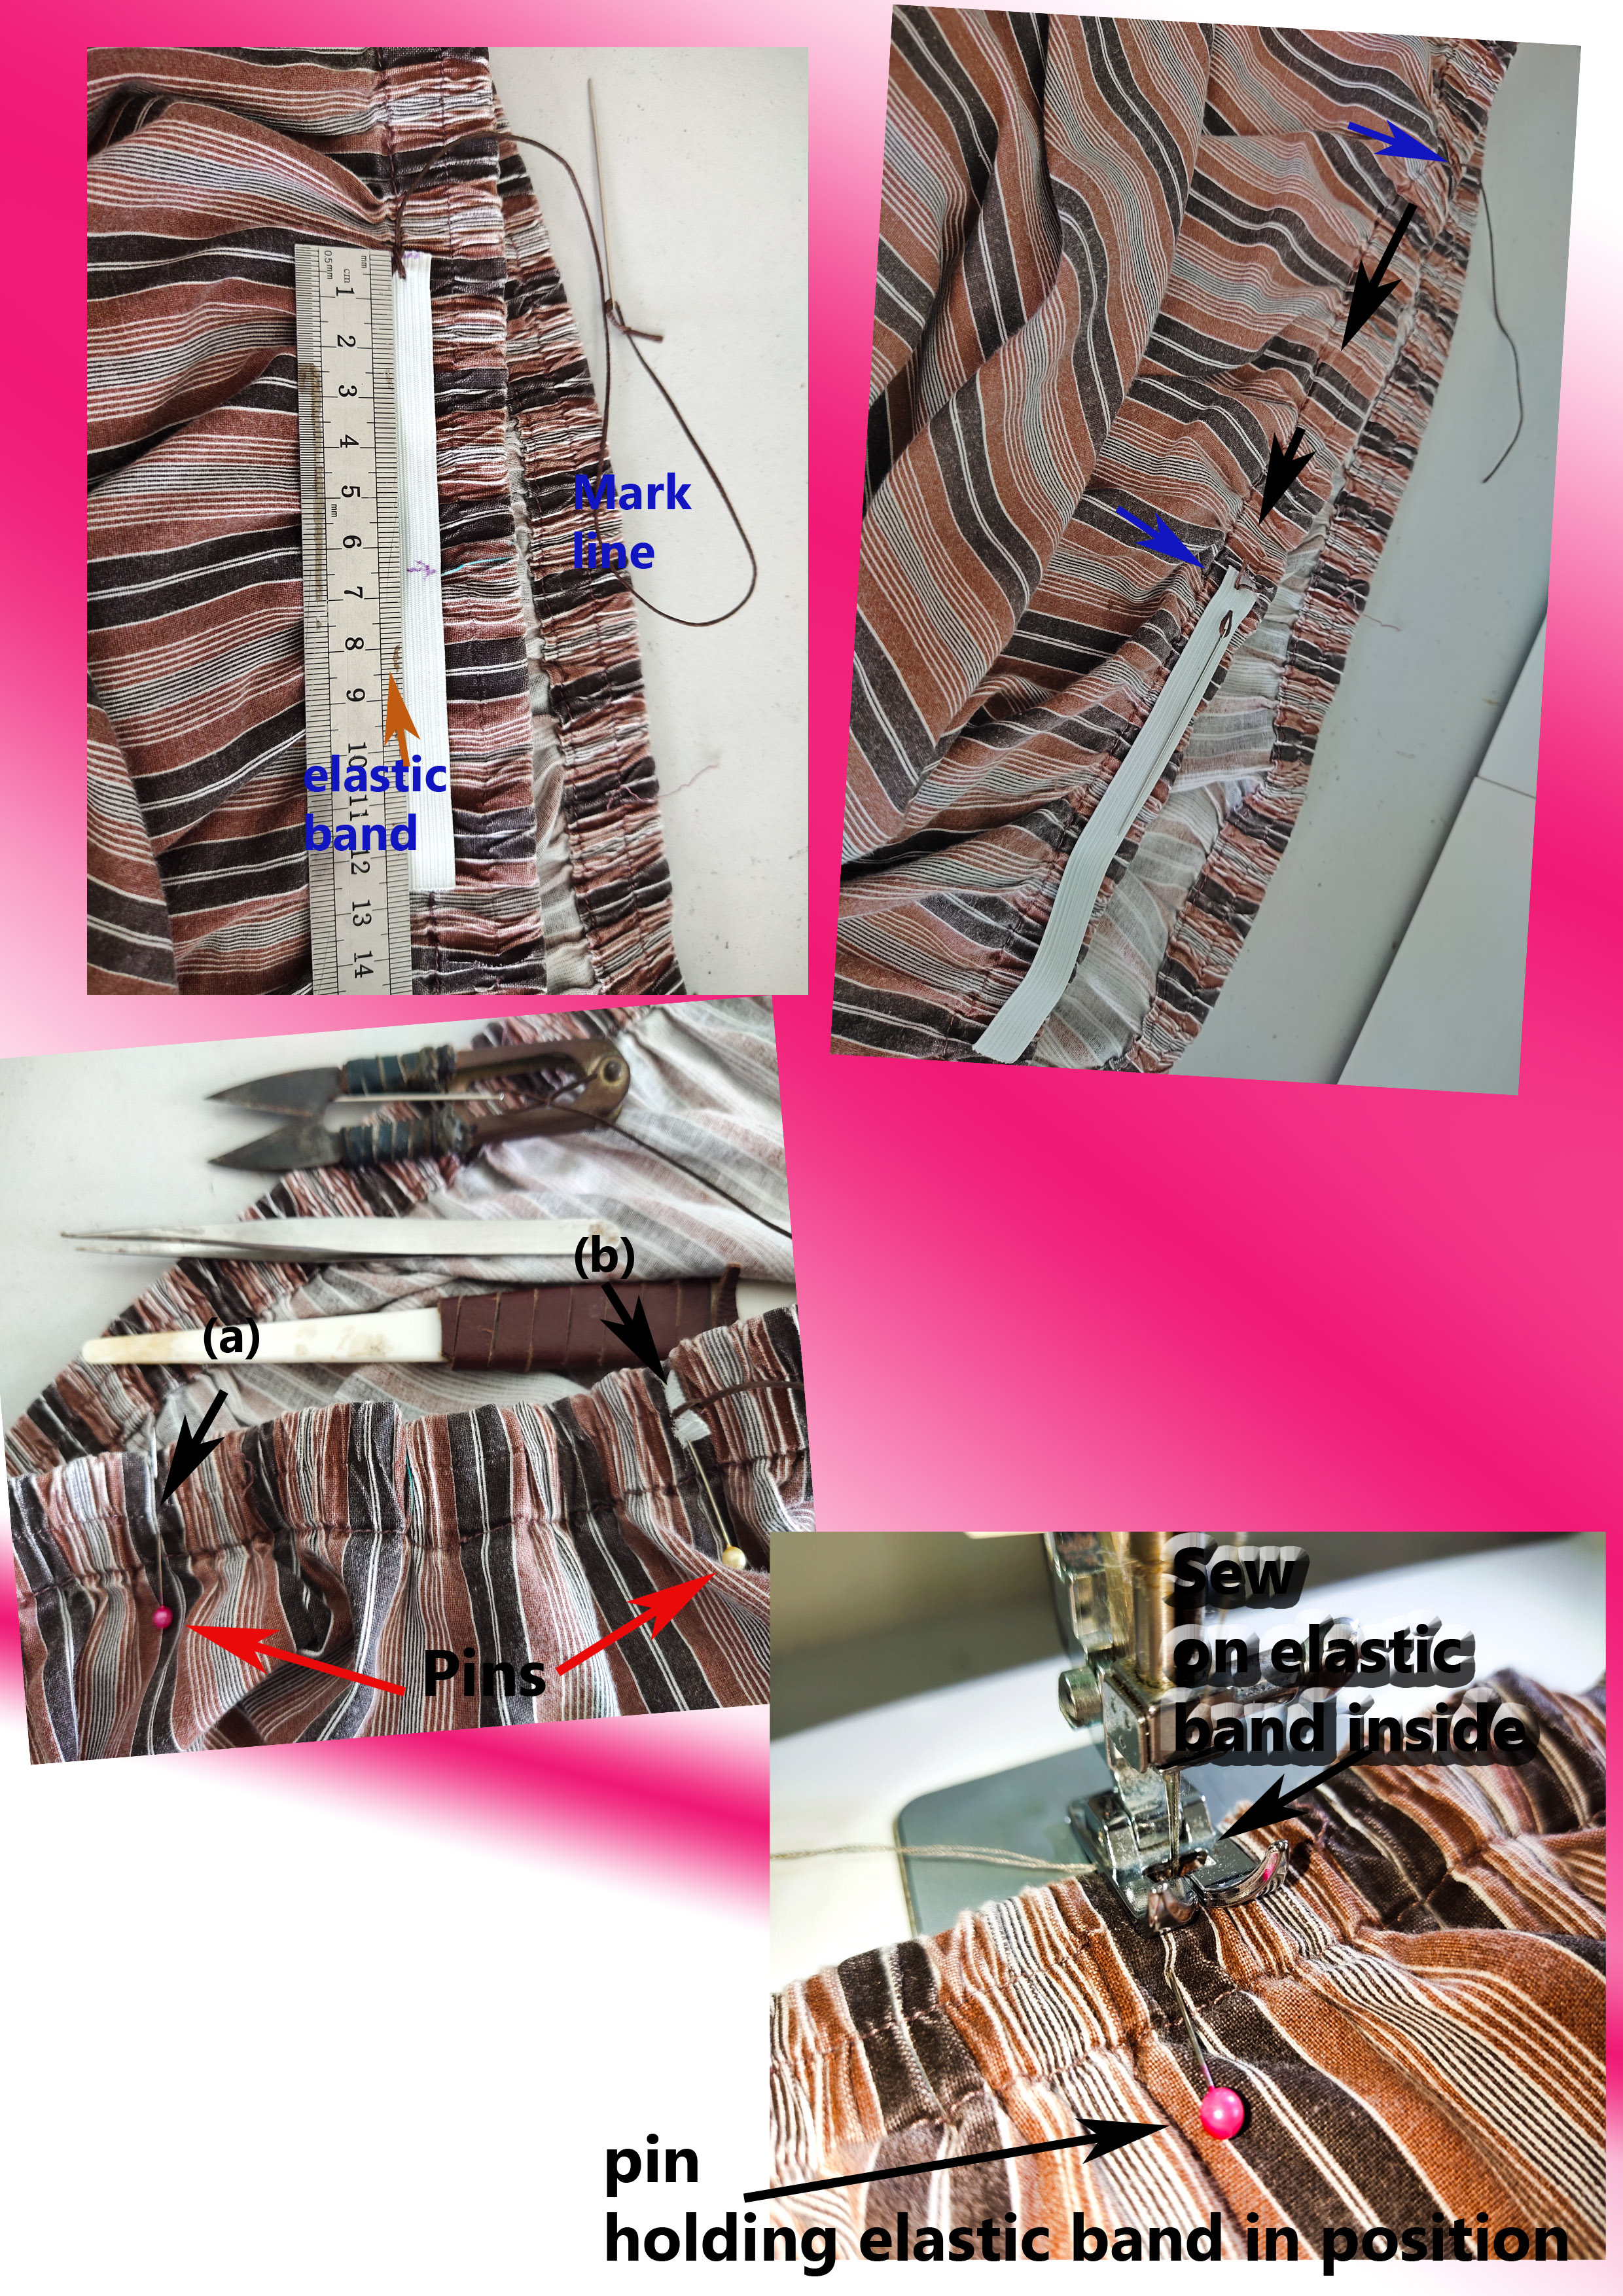
1) With a full strip of elastic band, have some disadvantage, the long band might be too long piece, it might weaken thru wear and tear. It rather weak in term of stress due to handling the elastic band to place into tote bag and during retrieve it process. 

(Possible idea and thinking forward to add handle strap in future for glass container protector, to assist with better handling purpose. If this added to make it user friendlier and better control to achieve it objective)

2) Another approach is mixture of leather strap or cloth strap material with shorter elastic band sew into it. This have some advantage is the elastic band is shorter and better stress of leather strap or cloth strap to terminate at the top edge of project.

There are some challenge to attach cloth material, one being if use glue, if spill it will have permanent marking of harden glue traces on cloth surface.

Hence have to be extra careful when glue is apply to hold the project in place, cloth tender to pluckier and it move around and does not stay flat, have different properties which need a skill set to overcome

Small glass container protector design with cloth material panel cover the bare cardboard base.

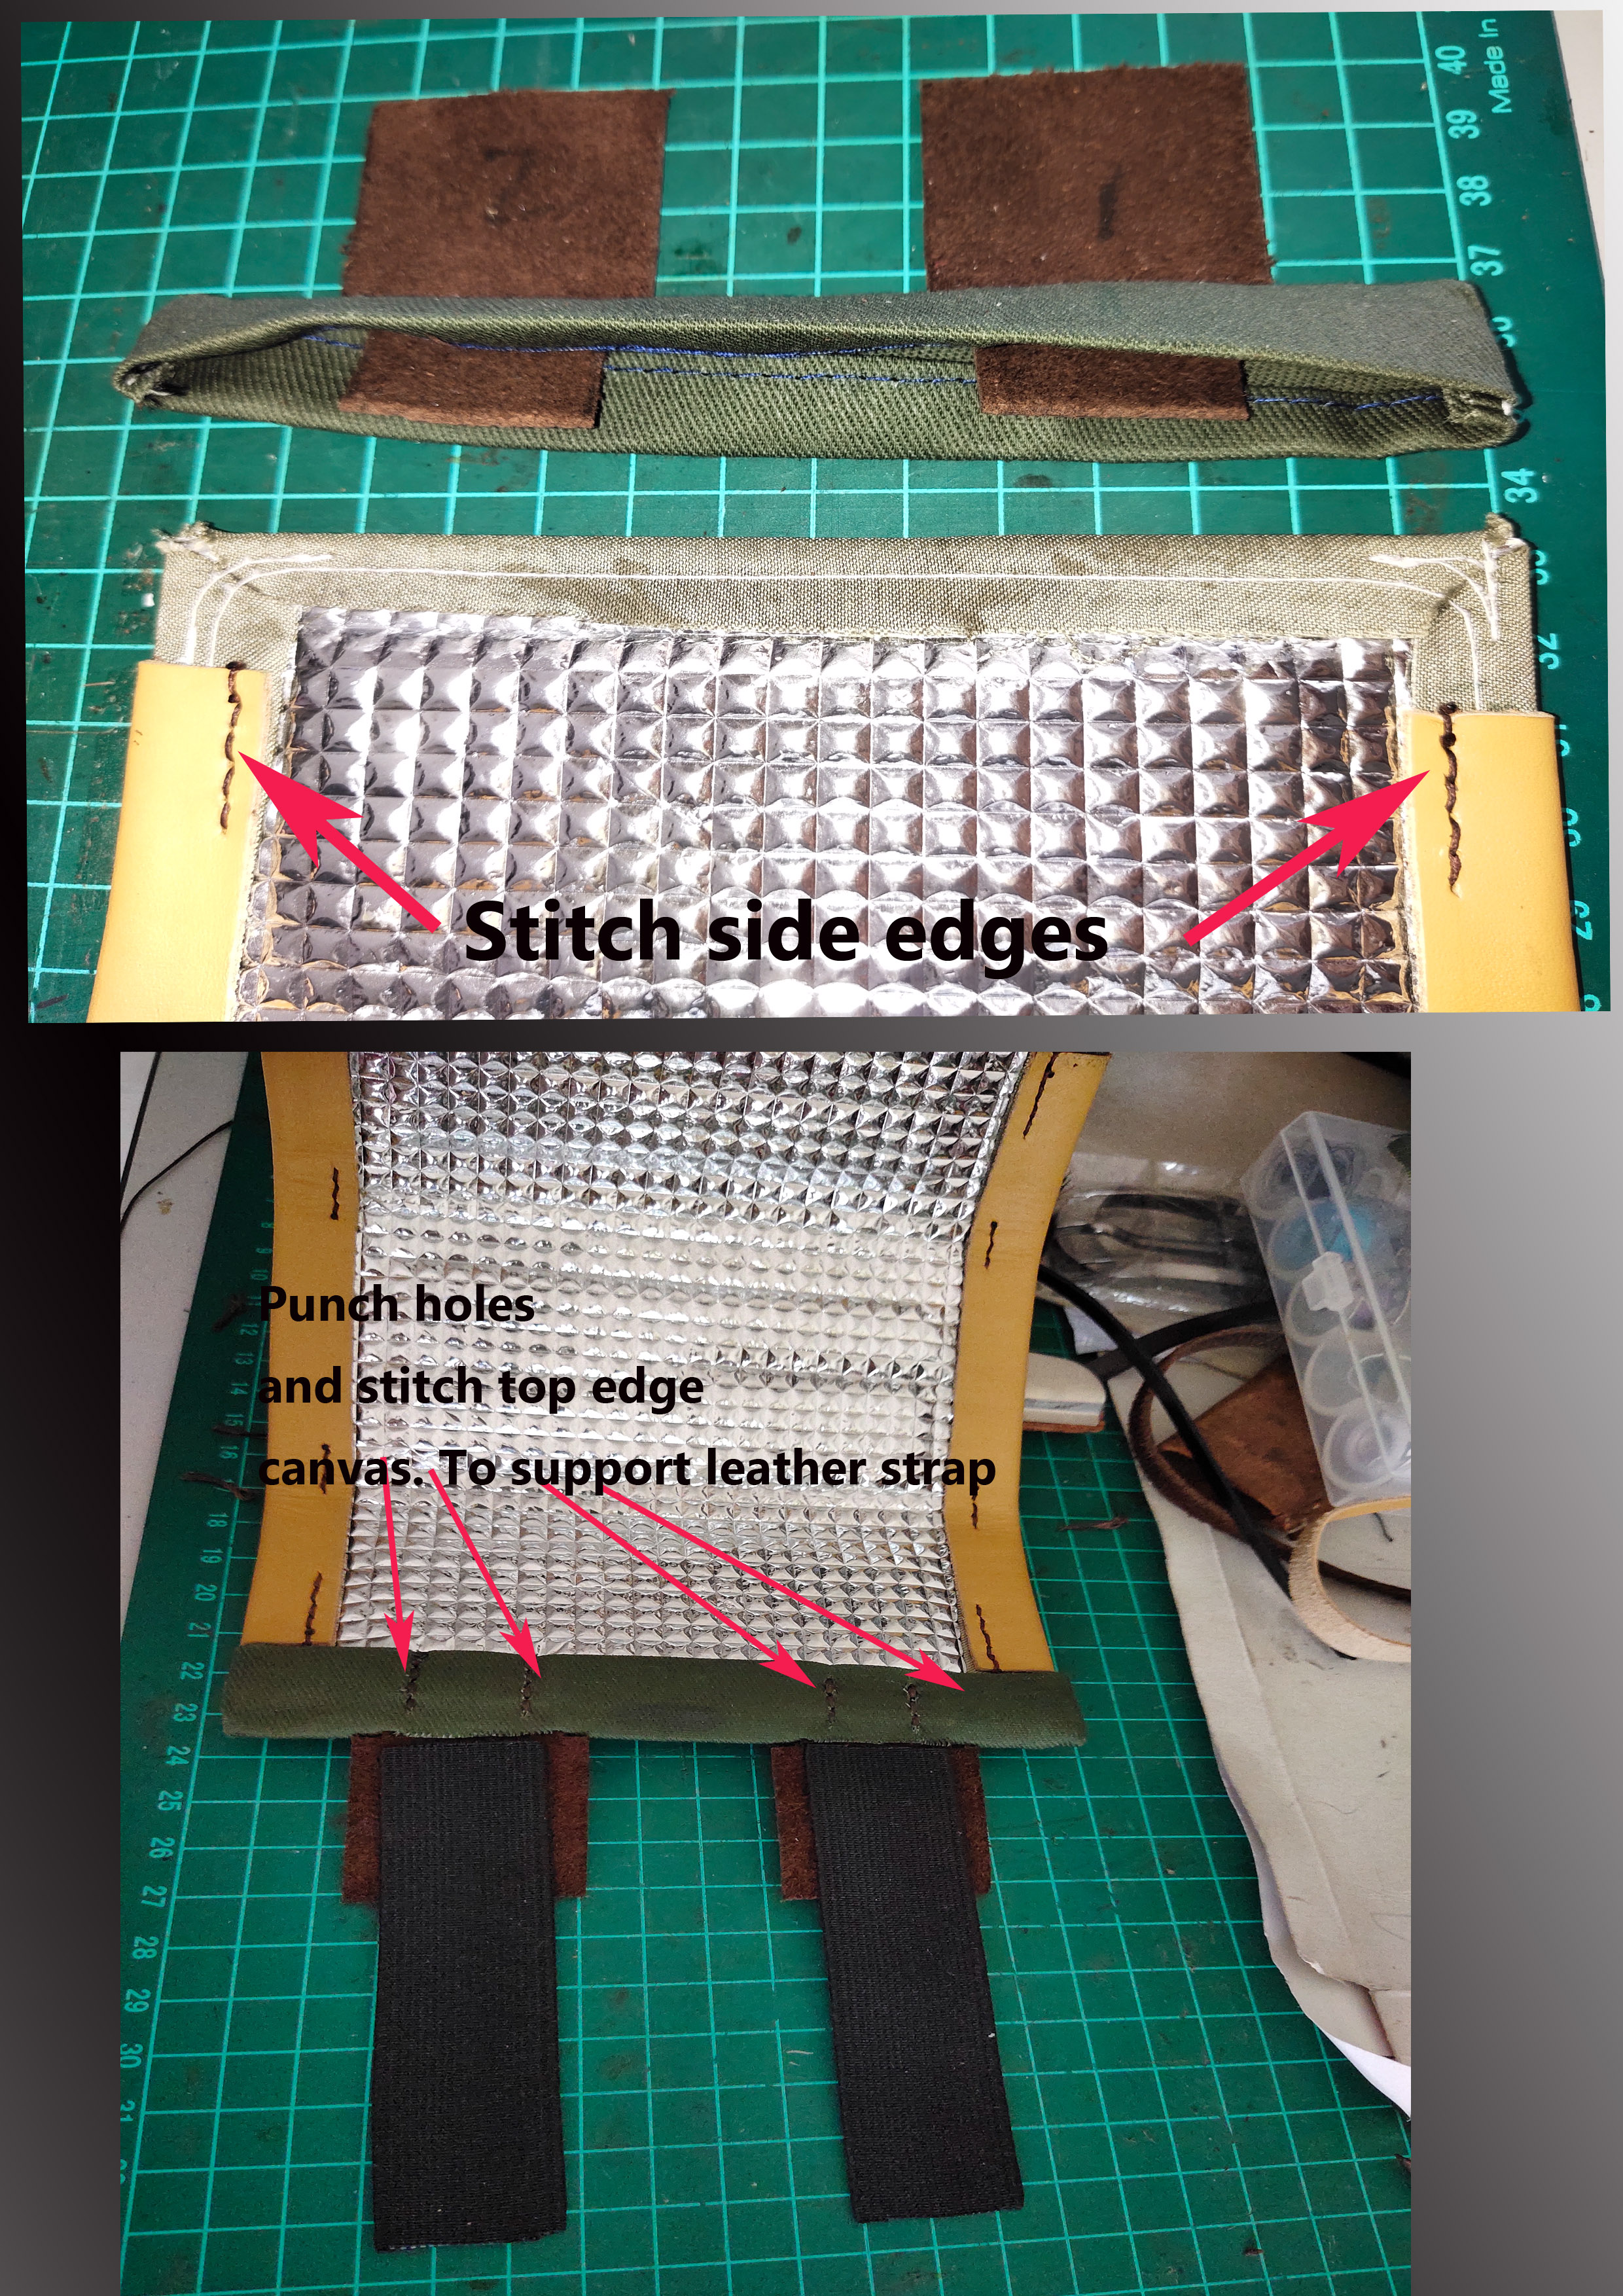
The reason for using leather strap add to both side edge, it is to ensure better grip and also to use as a stronger / stiff the frame to project.

前回の投稿 - 2022年8月25日のタイトル「ガラス容器プロテクター」を参照してください。

このオリジナルプロジェクトは、紙ベースのボール紙に外装材が何もなく、露出しています。 その他の変更点は、ゴムバンドを所定の位置に保持するために使用される素材が、1) 真っ直ぐなゴムバンドとして取り付けられるか、2) 一部のレザーストラップ/布ストラップとゴムバンドの混合物のいずれかであることです。

観察によると、ストラップの上端全体に賛否両論があります。

1) ゴムバンドの完全なストリップには、いくつかの欠点があります。長いバンドは長すぎる可能性があり、磨耗により弱くなる可能性があります。 トートバッグに入れる時や取り出す際のゴムバンドの取り扱いによるストレスにはやや弱いです。

(将来的には、ガラス容器プロテクターにハンドルストラップを追加して、より適切な取り扱いを支援するという考えと前向きの考えがあります。これが追加されると、ユーザーフレンドリーになり、目的を達成するための制御が向上します)

2) 別のアプローチは、革ストラップまたは布ストラップ素材を混合し、それに短いゴムバンドを縫い付けます。 これには、弾性バンドが短くなり、プロジェクトの上端で終了するレザーストラップや布製ストラップのストレスが軽減されるという利点があります。

布素材を取り付けるにはいくつかの課題があり、その 1 つは接着剤を使用する場合、こぼした場合に布の表面に硬化した接着剤の痕跡が永久に残ることです。

したがって、プロジェクトを所定の位置に保持するために接着剤を塗布するときは特に注意する必要があります。布は柔らかくてはがれやすく、動き回って平らにならないため、克服するにはスキルセットが必要なさまざまな特性があります。

布素材のパネルを備えた小さなガラス容器プロテクターのデザインが、裸のボール紙ベースをカバーします。

両側のエッジにレザーストラップを追加する理由は、より良いグリップを確保するためと、フレームの突出強度を高めるためです。


The cloth material selected and cut with seam allowance to wrap on the project cardboard base.

Tools used are as shown. After allow glue to harden then proceed to sew the seam edge

Need to trim the canvas material for all the corner to keep the thickness in check.

When sewing the seam edge ensure the thread stitch length is not too short, recommend between 3 to 4 stitch length on setting.

In this case notice the corner area have extra sewing done to better hold it position due the cut pattern and gap of fold.

布素材を選択し、縫い代を付けてカットし、プロジェクトの段ボールベースに巻き付けます。

使用した工具は画像の通りです。 接着剤が固まった後、縫い目の端を縫い始めます

厚さを抑えるためにキャンバス素材の角をすべてトリミングする必要があります。

縫い目の端を縫うときは、糸の縫い目長さが短すぎないことを確認してください。設定では3〜4針の長さを推奨します。

この場合、カットパターンと折り目の隙間により、コーナー部分の位置をより良く保持するために余分な縫製が行われていることに注意してください。


Measure the band length required across the top edge, it is about 10.5 cm.

Do take note the top strap length and to include the other part to attach to the top edge facing. It is a Inverted "U" shape strap.

バンドの上端から必要な長さを測ると、約 10.5 cm です。

上部ストラップの長さに注意し、上部端面に取り付ける他の部分も含めてください。 逆U字型のストラップです。


This top edge use a canvas material to hold and position the strap, hence take due consideration for good tension and good support for elastic band. One end of leather  is hand stitch while the other end of leather is machine sew between leather and elastic band.

この上端はストラップを保持し、位置決めするためにキャンバス素材を使用しているため、弾性バンドの適切な張力と適切なサポートが考慮されています。 革の一方の端は手縫いされ、もう一方の端は革とゴムバンドの間に機械で縫い付けられます。


Inside view of the project, it better to attached leather seam binder for both side first.

This will be better get the side binder stitch in place and then proceed to do the next step.

プロジェクトの内側から見ると、最初に両側のレザーシームバインダーを取り付けた方がよいでしょう。

これにより、サイドバインダーステッチを所定の位置に固定してから、次のステップに進むことができます。


First trail using cloth to cover over cardboard base. Mistake to apply contact glue, it leaves marks after it harden (see the blue arrows as per image on top left)

This is one way to attached the strap across the top edge. In this case we use the leather strap interface with elastic band (in between)

Hence the leather one end to sew with elastic band edge and the other end of leather to attached to canvas material.

最初のトレイルは、布を使用してボール紙のベースを覆います。 接着剤を塗布するのを間違えた場合、硬化後に跡が残ります (左上の画像の青い矢印を参照)

これは、ストラップを上端全体に取り付ける 1 つの方法です。 この場合、ゴムバンド(間にある)を備えたレザーストラップインターフェイスを使用します。

したがって、革の一端をゴムバンドの端で縫い、革のもう一端をキャンバス素材に取り付けます。


Use leather strap and clip to hold item shape required .This will help to position the strap in place and allow the glue to set . To prepare for stitching strap into place of canvas.

レザーストラップとクリップを使用して、アイテムを必要な形状に保持します。これにより、ストラップを所定の位置に配置し、接着剤を定着させることができます。 キャンバスの代わりにストラップを縫い付ける準備をします。


Bottom image shows the completed project.

Another view of finish project with glass container (small size)

下の画像は完成したプロジェクトを示しています。

ガラス容器(小サイズ)を使用した完成プロジェクトの別の図


On the left is project with full elastic band to top. On the right is mixture of leather and elastic band for top strap.
左側は上部にゴムバンドを完全に取り付けたものです。 右側はレザーとゴムバンドを組み合わせたトップストラップです。


On the left is the bare cardboard (at bottom) , the right is the new design with cloth materials.
左は裸のボール紙(下)、右は布素材を使用した新しいデザインです。

                        End of document 😎

Car remote control repair-change battery - 車のリモコン修理・電池交換

             Just recently send car for quarterly service, detected battery issue on remote control unit.

Issue was at time the car push button does not work (cannot open car door). The service center's guy says the remote control could have weak battery (battery life is about 3 year).

So he shows us how to replace new battery. The original battery is # CR2232 type (Lithium, 3Volts).


最近、四半期ごとのサービスに車を送ったところ、リモート コントロール ユニットのバッテリーの問題が検出されました。

問題は、車の押しボタンが機能しない(車のドアを開けることができない)ときでした。 サービスセンターの人によると、リモコンの電池が弱っている可能性があるそうです(電池寿命は約3年)。

そこで彼は、新しいバッテリーを交換する方法を教えてくれました。 元のバッテリーは # CR2232 タイプ (リチウム、3 ボルト) です。


Tools required and spare battery .

必要な工具と予備のバッテリー。


Remove the metal car key from storage by unlocking it before open casing.

ケースを開ける前に、金属製の車のキーのロックを解除して保管場所から取り出します。


Do take care when try open the remote control casing.

リモコンのケースを開けるときは注意してください。


Re assembly the reverse way.  

逆の手順で再度組み立てます。


Be aware of battery polarity ,the positive terminal is facing up.

電池の極性に注意してください。プラス端子が上を向いています。


Check remote control after repair and confirm it is working.

修理後にリモコンをチェックし、動作することを確認します。


End of document 👴


SEWING-replace elastic band - - 縫製交換用ゴムバンド

                  Trying new skill on sewing , replacing elastic band on own clothing. The old cloth have elastic band worn off, out of shape and less/weak tension.

Hence have been searching for a solution on how to replace a worn off elastic band. 

Found a few useful site and tips and gain more knowledge at the same time.

*** note:- Please see and view some of these YouTube video link related to this repair situation. So sharing these video for me to be better prepare , learn tips , how to use sewing machine and many other ideas, comments, simple technique, suggestions. And the list goes on.

For this situation on repair I try to open a small slit line on the cloth from the inside layer (wrong side facing). 

First mark the point or area or section to insert elastic material.

Then insert elastic band cut to certain length. The original "width" is about 40 cm waist line. 


自分の服のゴムバンドを交換して、裁縫の新しいスキルに挑戦します。 古い布はゴムバンドがすり減り、形が崩れ、張力が弱くなっています。

したがって、摩耗したゴムバンドを交換する方法についての解決策を探してきました。

いくつかの役立つサイトとヒントを見つけて、同時により多くの知識を獲得してください。

*** 注:- この修理状況に関連する YouTube ビデオ リンクの一部を参照してください。 したがって、より良い準備、ヒント、ミシンの使い方、その他多くのアイデア、コメント、簡単なテクニック、提案を学ぶためにこれらのビデオを共有します。 そしてリストは続きます。

この状況の修理では、内側の層(裏側を向いている)から布に小さなスリット線を開けてみます。

まず、弾性素材を挿入する点、領域、セクションにマークを付けます。

次に、一定の長さにカットしたゴムバンドを挿入します。 本来の「幅」はウエストライン約40cm


After repair waist line is about 39 cm.

For the Zig-Zag  pattern, see other setting for this project.

Alternative way to insert elastic band is with a tweezer.


修理後のウエストラインは約39cmです。

ジグザグ パターンについては、このプロジェクトの他の設定を参照してください。

ゴムバンドを挿入する別の方法は、ピンセットを使用することです。


End of project.  プロジェクトの終了。

= * = * = * = = = = = = = = = = = = = = = = = = = * = * = *

https://www.youtube.com/watch?v=FEbAwyrF1NM&t=4s

How to sew elastic (2 techniques) Sewing Tutorial with Angela Wolf.  

23 Jul 2016, (3:43) . By Craftsy.

Elastic waistbands are a quick and easy option for many garments. Learn how to sew elastic two ways, from a versatile casing to a no-budge sew-in option. Read more about types of elastic for sewing — http://craftsy.me/2ah9QdY Stock up on elastic here — http://craftsy.me/29ZYHvW Shop elastic threaders — http://craftsy.me/29UXc0p Master sewing elastic with your serger —http://craftsy.me/2akcWwd

= = = = = = = = = = = = = = = = = = = = = = = = = = = = = = = = = = = = = = = = 

https://www.youtube.com/watch?v=o1l95gh_QzY

Sew an Elastic Waistband without Casing.  

26 Feb 2016, (8:32).  By Threads Sewing

Threads author Nick Comman demonstrates an -easy-to-sew technique for instering an elastic waistband without casing. This clever method helps the waistband lay flatter against the body and produces bulk-free results.

= = = = = = = = = = = = = = = = = = = = = = = = = = = = = = = = = = = = = = = =
https://www.youtube.com/watch?v=SAgACO6sskk&t=54s

All about ELASTIC -How to pick the right elastic for your sewing project.
16 Apr 2019. (8:48). By Seamwork.
In this video: Learn how to pick the right kind of elastic for your sewing project. Read The Ultimate Guide to Elastic here: https://www.seamwork.com/issues/2018/...


= = = = = = = = = = = = = = = = = = = = = = = = = = = = = = = = = = = = = = = =
https://www.youtube.com/watch?v=o1l95gh_QzY

Sew an Elastic Waistband without casing.
26 Feb 2016. (8:32). By Thread Sewing. Threads author Nick Comman demonstrates an -easy-to-sew technique for instering an elastic waistband without casing. This clever method helps the waistband lay flatter against the body and produces bulk-free results.

= = = = = = = = = = = = = = = = = = = = = = = = = = = = = = = = = = = = = = = =
https://www.youtube.com/watch?v=AZbNFSnXmNQ

How to sew a thin elastic band together into a wide elastic. Useful tips you would like to know.
25 Aug 2020. (5:54). By Julia Medeiros.

✂️Sometimes the ready made wide elastic band is too rigid or thick to use on delicate fabrics like silk, chiffon or thin knit fabric. ✂️This video is the detailed instruction how to make wider elastic band by stitching together side by side thin elastic strips.

= = = = = = = = = = = = = = = = = = = = = = = = = = = = = = = = = = = = = = = =
https://www.youtube.com/watch?v=VRM95_4qlF4&t=1s

Making elastic wrist bands with Velcro latching.
7 May2020. (2:24). By neuromangler.

Shows materials to assemble elastic bands and velcro, sewn on a Singer heavy duty machine with extended foot control
= = = = = = = = = = = = = = = = = = = = = = = = = = = = = = = = = = = = = = = =
https://www.youtube.com/watch?v=QpJrPpTw8bQ

How to make your jeans bigger by inserting ELASTIC - 3 ways from very easy to professional. 18 Jun 2021. (14:09). By Downtown Tailoring.
 = = = = = = = = = = = = = = = = = = = = = = = = = = = = = = = = = = = = = = =
https://www.youtube.com/watch?v=fO5bMrhCnRo&t=9s

How to Sew an Exposed Elastic Waist band.

14 Jul 2014. (6:15). By professor Pincushion. Skip the casing and sew on wide elastic for an exposed elastic waistband. This technique will come in handy for sewing boxers and skirts.

= = = = = = = = = = = = = = = = = = = = = = = = = = = = = = = = = = = = = = = =

https://www.youtube.com/watch?v=uMw2mj06PvA

Sewing with Elastic in 3 Methods * How to Sew Elastic or Garter * Sewing tutorial..

11 Feb 2020. (7:03). By THE SEWIST. Xxx Encased elastic, Xxx - Zigzag stitch, Xxx - Overlock stitching.

Type of ELASTIC material. 1) Braided elastic 2) Knit elastic 3) Woven elastic 4) FOE - fold over elastic. 5) Lingerie elastic.

= = = = = = = = = = = = = = = = = = = = = = = = = = = = = = = = = = = = = = = =

                                   End of document 😎

Water bottle strap holder - - ウォーターボトルストラップホルダー

     Saw grand daughter bottle she carry have broken /missing strap. She have to hold the bottle with her bare hand on the nozzle head. 彼女が運んでいる孫娘のボトルにストラップが壊れているか紛失しているのを見ました。 彼女はノズルヘッドを素手でボトルを保持しなければなりません。

Hence decide to make a simple strap holder for this plastic bottle of about 7  cm diameter.  そこで、この直径約7cmのペットボトル用の簡単なストラップホルダーを作ってみることにしました。

Instead of using leather material, try hand with some scrap left over from previous project canvas material. 革素材を使用する代わりに、以前のプロジェクトのキャンバス素材から残った端材を使って手作りしてみてください。

Did some idea to this project, want to add id name on strap for ease to track and find her bottle, light strap to compliment the bottle, ease to install strap to bottle by use elastic band to grip on bottle, use snap hook to attach to bottle strap , a simple strap shoulder pad to suit kid size.  

このプロジェクトにアイデアを出しました。ボトルの追跡と検索を容易にするためにストラップに ID 名を追加したいと考えました。ボトルを引き立てる軽いストラップ、ゴムバンドを使用してボトルをグリップし、スナップ フックを使用してストラップをボトルに簡単に取り付けることができます。 ボトルストラップに、キッズサイズに合わせたシンプルなストラップショルダーパッド。


Check on bottle design, shape, size to determine best place to locate the strap around bottle .
It best placement is around the bottle where the original strap or two ear protrude at both side.  
Use canvas material to make some basic measurement, To decide the length for canvas and flexible elastic band to have sufficient grip on bottle.
ボトルのデザイン、形状、サイズを確認して、ボトルの周囲にストラップを取り付ける最適な場所を決定します。
最適な配置は、元のストラップまたは 2 つの耳が両側に突き出ているボトルの周囲です。  
キャンバス素材を使用して基本的な測定を行い、ボトルを十分にグリップできるキャンバスと柔軟なゴムバンドの長さを決定します。


Watch a short video clip on how to set up the SINGER model 2250 for embroidery pattern stitching.

 - https://www.youtube.com/watch?v=qYyWkoyL6lo

By Singer Dream Zone. SINGER モデル 2250 をセットアップして刺繍パターンをステッチする方法についての短いビデオクリップをご覧ください。

  - https://www.youtube.com/watch?v=qYyWkoyL6lo

歌手ドリームゾーンによる。


Need do some practice and setting on sewing machine to optimize result. Play attention to your needle, quality size and thread type and size, quality, fabric properties and etc. 結果を最適化するには、練習とミシンの設定を行う必要があります。 針、品質のサイズ、糸の種類とサイズ、品質、生地の特性などに注意してください。


End of project and have grand daughter try out, happy day for all. プロジェクトが終了し、孫娘に試してもらいました。皆さんにとって幸せな一日になりました。

                  == == == == ========================  == == == == =

* Note: I am trying use "Google Translate" application from English to Japanese, sorry if this translation is not suitable please do let me know and thank you.

* 注: 英語から日本語への「Google 翻訳」アプリケーションを使用しようとしています。この翻訳が適切でない場合は、申し訳ありませんが、お知らせください。ありがとうございます。

                                       👼 End of document 👴 


                                                 👷  End of document 👴


Repair broken snap on fastener for wallet - 壊れた財布のスナップボタンを修理します

 This lady wallet have two snap on fastener loosen (wear and tear) and need replacement. Also certain part of stitches are broken. 彼の女性の財布にはスナップボタンの留め具が 2 つ緩んで (磨耗して) 交換が必要です。 また、ステッチの一部が切れています。

Verify both snap on is VT5 button size. 両方のスナップオンが VT5 ボタン サイズであることを確認します。


The socket is broken, hence the snap on fastener is weak to hold it on position. ソケットが壊れているため、スナップオンファスナーが弱く、所定の位置に保持できません。

Noted some part of stitch have broken thread.  ステッチの一部に糸が切れていることに気付きました。


After repair was done, use some olive oil and rub on wallet surface. 修理が完了したら、オリーブオイルを少し塗って財布の表面をこすってください。


 == == == == ========================  == == == == =

* Note: I am trying use "Google Translate" application from English to Japanese, sorry if this translation is not suitable please do let me know and thank you.

* 注: 英語から日本語への「Google 翻訳」アプリケーションを使用しようとしています。この翻訳が適切でない場合は、申し訳ありませんが、お知らせください。ありがとうございます。

                                       👼 End of document 👴 


                    👀  End of document 😎

Year 2024 HAPPY Winter Solstice

 Year 2024 HAPPY Winter Solstice * Note: This is trail use of "Google Translate" application from ENGLISH to JAPANESE, sorry if th...