Old tote repair project.
WHY
need repair on this old tote (created on May 2017)
1.
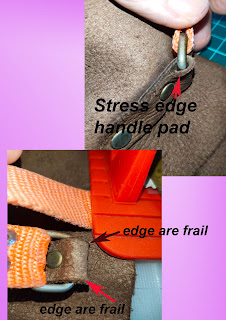
Handle pad on other three is slowly showing sign
of worn out (sign are the edge are frail and weak point)
2.
There is one minor error on one side of web sling
is not correct position and orientation,
3.
Worn off on web strap end, redo the web strap expose
end by use lighter to melt and reinforce it,
4.
All handle pad need to reinforce with additional
layer where the D ring surface meet the inner leather surface.
5.
The old design on handle pad using rivet to hold
and the “pulling stress” position is not optimize. Very obvious when remove old
pad and notice leather surface is uneven and stretching pattern.
6.
Add on pocket on one side is done ad hod and too
big a design and other factor like intended purpose is lacking.
7.
Not sure if this due to wear and tear or other
factor cause the leather to get “soften” and the bag just sit flat (like
collapse posture) when place down. Hence add a top edge strip with seam with
nylon cord as backbone for support both front and rear.
8.
Numerous stitching error or lack of experience
on saddle stitching resulted on uneven stitch thread for tote bag.
Refer to item #8
Refer to item # 7
Refer to item# 1
Work in progress.. thank you
Update on 27th Feb 2022
Remove handle pad and notice certain area is highly stress and frail part.
New handle include an interface material to reduce stress area.
Step to remove old thread from bag.
Try use tweezers to force out the thread , notice the black thread is for inner pocket.
Overall bag view after remove the thread.
Notice the EA foam was loosen on certain spot, re glue it to base leather.
Remove rivet from handle pad.
Create new handle pad
New handle pad with new shape.
Only skive certain part of project, do take note added new layer of interface material on center section.
Showing how skiving was done.
Note and tip :- before use the project leather it is better to run a trail run with scrap leather to verify the correct thickness to skive.
For this skiving the final part still needs to trim the edge excess part. Use a knife or scissor to trim the edge.
The reason for not skive the center section is to ensure sufficient support with interface material
This is one way to pre punch hole on handle pad and the inner support pad
Tips on how to apply glue to a small nylon cord.
This technique allow the round cord to hold in position and easier to apply glue on it surface
Use a big table top surface to do stitching on seam.
This is the process to prepare for adding the handle pad and supporting pad to attached handle strap.
Do take the handle pad and supporting pad are temporary attached with double sided tape and pre punch stitching hole.
Once confirm position and location the handle pad is punch hole with awl.
After alignment on pre punch hole between handle pad and supporting pad. Temporary hold both pad with thread, this is one way to align and match the pre punch hole between both pad.
Work in progress.. keep watching for more...
Update 6th March 2022
Inner pocket design attached inside tote bag.
One of the top edge have pipe to give support for the soft lining material.
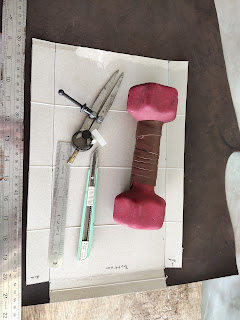
Cut material with tools
Add a divider pocket using the previous materials.
Depth of about 26 cm. and width to fit current tote bag width about 45 cm not include for side seam of 1 cm.
Have slight extra width for the inner pocket of 1 cm to create a bigger space.
Hand holding the layer of inner pocket with extra seam of 1 cm added.
The other divider layer is the recycle pocket material.
The bottom layer is with top edge wrap with nylon cord as part of piping.
This is one way to fold corner and sew the edge to take into consideration it is slightly wider length.
Cut both side layer use paper tempate.
After cut new side layer and stitch the bottom edge in this case.
Note:- edge seam is folded and punch hole.
To know where to punch 1st hole, need additional care to check on the first punch hole align to old punch hole.
Hence take additional step to re confirm for both side
(the right side and left side).
Note and tips, it better to pre punch holes on all three side edge before start stitching work.
Tips, after checking position and alignment between both end of side layer.
Before start stitching work it better to hold the one end point with temporary stitching.
Since the tote bag leather might have certain wear and tear.
This might result in the previous punch hole might run off position.
Another point is, with one end anchor in position temporary thread will make easier to start stitching the bottom edge to new side layer.
Place work piece on flat table to make work more relaxing and smooth flow. As the project is too big for stitching pony.
Prepare thread by start thread from bottom about 6 stitching point away and work from bottom to corner of front/rear layer.
Tips:- it help to enforce and allow greater strength to support stitching from bottom corner to the top of the front/rear layer seam edge.
Tips:-
1) use clip to hold the two layer together.
2) Use external box for support to project during stitching/
3) Another way is to temporary hold the top corner with temporary thread.
Do note this side did not have additional layer for pocket. Hence only two layer and straight forward stitching.
How to reinforce the corner.
Use awl to punch hole for stitching corner.
One technique for this stitching on project. Take note both needle at facing opposite side to each other. On same punch hole with two layer.
It take time to insert both needle and need additional time to slowly align and position needle.
Reason for doing this is to minimize thread punch thru other thread and this result in poor stitching outlook.
One way to hold the project in position in aid to stitching work.
Use a card board with paper clip to hold project up right. Also use another clip to hold both layer in position.
Slowly insert both needle thru same punch hole to stitch project.
The other needle is a temporary thread and needle to hold the top edge together.
Do take note the inner pocket is stitch to body with a thin thread to hold it in position. This is to minimize movement when stitching the side layer.
In this case there is three layer, 1. Front/ Rear 2. Inner pocket and 3) side layer.
First the awl tip is use to align the pre punch hole from outside facing.
Once the tip of awl is noted the needle is to follow the tip of awl as it is slowly remove. This is one way to stitch.
Take note the awl tip is slowly remove and the needle tip follow the awl.
This is done from bottom work up to the top edge.
This is to show one way to minimize the piecing thru the thread as the layer is thick and the outer layer is pre punch hole. As the inner pocket is black in colour make it difficult to see the hole position.
For the corner stitching work. This corner need to reinforce by cross over corner stitching.
Update on 8th March 2022
Close up view on corner stitching.
Cut leather material in preparation for handle support.
Pre-punch stitching hole
Wrap leather over handle strap.
Apply cross stitch pattern for handle wrap.
Close up view on cross stitching method.
Do take note the thread length to cut is about 6 times.
Since use this cross stitch require more than normal straight stitching hence need additional thread length.
Project done.
= = - - - - = = = = - - - = = - - - - = = = = - - - = = - - - - = =
* Note: This is trail use of "Google Translate" application from ENGLISH to JAPANESE, sorry if this translation do not make sense or suitable word or sentence, please do let me know and thank you.
* 注: これは英語から日本語への「Google 翻訳」アプリケーションの試用です。この翻訳が意味をなさない、または適切な単語や文でない場合は、申し訳ありませんが、お知らせください。ありがとうございます。
👦 End of document 👴
👷 End of document 👴