Tote Bag # 14 (Canvas/Leather tote bag)
This tote bag was to try out a mixture of canvas and leather material. The objective is make the bag lighter but strong enough for it intend purpose.
Also explore other way to make a heavy duty handle and try out new idea for inner pocket organizer.
Over all view of finish project of tote bag.
The front and rear is canvas material while the side are leather.
Inside view of bag, with web material as handle.
Inside view where the bottom layer have a piece of leather is sew at bottom.
Partial inside view of one side of bag. It shows how the pocket layer is laid out with respect to other layer.
Do take note, it better to sew all the pocket layer activity
and once it is ready. It is attached to the bag, take note the seam of the canvas is hold the pocket layer for better support.
Tips, the pocket design and shape and size depend on the user needs. Of course the edges of pocket need seam to minimize the raw edge of canvas frail.
Take time to slowly sew the pocket design.
On this design there are three pocket.
As for the bag side, it use a 2.0 mm leather material.
There is seam allowance for the side and bottom. Do note the side are not straight line in this case, this will create a bell like shape. It result is bell like shape and introduce new challenge when doing stitching between the canvas edge to leather edge.
It is better to start stitching from the top to bottom and stop at about mid point of bottom . Start stitching the other top edge and moves along to bottom. The two stitch cross over at one point.
Each person have different method to start and stop stitching base on their preference. You can also do stitching with the inside fold out method.
For this project need to pre-punch stitching hole on the leather material.
Close up view of side wall leather to canvas.
Do take note on position between the canvas meet the leather. Refer to the arrow showing where the canvas and leather meet and start stitching.
Do take note the looping stitching use here. Hence the the thread length to cut is slightly longer.
The challenge here in stitching method is use awl to punch and align the pre-punch hole to match.
The web handle and padding need to properly align and need to check from time to time to minimize movement.
The pad is pre-punch hole so that it match and less alignment issue during stitching.
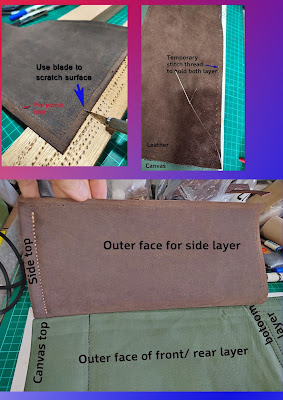
Step to attached side layer to bag. Do take note the sequence to follow and watch the facing surface direction during this step.
Will recommend to follow the surface facing direction when doing stitching step.
Step to attached the side layer to project.
The use of clip is to secure it while the glue take time to cure. It better to temporary secure the other side with thread so that the alignment is maintain while glue the other side edge.
This is how the pad and strap are attached.
This is how the pad is stitch to web handle.
The real challenge is when attach the pad to canvas ,need to take care the leather pad will move a bit hence need to recheck the position status from time to time.
This due to canvas surface is smooth and flexible compare to leather surface.
Finish project note the handle is sufficient drop length for the arm to hold bag.
= * = * = * = * = * = * = * = Drawing page = * = * = * = * = * = * = * =
= = - - - - = = = = - - - = = - - - - = = = = - - - = = - - - - = =
* Note: This is trail use of "Google Translate" application from ENGLISH to JAPANESE, sorry if this translation do not make sense or suitable word or sentence, please do let me know and thank you.
* 注: これは英語から日本語への「Google 翻訳」アプリケーションの試用です。この翻訳が意味をなさない、または適切な単語や文でない場合は、申し訳ありませんが、お知らせください。ありがとうございます。
👦 End of document 👴
End of document 👴


