Repair Shoe of spouse

    This is a shoe / slipper repair for both slight wear and tear at heel area ( mainly the worn off is at the edge of heel) . 

The brand name of shoe is "Good Arch" manufacture is Taiwan, size 38.


Nail is used to minimize the repair layer from moving. As the area of coverage is very small.
Trim the edge to match the contour.

Compare before and after repair.


After repair try polish the shoe with a chemical liquid.

KENDA FARBEN chemical products for shoes. Starlux. bright finish for open grain leathers. made in Italy.


= * = * = * = * = * = * = * = * = * = * = * = * = * = * = * = * = * = * = * = * = * = * =


Right side of slipper with strap loosen, can see glue mark

Use a punch for marking position to punch with awl tool. Not recommend to use punch tool as the material is not leather material and it looks like sponge material.
Use awl to punch hole thru and needle follows the direction.

This is one way to start tie knot.


Repair done, take note of the thread stitch path.


   👷  End of document 👴

Non Leather Project # 9 (Trolley Handle Wrap)

 Non Leather Project # 9 (Trolley Handle Wrap)

A friend fold able trolley was available to try out a project using leather of 2.0 mm thickness to wrap around the handle. Prefer a rough surface for better grip surface , user friendlier design and ergonomically.

In this case try out two separate wrap around on same handle of trolley. Since most of the time our hand grip a certain part of the handle hence decided to have two separate wrap material.


Overall view of this project before and after.

Cut a leather of size 15 cm (width) and 8.8 cm (depend on diameter of handle). 


One quick way to verify and check is use a scrap leather to confirm length to cut. Wrap leather piece around handle and mark position.

On this example the handle diameter is 2.5 cm and circumference is about 8.8 cm.


Stitch path length is about 15 cm, cut a thread length of about 126 cm (take into consideration of length for cross stitching). Remaining length of about 20 cm on both needle which just right left over. 


Details on how to terminate thread for cross stitch.


                                               👷  End of document  👴

Tote Bag # 14 (Canvas/Leather tote bag)

       Tote Bag # 14 (Canvas/Leather tote bag)

          This tote bag was to try out a mixture of canvas and leather material. The objective is make the bag lighter but strong enough for it intend purpose.

Also explore other way to make a heavy duty handle and try out new idea for inner pocket organizer.


Over all view of finish project of tote bag.

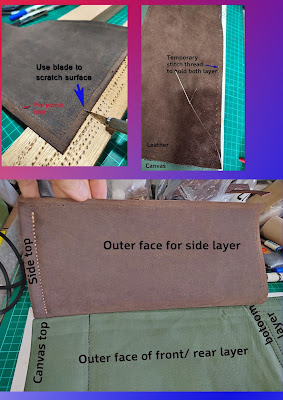
The front and rear is canvas material while the side are leather.

Inside view of bag, with web material as handle.


Inside view where the bottom layer have a piece of leather is sew at bottom.


Partial inside view of one side of bag. It shows how the pocket layer is laid out with respect to other layer.


Do take note, it better to sew all the pocket layer activity
and once it is ready. It is attached to the bag, take note the seam of the canvas is hold the pocket layer for better support.

Tips, the pocket design and shape and size depend on the user needs. Of course the edges of pocket need seam to minimize the raw edge of canvas frail.
Take time to slowly sew the pocket design.

On this design there are three pocket.

As for the bag side, it use a 2.0 mm leather material. 

There is seam allowance for the side and bottom. Do note the side are not straight line in this case, this will create a bell like shape. It result is bell like shape and introduce new challenge when doing stitching between the canvas edge to leather edge. 

It is better to start stitching from the top to bottom and stop at about mid point of bottom . Start stitching the other top edge and moves along to bottom. The two stitch cross over at one point.

Each person have different method to start and stop stitching base on their preference. You can also do stitching with the inside fold out method. 

For this project need to pre-punch stitching hole on the leather material.


Close up view of side wall leather to canvas.


Do take note on position between the canvas meet the leather. Refer to the arrow showing where the canvas and leather meet and start stitching.

Do take note the looping stitching use here. Hence the the thread length to cut is slightly longer.

The challenge here in stitching method is use awl to punch and align the pre-punch hole to match.


The web handle and padding need to properly align and need to check from  time to time to minimize movement.

The pad is pre-punch hole so that it match and less alignment issue during stitching.


Step to attached side layer to bag. Do take note the sequence to follow and watch the facing surface direction during this step.

Will recommend to follow the surface facing direction when doing stitching step.


Step to attached the side layer to project.

The use of clip is to secure it while the glue take time to cure. It better to temporary secure the other side with thread so that the alignment is maintain while glue the other side edge.

This is how the pad and strap are attached.

This is how the pad is stitch to web handle.

The real challenge is when attach the pad to canvas ,need to take care the leather pad will move a bit hence need to recheck the position status from time to time.

This due to canvas surface is smooth and flexible compare to leather surface.


Finish project note the handle is sufficient drop length for the arm to hold bag.


= * = * = * = * = * = * = * = Drawing page = * = * = * = * = * = * = * =


                    End of document 👴
Simple pouch


SIMPLE POUCH #1 design

      Trying new way of doing stitching for a simple pouch. It is a multiple purpose project using the softer leather material. User can keep their money, store car key and accessories or for certain small mobile phone design.


Verify leather material thickness, it important for correct thickness for use with box stitching.

If too thin (less than 1 mm) it very challenging to do box stitching due to limited thickness punch thread hole with awl.
If too thin there is possible weakness on strength of project.
As the thread is to whole the two edge together.

Estimate length in this project is about 25 cm. You can try longer than 25 cm is possible to meet your need, hence in this design it best cut at 25 cm.
If not mistaken the leather is " crazy horse" type.

It is better to burnish all edge before you proceed to next step.
As it will look neat when finish box stitch.

Do take note to add VT2 button (stud and post) on front side first before stitching (for using press machine to set button). Or unless you have a manual punch for VT2 it can be installed at any time.

A snap fastener (also called press stud, dome fastener, popper, snap or tich) is a pair of interlocking discs, made out of a metal or plastic, commonly used in place of traditional buttons to fasten clothing and for similar purposes.

Draw line in preparation for punch hole mark only, then use the mark position and use awl to piece at angle.
This done for both facing edge. 

This is how it is done.


This is how I box stitch to minimize the thread punch thru other thread during stitching process.

One advantage of this box stitching is the pouch is looks and feel wider as the edge are facing each other. 
Other stitch method there is a seam allowance to take care. This result in the pouch is slightly narrower.


View of the finish project
View with flap open, the button apply is VT2 type.

This simple pouch can be use to keep money or small mobile phone and etc.

Take note, the button is installed direct to the front, where the post is facing the flesh side. 
While stud (sometimes referred to as the ball, is the male component of the snap) is facing outside.

In this case the metal part surface of the post is not covered and it could pose issue for sensitive part can be scratch.

Hence other simple pouch design #2 and #3 have different to overcome this issue.
Rear view of project.

Inside top view of project with flap open.

You notice the side edge is not restrict and hence
the inside pocket look wider.
Compare with saddle stitching the seam at edge occupy certain space and make slightly smaller. 

Close up view on the edge.


= * = * = * = * = * = * = * = * = * = * = * = * = * = * = * = * = * = * = * = * = * = * =

You Tube video on box stitch

https://www.youtube.com/watch?v=cvpGDRfWxQg

7 Different Ways to Stitch Leather by Hand

7 Sept 2019 Maze Leather (18:32 minutes)


Add some new ways to stitch your leathercraft projects. You can check out a detailed article on steps here: https://mazeleather.com/7-different-w...

Timestamps Below:


Single Stitch 00:30                Z Stitch 03:14                Baseball/V Stitch 06:36

Butt Stitch 08:45                    Cross Stitch 11:34        Box Stitch 13:48                French Stitch 16:09


= * = * = * = * = * = * = * = * = * = * = * = * = * = * = * = * = * = * = * = * = * = * =


SIMPLE POUCH #2 design

Update 1 st Dec 2021.

Cut top front edge using round template to create a curve cut line.
It better to burnish this edge after cutting the edge.

Apply burnishing cream to all edge.
Some of the tools required for this project.
In this case I have VT5 button installed on a small strip of leather. The white layer is an interface material to give firmer support to VT5 button. 

You have notice it have pre-punch stitching hole before glue to front layer. Since it quite thick when bonded on front layer. Notice is easier to picking iron tool which have pre punch hole.

Punch hole thru the front layer and notice it better this way but extra work.

Note the stitching have a loop to secure both edge, then two stitch space follow by a loop.
The loop is on alternate left and right needle is to ensure they are even thread length when it completed.

Hence in this case the thread length is cut to accommodate this additional loop.
Pre punch hole along edge of logo piece.
Outside view with round logo facing outside.
For alignment purpose a thread is temporary stitch to hold both layer in position.

Once the desire position is fix, use marker to confirm position and alignment.
Verify the VT5 cap and snap are in line to the post position.
USe ruler to check for position required.

Once confirm can start punch hole with awl.

Stitch the flap round part with stitching pony.

View with the flap part open position.

The flap is sandwich by both round layer to conceal the VT5 cap and socket.

The inner round layer is plain while the outer round is emboss with logo.


Overall view of a finish project.


The inner round layer is plain while the outer round is emboss with logo.


= * = * = * = * = * = * = * = * = * = * = * = * = * = * = * = * = * = * = * = * = * = * =


                                                 End of document 👴


Man shoe repair (stitching sewing) - 男性靴修理(ステッチ縫製)

 This is about my own shoe repair for the outer sole separated... This is a Clarks - Gore-tex . これは、剥がれてしまったアウターソールの靴の修理についてです。これは、クラークスのゴアテ...