Leather repair executive bag ( Bag Handle )
This executive bag repair require other attention beside it worn off corners.
Please refer to a repair post which is related to this executive bag. Title of post is ( Leather repair executive bag - bottom corner ).
However this repair project is to concentrate on executive bag handle worn off . Which is broken into a few repair as they are inter related.
F: LimDATA/ leatherProjectJune2019/ ThamSHBag
As this repair for a broken handle system ( Handle support and D link, strap support and hand wrap).
There are a few broken parts need to fix :-
1. To remove the defective Handle system, it need to remove certain part of the bag first before can gain access thru flap rear (bag cover flap) .
2. Only when the rear flap is open up, next step of repair can proceed.
3. First all four brass rivet need to be remove. The handle support will be free to remove D link, strap support handle, and hand wrap.
Before the black cloth was remove there is two "ear" need remove thread near to bag edge.
== == == == Update 19th Oct 2020
Note:- extra care is required as there leather and soft leather parts is very close to the area.
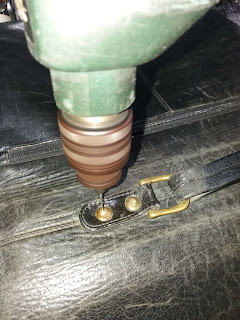
Use drill bit to remove all brass rivet.
For this it best to use pilot drill to create small hole as the rivet head are smooth and convex in shape.
This make it challenging to remove them without damage other area.
Tips. another best practice is to file the brass dome shape flat by using a needle file. Then make pilot drill hole for correct drill bit to remove rivet easier.
Tools to separate the rivet from aluminium bar.
Do not discard old rivet, as it it is important to determine the new rivet length.
Use a flat screw driver to pry the aluminium bar to separate the rivet
This way to remove rivet with minimize damage to leather part and reduce damage to aluminium bar
Name of parts in this repair for handle.
 Use sewing machine to stitch certain parts ("strap to support hand warp" ).
This is how the "strap to support hand warp" is slowly rebuilt for repair.
This how the "strap to support hand warp" is stitch up after hole are punch.


No comments:
Post a Comment