Badge tag project
Update 5th Sept 2018 to compare old and new design badge tag.
Front view of badge tag. On the left is the new badge tag, on the right is an old badge tag.
Rear view of the badge tag.
You will notice the new badge tag rear layer is a firmer leather to support the front layer.
This is some thing simple and new to try out project, badge tag for ID card size of 8.5 cm and 5.5 cm.
Use an ID card , or old credit card size template to prepare for leather material.
Cut project leather for width approximately 7.5 cm.
Cut the height of leather of approximately 11.5cm.
 Cut two leather of same dimension, 7.5 cm x 11.5 cm.

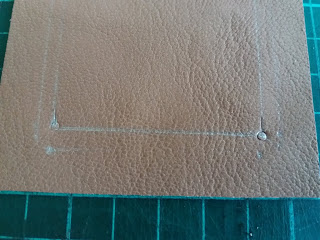
Measure to cut a rectangular hole base on the template ID card size, slightly smaller approx 5mm from edge of template.
 The inner line marking is where to cut off.
The backing layer need to cut a slit hole to
accommodate for inserting the crd
Gule both layer together
Rear view of project
Height of cut off is approximately 7.5 cm
= = = =
Use template to mark punch mark, the top side and the bottom edge marking.
Tips:- to help in punching hole using diamond punch. Note it better to draw line to help in alignment. Note however discover the punch line was not straight if view from end
Can see the stitches is not that straight line. Possible due to improper handling of leather and did not counter check the punch line.
= = = = = next project piece use a firmer back layer.
The front layer is softer leather, while the rear layer is thicker and firmer leather
USe template for mark line to cut and punch hole
Improvement was to punch small round hole are each corner. The cut off center piece will be better corner as the corner edge is cleaner.
Verify the cut off line.
Cutting with sharp knife is very important. After cutting is done, better to burnishing to edge is perform.
First start cutting from this corner and stop at mid point
Start cut from the other corner and meet at mid point.
Tips :- when cutting the line it best to start from one corner and cut from the other and meet at center.
Punch hole for the rear layer, in preparation for
cutting a small slot line.
The width of the slot is approximately 5.5 cm,
to confirm place a template card.
The purpose of the small hole to get cleaner end.
Apply burnishing chemical to ensure smoother edge for the slot
= = = = = Tips on cutting center piece
= = = = = Tips on burnshing edge of project
End of document
Update 5th Sept 2018 to compare old and new design badge tag.
Front view of badge tag. On the left is the new badge tag, on the right is an old badge tag.
Rear view of the badge tag.
You will notice the new badge tag rear layer is a firmer leather to support the front layer.
This is some thing simple and new to try out project, badge tag for ID card size of 8.5 cm and 5.5 cm.
Use an ID card , or old credit card size template to prepare for leather material.
Cut project leather for width approximately 7.5 cm.
Cut the height of leather of approximately 11.5cm.
 Cut two leather of same dimension, 7.5 cm x 11.5 cm.
Measure to cut a rectangular hole base on the template ID card size, slightly smaller approx 5mm from edge of template.
 The inner line marking is where to cut off.
The backing layer need to cut a slit hole to
accommodate for inserting the crd
Gule both layer together
Rear view of project
Height of cut off is approximately 7.5 cm
= = = =
Use template to mark punch mark, the top side and the bottom edge marking.
Tips:- to help in punching hole using diamond punch. Note it better to draw line to help in alignment. Note however discover the punch line was not straight if view from end
Can see the stitches is not that straight line. Possible due to improper handling of leather and did not counter check the punch line.
= = = = = next project piece use a firmer back layer.
The front layer is softer leather, while the rear layer is thicker and firmer leather
USe template for mark line to cut and punch hole
Improvement was to punch small round hole are each corner. The cut off center piece will be better corner as the corner edge is cleaner.
Verify the cut off line.
Cutting with sharp knife is very important. After cutting is done, better to burnishing to edge is perform.
First start cutting from this corner and stop at mid point
Start cut from the other corner and meet at mid point.
Tips :- when cutting the line it best to start from one corner and cut from the other and meet at center.
Punch hole for the rear layer, in preparation for
cutting a small slot line.
The width of the slot is approximately 5.5 cm,
to confirm place a template card.
The purpose of the small hole to get cleaner end.
Apply burnishing chemical to ensure smoother edge for the slot
= = = = = Tips on cutting center piece
= = = = = Tips on burnshing edge of project
= = = = = Tips on sanding the edge of project
End of document


No comments:
Post a Comment