Non Leather repair #23 (Water tank float repair)

                     Non Leather repair #23 (Water tank float repair)


This repair was for a water tank with water overflow. 
This is because the float valve with it rubber washer worn off . This result in the inlet water keep coming into water tank until it over flow.


Remove water pipe to water tank inlet.


Overall view on pipe connection. The cloth is to minimize water discharge when remove pipe connection.


Worn out rubber pad. Since hardware store do not sell this rubber pad only.
Alternative is to source other materials.
Use a rubber hose and punch a 13mm part as replacement part.

And re install the float (after verify the float ball is still good.)


Update 15th July 2020.


Use this thick water hose as rubber pad


                 End of document 👴

Non Leather repair #22 (Dining chair repair)

       Non Leather repair #22 (Dining chair repair)

This is about a repair job on dining chair for daughter's house furniture.
One of the dining chair was broken, center part sink in.

Bottom view of broken dining chair, the soft board broken into a few pieces.


Closer view on extend of damage on chair.


Inside view with the bottom cover removed.


Use vacuum cleaner to remove small parts and remove dust.


Use vacuum cleaner to remove fine dust on bottom cover.


Cut and add wood support to push the soft board to it original position.


To be continue when more update is make available.

Update on 10th July

Tools for repair chair.
1. Electric drill
2. drill bit with countersink
3. Wood glue
4. long screw driver 
5. countersink screw


Checking on wood support under chair.


Use vice to hold wood when add glue and screw to "H" support


View of chair bottom where the "H" wooden support is added to give better support for soft board.


This is how this chair was repair and put to service.

Update 13th Nov 2020.

Another dinning table chair need repair. This unit have two issues 1) seat collapse and 2) one of leg is defective, broken nut on the leg.


1) Seat have collapse and remove chair's bottom cover sheet, it can be seen the soft board have give way. 

* Notice one of the leg have broken nut embeds on leg and was remove.


One of the inserted nut is broken hence screw was loose.
This leg is shaky need to replace with a longer screw to secure leg properly.


This bottom black cover sheet need to reinforce by sew the edge to Velcro tape. 


This repair use two piece of scrap wood to give sufficient support to soft board.

Recommend to mark on chair frame support to define the location for support beam. It is also to cut material to match the frame.

As the shape of the frame is trapezoid in shape it make cutting to be more challenging.

Hence the position mark help to ensure if fit and match the wooden edge.

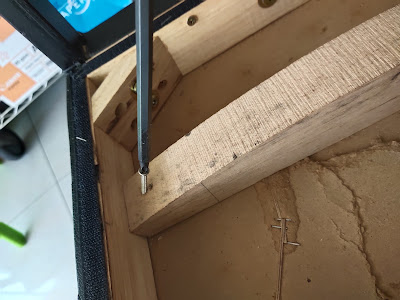
Use a very long wood screw to secure to chair's frame is equally challenging task.


Tips:- if the wood is hard it important to use correct drill bit size.
In this case the screw is 4 mm and drill bit is 3.5 mm.

The long screw need to be careful when securing it. If exert too much force it can bent.
Try to slowly turn screw and unscrew to create a thread on the wood and progressively way.

Other safety to look out not to injure your hand palm while tighten screw.


                        End of document 👴

Coin purse project # 9

              Old coin purse #9  design.

Use paper edge to minimize glue flow out of selected area.

This how we hide the button on flap

Use paper pattern to cut materials


Back to some coin purse design.


Refer to this old post

           Overall view on project (dated 14th Aug 2018)

These are project created since about 9 months ago (around late Oct 2017 onward).
(
*refer to Past Project post dated 29th July )

Various design for coin purse is displayed.


Of course there are several distinct type of coin purse. 

1) Single pouch version 

2) Double pouch version 

3) Hidden button 

4) Different width type and deeper or shallow pouch 

5) Different shape of flap and different shape cut on the edge of the coin purse.

                        End of document  👴


Dragon Boat and Bak Chang Festival -June 2020- 2021

Another year another day fly by for Bak Chang 3rd June 2022.


= = = = = = = = = = = = = = = = = = = = = = = = = = = = = = 

Time do fly.. 14th June 2021 is Bak Chang Festival..

An overall view on various type of bak chang.


A typical Nyonya chang , dumpling


https://www.youtube.com/watch?v=vNiFmaj5YA8 =  the story of Chu Yuan (Dwanyu festival)

* * Note:- These are some comment from other user.. need to verify which is the truth. Any comment or feedback is well come, as I am not sure the whole story and limited knowledge behind this event. 

by Kim Dramer
 
Very pretty video, but some errors.  Chu Yuan (Qu Yuan) died in 278 BC during the Warring States era.  At that time, China consisted of different states ruled by kings.  There was no Emperor until 221 BCE when King Zheng of the State of Qin conquered all the other states and founded the Qin empire.  Chu Yuan was an advisor to the King of Chu.  When he objected to an alliance between Chu and Qin, he was accused of treason and exiled.  Later, when Qin conquered the Chu, Chu Yuan drowned himself in despair.  The locals raced to try and rescue him. This is the origin of the Dragon Boat Festival. Failing, they threw rice cakes into the river to distract the fish from eating his body.  This is the origin of glutinous rice cakes eaten during this festival.  Chu Yuan is celebrated for his fealty and upright behavior, two key Confucian virtues..

By Jake Kate
This a very sad story to remember ,yet ....many youngest like to said Happy Duanwu Jie ,you can said Happy Dragon boat Festival NOT Happy Duanwu Jie ,that's sound totally wrong , not every public holiday must add a "Happy" words .

By Ellen Peng 
Im pretty sure Qu Yuan was an advisor, not a servant. He only commited suicide because his advice would have let his country win in the war, but the emperor did not listen to his advice, so they lost the war and he was so sad that he drowned himself.
= = = = = = = = = = = = = = = = = = = = = = = = = = = = = 


         Dragon Boat and Bak Chang Festival -26th June 2020

wishing all viewer with good health and welcome dragon boat festival and bak chang (dumpling wrap with bamboo leaf) festival.


End of document 👴

Pencil Case project #9 (using partial recycle materials).

            Pencil Case project #3 (using partial recycle materials).

This project was created using old recycle silicon sealant container as pencil case. 

Since was using a number of silicon sealant for other project and have kept almost all empty container until one day. I had an idea to recycle these cylindrical container to be pencil case.

This resulted in finding way to recycle all parts of recycle material if possible. 

Hence the first action is to remove all residue and unwanted material (mainly the remaining silicon materials inside) from discarded silicon sealant tubes..


Part to keep is 
a) Plunger, 
b) Silicon sealant plastic tube .


Saw off the head so to remove residue and remove the plunger inside.

* Tips:- use vice for better grip and hold, use a marker pen to mark or follow the dent line to cut off the top head (end cap with protruding screw thread).
 If cut carefully the edge can be use to support the end section to attached a round cover end.


Adjust vice grip (jaws distance) to accommodate different tube specification.

Tools required for this task
1. vice
2. saw
3. vacuum cleaner
4. any brush
5. sandpaper
6. wooden block


Remove end cap head

Expose end of head, remove unwanted silicon materials.

Use silicon gun device to move and reposition plunger inside.

Tips:- carefully remove the plunger as it use as part of pencil case.


One way to remove the plunger from silicon rubber, use a knob or any round object to force it to move by use the silicon gun device.

Have to use with great care as the plunger plastic might break off .
I had used a few method to dislodge the plunger from inside,  or use what ever method fit your needs.


In this case I use an old knob that fit the diameter and use pump gun device to slowly dislodge the plastic plunger.
Use with care as old plastic might break apart.
Show example how a knob is use to dislodge plunger.


Use plunger to draw an outline and cut leather base as part of end cap.


Method to cut the round end cap base.
Use great care as the cutter knife is very sharp.


Trim one end of plunger with saw

smoothen cut end with sandpaper and sharp knife to remove blur and uneven cut line.


cut leather for pencil case bottom and top layer casing

End cap with round logo chop

Transfer from drawing to leather using tracing paper and special round point tool.


Copy pattern to tracing paper

Transfer pattern to top layer
Stitching top layer.


Update on 27th June 2020.. You Tube training video link to share.

https://www.youtube.com/watch?v=dG-dpt8ZTDk

 【革の縫い方っ!4】:『クロスステッチ-①(crossstitch-1)』 レザークラフト動画<011

Translation -   [How to sew leather! 4]: Cross stitch- (cross-stitch-1) leather craft video <011>

 •8 May 2010                                                       Arukus01 (08:36 minutes)


https://www.youtube.com/watch?v=W06ZlqzwLEI

 【革の縫い方っ!5】:『クロスステッチ-②(crossstitch-2)』 レザークラフト動画<012

Translation -  [How to sew leather! 5]: Cross stitch- (cross-stitch-2) leather craft video <012>

  •8 May 2010                                      Arukus01  (06:30 minutes)


Update 20th August 2020.

Learn from this You Tube video that to better result on cross stitching is better to have punch hole  wider spacing to see the thread crossing.


#12 Cross Stitching - Leather Work For Beginners

11 May 2019                Geordie Leather  (11:44 minutes) . listen to timing (0.59)

00:50  stitch it just wouldn't look right that
00:53  the holes are too close together and you
00:55  wouldn't see the crosses to be very 
00:57  small crosses you want a nice decorative
00:59  cross so therefore we space out the
01:01  holes a wider distance apart so I'm


Draw and transfer pattern to bottom layer


Update on 28th June 2020


Different leather for pencil case project

Tools used

Proper label on silicon sealant tube to minimize mix up and ensure correct template paper is used.

Tips it is very important to minimize mix uo if you have several pencil case

Bottom layer template and verify correct size. It better to cut a paper template first to ensure correct size before cut leather material.


                                          End of document  👴

Year 2024 HAPPY Winter Solstice

 Year 2024 HAPPY Winter Solstice * Note: This is trail use of "Google Translate" application from ENGLISH to JAPANESE, sorry if th...