Small Bag (for kid bag)

Small Bag (for kid bag)
   Trying out make small bag for my grandson.
The challenge here is the round corner cutting and stitching at edge.


basic tools required for this project

The round corner and how this type of punch for straight edge

How to attached the other side of bag


Way to hold it in position and try use as many clip along the round edge
 It important before glue get the estimate location marking to make life better for alignment. As you know leather is like cloth it soft and flexible and stretchable. This pose some challenge in attaching the two different piece together

One technique is to carefully line up and careful o do it slowly and steady..


                                           End of document   πŸ‘΄ < . . < πŸ‘Ά

Leather Project # 10 (Common Seal)

Leather Project # 10 (Common Seal)

This project is to create a "forest" logo using a common seal press to create a positive image of logo. Can you this to attached to big leather project to make it looks better and branding in a way.


The strap attached was to hold the lever over extended period.
Typical duration is about 0.5 hour to 1 hour depending on leather type

Do alignment marking for common seal press

 Trying out different alignment point to observe the result


Wet leather before insert


Do read this post (Leather Project #6......Part 1 and Part 2 ) with regards to and before this common seal press was ordered. It need to design the logo, it is another learning thing on Adobe Photo Shop and Adobe Illustrator.

Leather project #6  Part 1 (Order a Mould for emboss LOGO)

                        End of document πŸ‘΄πŸ‘²πŸ‘·πŸ‘Ά

LeatherMan multi function Sheath #2 Part Two

           LeatherMan multi function Sheath #2 Part Two

 Sharing the step to make Leather man sheath.


Apply glue on both leather layer. Allow sufficient time for glue to settle before attached both  layers.

This way to use roller to better glue adhesion between two layer .


Marking edge line with tool before punch hole

This is how to punch hole before stitching after glue harden.

Way to hold punch hole tools.

How the draw line at edge make it easier to for alignment and correct place with punch.
For this case use a wooden block to raise the level so it is easier to punch the edge


Prepare for adding a round layer to which Velcro is attached.
The purpose of rivet is to allow the sheath to move around.

Once rivet is complete attached Velcro (rough side of Velcro)

This is how glue is apply to both layer
This to show sone of the tools required to use.

This is how the stitching pony tool to help in stitching.

Another view of the stitching pony


                      End of Document πŸ‘΄

LeatherMan multi function Sheath #2 Part One

LeatherMan multi function Sheath #2 Part One

This design follow the original leatherman WAVE sheath concept but add improvement on way to attached to belt.

 Sharing some of tools for this project.

Note: inner lining with one using wood shaving  (top) and another just plain leather (see bottom).

New design to attached to user belt, the two slot is to allow the user belt to slide thru. Hence the slot is design for different belt width., in this case is for 35-40 mm belt width.

Use Velcro to attach sheath to belt.
You will notice the velcro is of the smoother surface, so as not to cause hand or finger rub against it.

Draw line to cut slot and for mount Velcro part and prepare to guide punch hole and straight line to create slot hole.


Use two different materail to line the inner parts

Use a round leather to cover the rear of button

Stitching Velcro part to sheath


Stitch side pad of elastic band to leather layer.


                                             End of document πŸ‘΄πŸ‘³πŸ‘·πŸ‘Ά

Non Leather Training -Wood Working, Day one

Non Leather Training -Wood Working on lathe at Penang Science Cluster.

This is a three day session for lathe course, this is first day and instructor is Mr. Susumo-san.


select tools for lathe work.


verify the piece status


This the technique to turn a wooden rod.


almost complete project (fabricate burnishing tools)


                       End of Document πŸ‘΄

Leather Project # 8 (Science Fair) Part Two

Leather Project # 8 (Science Fair) Part Two.


Today set up for booth on leather craft at SPICE Arena site.
           Verify and inspect the booth site #24.


At home do banner and get ready

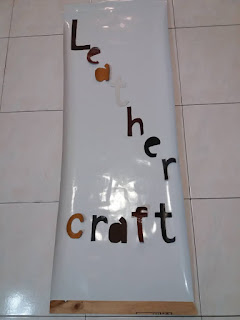
 Cut a white background banner at home in preparation for the booth on "leather craft" project.


Wording layout on banner, using scrapped leather piece.


**Note:- Will like to take this opportunity to thank you all friends and relative/s for their great support, time spent to assist and provide loaner.

Update 18th Nov 2019 on event held at SPICE ARENA


This video is to show the sponsor booth.


This video is from booth #24 view on the traffic and volume of people of all walk of life are present.
A thumb up for the organizer. Looking forward for 2020 space maker... keep it up.

        End of document  πŸ‘΄

Leather repair project (Friend's Leather Brief Case Bag) UPDATING #4 in progress

        Leather repair project (Friend's Leather Brief Case Bag) UPDATING #4 in progress

This repair project for update #4 have two portion:-
1) Repainting foot button
2) Different way or technique to perform stitching bag for repair.

1) First cut thick paper template with hole to fit the bottom foot button. So that it easier to remove rust and apply a layer of paint.


Pre repair, with all bottom button rusty.


Close up view of the rusty bottom button


Another close up view on bottom of bag


Update on 25th Oct 2019.


Use a paper cut off template to allow the button head expose and the surrounding is protect by the template when do wire brush cleaning and painting work

Close up view of the wire brush to remove rust spot follow by cleaning before apply paint to button head

Compare those button head being painted against those not painted.


Tools (wire brush, cleaning cloth) and paint material, cotton bud .


2) Have to use different technique for perform stitching on repair of bag with flap that is movable and heavy.

 This is one way to do stitching with bag laying side and the flap hanging upward.
This is one way to gain access from the inside to outside for the needle and thread.

Step#1 insert needle #1 half way from outside, then proceed to next step.
* note:- if have difficulty it will need a scratch awl or special punch hole awl.

Step#2 use the other needle #2 and locate the #1 needle pointed part as reference hole. Use needle #2 and locate point and insert at reference hole.

Tips :- The reason why this was done was for needle #2 to exit from inside to outside to make it easier to do saddle stitching.


This needle #2 pointed part can be clearly seen.

Do take note there are short white thread which is to temporary hold the two leather together before start stitching.

It is also to assist to punch hole with scratch Awl as it minimize two layer of leather from movement.


 Step #3, The needle #1 now cross the needle #2 for part of saddle stitching to take place
 Step # 4, insert needle #1 into the place where needle #2 existed. 
Some situation it might be easier to have needle start from inside or outside depend on your preference.

Step #5, once needle #1 pointed part exit from inside layer next loop thread (note the direction of loop is important to be consistent flow).
Proceed to pull thread for needle #1(inside layer) and needle #2 (outside layer).
This complete one saddle stitch task and repeat for the rest.


Note and tips:-  there are situation to have the bag laying at it side or standing upright position whichever suit you.
To minimize the flap from obstructing access I have use a raffia string or any strong string to lift open flap so as to gain access to inside of bag.
However this is just a tips/suggestion, it depend what type of bag you are doing. However for this case the lawyer bag is vintage and old it need additional care to handle this repair job.

                                                    End of document πŸ‘΄

Year 2024 HAPPY Winter Solstice

 Year 2024 HAPPY Winter Solstice * Note: This is trail use of "Google Translate" application from ENGLISH to JAPANESE, sorry if th...