Glass Container protector - - ガラス容器プロテクター

 This project is to fabricate glass bowl container for three sizes.

1. Large bowl is 47oz/ 1.38 Liter

2. Medium bowl is 27 oz / 0.8 Liter

3. Small bowl is 16 oz / 0.47 Liter 


このプロジェクトは、3 つのサイズのガラスボウル容器を製作することです。

1. 大きなボウルは 47 オンス/1.38 リットルです。

2. 中くらいのボウルは 27 オンス / 0.8 リットルです。

3. 小さなボウルは 16 オンス / 0.47 リットルです。


Trail version using cardboard and wrap around glass bowl to get a feel of the project.

プロジェクトの雰囲気をつかむために、厚紙を使用しガラスボウルに巻き付けるトレイルバージョン。


Glue a PA foam layer for insulation purpose.

断熱目的でPAフォーム層を接着します。


Add a foil layer on top of foam with card board.

The use of cup board was to give the form of shape, while the foam and foil is for insulation layer of body.

フォームの上に厚紙でホイル層を追加します。


食器棚は形を整えるために使用され、フォームとフォイルは本体の断熱層として使用されます。


Add strips of foam for better insulation result , instead of one big piece.

より良い断熱効果を得るには、大きな 1 つの部分ではなく、フォームのストリップを追加します。


Check on of leather thickness and skive to desired thickness for strap use.

革の厚さを確認し、ストラップに使用する好みの厚さに削ります。


Check the container fit each glass bowl size.

各ガラスボウルのサイズに適合する容器を確認してください。
Punch hole on leather edge seam.

革の端の縫い目にパンチ穴をあけます。

The first idea was for both end of the casing was to be close with an end cover.

This idea was not user friendlier to "put in" and too much work to take it out.

最初のアイデアは、ケーシングの両端をエンド カバーで閉じることでした。

このアイデアは、「入れる」のはユーザーフレンドリーではなく、取り出すのは手間がかかりすぎます。


Use paper template to verify design for both end of container.

First prototype version was stop during trail phase.
The idea was not user friendlier.
Decided to stop and start thinking for another design, simple to insert glass container and ease to remove it.


t最初のプロトタイプバージョンはトレイルフェーズ中に停止されました。
このアイデアはユーザーフレンドリーではありませんでした。
立ち止まって、ガラス容器を簡単に挿入でき、簡単に取り外せる別のデザインを考え始めることにしました。
This idea and prototype was stop and removed.

このアイデアとプロトタイプは停止され、削除されました。

Use a nylon webbing strap .

ナイロンウェビングストラップを使用.
Cut strap to match nylon webbing strap size.

Note the small leather strap is to support holding the nylon webbing.
The longer leather strap is sitting the outer surface while the smaller strap is position on the inner surface.

ナイロンウェビングストラップのサイズに合わせてストラップをカットします。

小さな革ストラップはナイロン ウェビングの保持をサポートするためのものであることに注意してください。
長い革ストラップは外側に配置され、小さいストラップは内側に配置されます。


Cut the desire nylon webbing strap length for each glass container size.

各ガラス容器のサイズに合わせて、希望の長さのナイロン ウェビング ストラップをカットします。

Note the desire nylon webbing should be match with each glass container size to have correct tension when it is inserted.

挿入時に適切な張力が得られるように、必要なナイロン ウェビングが各ガラス容器のサイズに一致している必要があることに注意してください。
This is how a glass container is inserted,

ガラス容器を差し込むとこんな感じになります。


Method to punch hole on leather with nylon webbing strap for better secure and stronger support when stress to tension.

ナイロンウェビングストラップで革に穴を開ける方法で、張力がかかったときにより安全で強力なサポートを提供します。


 End of document 😎


Hush Puppies 35mm belt - ハッシュパピー 35mm ベルト

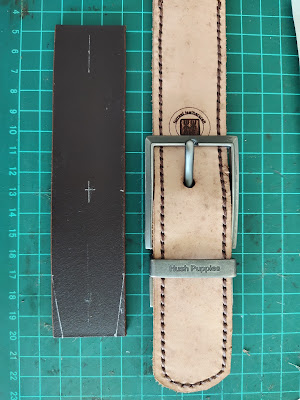
 Fabricate a new Hush Puppies 35mm belt, as old belt strap is worn off, but buckle is in good state. 古いベルトストラップは摩耗していますが、バックルは良好な状態であるため、新しい Hush Puppies 35mm ベルトを製作します。

First hole from buckle (reference edge) is about 78.5 cm , spacing between hole is about 2.5 cm and there are five hole.. Belt length is about 98.5 cm (end to end). バックルから最初の穴(基準端)は約78.5cm、穴の間隔は約2.5cmで、穴は5つあります。ベルトの長さは約98.5cm(端から端まで)です。


Show the old belt which is worn off and need to replace with new belt strap. 摩耗して新しいベルトストラップに交換する必要がある古いベルトを表示します。


To remove buckle is to pull in the direction as shown. There is a spring action from a screw at center (inside). バックルを外すには、図の方向に引っ張ります。中央(内側)のネジからバネの作用があります。


The buckle is Clip on buckle or Ratchet buckle. バックルはクリップオンバックルまたはラチェットバックルです。


Measure buckle pin size, so it can push thru the belt holder strap, it is about 4.2 mm. バックルピンのサイズを測って、ベルトホルダーストラップに押し込むことができるようにすると、約 4.2 mm になります。


Leather use is a pre cut , use edge beveller #2 size on all edge of belt strap.


Apply chemical TOKONOLE to belt edge for burnishing.


Burnishing edge with wooden slicker.


Use sand paper to smoothen edge

Apply chemical TOKONOLE to other side of belt edge.


Use sand paper to smoothen bevel edge 


Cut the end of belt and punch hole, install new belt to buckle.


Cut a 15 cm strap as belt keeper, marking for preparation to punch hole size 9mm (for hanger hook) and 4 mm (belt buckle pin).


Use round punch hole tools, this size is for hanger hook. I use a small straight punch (size 11mm) at the lower edge of round hole. 丸い穴あけパンチツールを使用します。このサイズはハンガーフック用です。丸い穴の下端には、小さな直線パンチ (サイズ 11 mm) を使用します。


The reason for this is to allow easier to hook and hang belt keeper. ベルトキーパーを引っ掛けたり吊り下げたりするのが簡単になるからです。


Tools use for belt keeper project. ベルト キーパー プロジェクトで使用するツール。


How to open jaw of buckle. バックルのあごの開け方。


The buckle is Clip on buckle or Ratchet buckle. バックルはクリップオンバックルまたはラチェットバックルです。


Complete project of belt and belt holder keeper. ベルトとベルトホルダーキーパーのプロジェクトを完了しました。


                                      👀  End of document 😎


Appointment Card Holder

 This is simple project for appointment card holder, present two version to suit user needs.


Version #1 is size 8.5 cm x 12.5cm and version #2 is 8.5cm x 13.5 cm.

The size of card holder is base on user appointment card available at the point in time plus seam allowance.

Each of these project take a few hours to perform if all materials are available. However the emboss part take about half a day for leather to be dry.


Height of appointment card


Width of appointment card


Both front and rear layer with emboss
pattern


Inner pocket lining use a canvas materials.


Appointment card holder version #2


Cut the top edge with this pattern.


The leather is still wet area as it have just removed from the emboss press.

Sewing the top edge of the lining with seam allowance


This is to show the inner pocket have two layer


Front and rear view on completed project

Another view on a completed project

Compare both appointment card holder

                     End of document 😎


Man shoe repair (stitching sewing) - 男性靴修理(ステッチ縫製)

 This is about my own shoe repair for the outer sole separated... This is a Clarks - Gore-tex . これは、剥がれてしまったアウターソールの靴の修理についてです。これは、クラークスのゴアテ...