Tobacco pipes and cigar holder
Update on 7th March
Tried to improve on the project edge burnishing to smooth and refine the surface .
What was tried by using fine sand paper of grit 1000 to polish the edge and apply chemical "Ledafil" and use wooden slicker and "jean" cloth to burnish edge. It is still a major challenge to improve. There is some slight changes, it looks like certain leather properties (chrome tan) make this a great challenge. Try other leather type, result vary depending on leather type and property.
Have to check with other expert to seek advise and check for possible solution or work around. Have view some YouTube "expert" which share idea and tips for better work around.
= = = = = = = = = = = = = = = = = = = = = = = = = = = = = = = = = = = = = = = = = = = = =
Update on 30th Dec 2021.
Tobacco Pipes Stand
= = = = = = = = = = = = = = = = = = = = = = = = = = = = = = = = = = = = = = = = = = = = =
Update 26th Nov 2021.
After getting feedback from end user, due to need to accommodate for a bigger diameter cigar.
Tools required for project.
When attaching both layer, it easier to start from either end and glue to other end.
Top view of project
Update image on 2nd Dec 2021
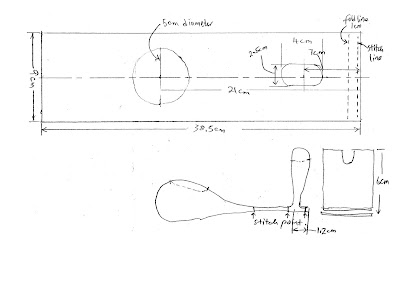
Drawing for cigar holder.
= = = = = = = = = = = = = = = = = = 4th Nov 2021 = = = = = = = = = =
This is a friend request to create a tobacco pipes and cigar stand / holder.
The design of these product is base on Pinterst web site, some idea are taken from there. Credit due is from them too.
This is for a cigar holder project.
You may want to follow the sequence . One end of the project is glue first. This to help hold in position to punch stitching hole.The reason is apparent the bottom layer is slightly shorter than the top layer is to accommodate the curving path.
It better to cut the hole for top layer first. Then trace on to other surface on the bottom layer. This is because it already curve hence it challenging to punch thru or cut line on uneven surface.
After cut thru the top layer use a pen to mark line for the bottom layer as shown. Position end strap cutter and follow the line to cut for bottom layer.
After cutting is done glue both top and bottom layer, once the glue harden.
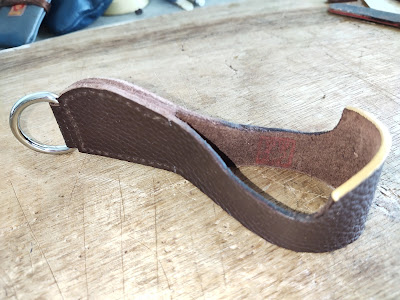
You will notice a inverted "V" shape on project.
Next punch a 4 mm round hole on both end of the project, inserted a leather string to hold the project in position required.
Some of the tools used for this project. Not visible here is a skive tool, to reduce thickness of leather materials.
Finish project for cigar holder.
Update on 26th Nov 2021.
More update to come.. stay tune.
Another design for cigar holder, it is an adjustable in length of cigar it can accommodate.
Work in progress...stay tune
A cut for "valley" width 2.5 cm is required in this project.
Base on end user the cigar is about 1 inch in diameter. Earlier design was base on own assumption which in error.
Further cut a bigger "valley" to meet end user requirement.
= = = = = = = = = = = = = = =
Update on 7th Nov 2021.
Tobacco pipes stand base on design as shown on Pinterest site. https://www.pinterest.com/pin/15903404924564000/
End of document 👷


No comments:
Post a Comment