Malaysia Merdeka Day (Independence day)

A Happy 😊 Happy  Merdeka Day (Independence day).. since from 31st August 1957.

Wishing all Malaysians a happy Merdeka day .. under new normal situation, stay safe ,stay at home.


                                     👴    End of document  👴

Leather Project # 9 (Lady Watch Strap)

 Leather Project # 9 (Lady Watch Strap)

Please refer to past post for Non Leather Repair #10 (Watch Strap repair)   Published on                        09/03/2019 07:46. 

It have some background inform as to why to replace it broken watch metal strap with leather strap.

Recap, since it is difficult to source for same metal material to repair by welding pin for this lady watch broken strap . 

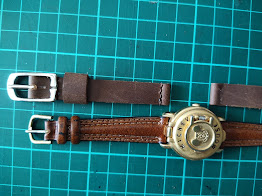
Hence user decide to have a new leather wrist watch strap. These are commonly called padded or line strap.


The watch strap uses these basic tools. The leather selected is waxy surface and thickness of 2 mm need to skive to about 1.0 to 1.2 mm.
A most watch strap is very thin due to limited gap or space between watch body and "Lock Bar" pin.
*note:- there other leather craft tools is not shown here.

Some challenges in fabricating small leather craft item are some tools need to improvise or make do we can find locally. A good magnifying glass will help in this project.

Another good to have tool is skiving tool to trim leather to required thickness. There some expert uses razor shaver or skiving knife. All these need practice and skill and correct technique to shave consistent thickness.


Use a thickness Gage to verify thickness of leather material.

Use the original metal strap to make estimate measurement for leather material.

In this case use simple buckle, it internal width is about 1.2 cm and it about match with watch strap size.


Check buckle pin size match with punch hole size.

It is important to punch hole size do not restrict pin movement


This is how the loop band is measured to ensure sung fitting for watch strap


Using another watch to verify both new strap is within the user wrist size.


Overall view to measure new strap length by comparing with exiting watch.

Another way is to make a paper template and have user measurement approximate measurement.


use a #1.0 edge beveler for this project.


Add an interface layer to support the watch spring bar make contact. Hope this will reduce wear and tear.


Tools use to punch buckle pin hole .


One view of finish project
Another view of project
Project done.


Tips :- it is recommend to apply olive oil to keep the leather surface moist and also help to minimize our body sweat due to local environment.

Happy reading this project. If you have any comment or suggestion for improvement please share. Have a nice day.


End of document  👴👴👴


Key Chain #09 (Key Chain and holder design)

 Key Chain #09 (Key Chain design) * update 30th Dec 2020

Experiment on new design key chain and customize for a few keys. 

The center layer is make up of two layer, one is a lining leather with interface to give support. The other outer side for center is old jean cloth with interface added.

The outer jean center piece is to support rivet to hold four key head .


Use a press machine to emboss logo on outside surface of leather.
It need to wet the area surface and allow it to soak in Then leave it for about 2 hour.

This embossing machine handle I have use a leather strap to maintain tension.

Tips:- I leave for about half a day for leather that is hard in texture.So the duration to press depend on the texture of leather materials.


Measure center piece match with key holder height


Tools to skive both side of center layer to be folded

Use center layer to jean material as template
Add interface to support jean material.


Attach both center layer after install rivet to key head.

Attached the center layer use glue. Prepare for punching hole to do stitching on both top and bottom edge.


Finish project for key holder.


Update 30th Dec 2020.

Key chain for 4 head project.

 
Use a small jean cloth material and wrap around a harder base.
The base is a 2mm paper base materials.


Glue the four edge, the longest path is warp around the paper base.

Apply glue, try not to pull too hard as cloth material is flexible and cause uneven surface if pull to hard.

Just sufficient folding to warp over, with both edge meet at approximately center.


Trim all four corner and fold both end .


Prepare key chain head and 7 mm rivet. Remember to allow a seam space for punch hole to key chain main body leather.


Next to stitch the center jean material with leather layer. The purpose is to prevent the jean edge from fraying and give better support for the center part.

Do take note when stitching two layer together it need care when punch hole.

In this case use a 4 mm punch spacing.


First way to mount jean layer, stitch both side but not complete stitch from top to bottom.


Second way to mount jean layer and stitches on both longest side from top to bottom.


Compare both key chain / holder project. Note both project yet to mount the button.

Note the left picture the button handle on the right side, the right picture with button on the left side.


                               👶 👶  End of document  👴

Non Leather repair #23 (Dyson V11 vacuum cleaner)

 Non Leather repair #23 (Dyson V11 vacuum cleaner)

            My daughter’s vacuum cleaner (Dyson V11 vacuum cleaner)which recently encounter poor suction and funny hissing sound when under operation. 

Rear filter remove to clean and discharge bin of dirt when it is full. 

Noted the indicator light for “flow path”  is on/off at time during usage.

This is my first time to open up Dyson V11 for service and cleaning. However as first timer it better to view some You Tube channel get tips and repair information – 

How to Clean and Maintain the Dyson V11 Cordless Vacuum Cleaner , 

dated 12 Jun 2019 , by Lords Electrical (26:17 minutes).

 url link https://www.youtube.com/watch?v=DWmcA0APECU

Very simple and informative, very details on how to open Dyson V11 vacuum cleaner for service and cleaning.

Timing - action..

08:19 remove rear filter

09:48 remove clear bin

15:48 remove part of air flow nozzle


Basic tools for this service.

Screw drive Philips
T8 trox screwdriver
1 inch brush
cloth
dust bin
newspaper.
Vacuum cleaner
10 cents or 20 cents coin.


Clear turbine head, underneath before cleaning.

* Note:- A lot of dirt clog up and stick to parts surface. 
Need to disassembly to gain access for cleaning.

A wet cloth to wipe out dirt and use brush to remove dirt and dust.
Please view recommended You Tube video it have a clear instruction to remove parts.


With clear bin removed notice a lot of dust and dirt have clog up air flow path.
The outer ring is where the dirt is visible.

This cause poor  air suction and hissing sound when operating.

Please view recommended You Tube video it have a clear instruction to remove parts.


Slowly remove dirt by using a bamboo stick to remove dirt.


As can be seen here once it removed the outer ring is fill with dirt.


Dirt and dust accumulated ,remove from Dyson V11 air path .


After reinstall Dyson V11 parts and check status of repair.  
Can feel the difference in air suction at entrance of input air path. 


Clear turbine head
Before cleaning.


Clear turbine head
After cleaning


Recommend to do this service and cleaning as required when suction is limited. This way it will prolong the life of this vacuum cleaner.

It is best to clean the rubber gasket as required, refer to user service manual.


                   👶👶   End of document  👴 👴


Key Chain #08 (Key Chain upgrade)

 Key Chain #08 (Key Chain upgrade).

 One of the old key chain holder need to upgrade, as some of the feature are not functioning or not serve it purpose.


This is an old key chain holder.

There is a remote control module is no longer use. It is light on/off control module.

The veg tan leather is too soft and there is limited "Support" for key holder.

This is an end product of key holder.

With it middle pad to give support and make center layer a rigid support


The VT2 button is hidden tag version.

This is the approximate size of leather 11.5 cm x 21.5 cm.

The center piece is base on four key head.


How to fabricate tag for hiding VT2 button head.


Tools required for tag.

In this case tag is about 2 cm width and the length can be adjusted depend on the design needed.

You will notice VT2 button head should position about mid point between the layer outer edge to the cut slot line.

The 2cm straight line hole is about 2cm from the edge.

Notice certain part of surface is clean or make rough before glue is apply

This is how a strip is inserted into 2 cm hole

This is to show the strip is glue to the layer. Remember to check the correct orientation of the strip.


Once the tag is glued it is time to punch hole for stitching work.
The purpose is to ensure the tag is secured properly when user pull tag to open key chain holder. 

You will notice it this case a wooden piece is use close to it edge as the VT2 button is close by.
This is one way to verify the other button position match


Verify position before proceed to apply glue.
This step is important to check to confirm , especially the button position to allow stitching start


Insert one end of tag into a cut slot line

Pull the end into position

Apply glue 
Allow glue to dry


Out side view of key holder

Inside view of tag where part of button is hidden.


                            End of document  👴👴


Man shoe repair (stitching sewing) - 男性靴修理(ステッチ縫製)

 This is about my own shoe repair for the outer sole separated... This is a Clarks - Gore-tex . これは、剥がれてしまったアウターソールの靴の修理についてです。これは、クラークスのゴアテ...