Leather Pairing Knife #4 part THREE

   Leather Pairing Knife #4 part THREE.

After sharpening cutting edge of pairing knife.

Update 22nd Oct 2019.
Do take note there are several You Tube video have very excellent topic on how to sharpen knife which is related to this subject matter.
It will be good to review and evaluate them base on your skill, experience on sharpen cutting edge.
Do take note it will affect your leather project is the cutting is dull.


Testing it cutting edge by try cutting fruit of lemon.


Close up view of the cutting process to verify if the sharping process and inspection are good to ensure better cutting edge.


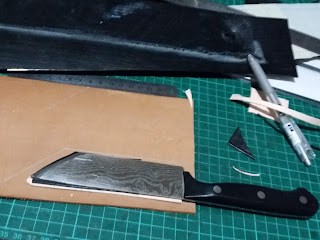
Taking measurement and cut leather material to size to fabricate sheath.


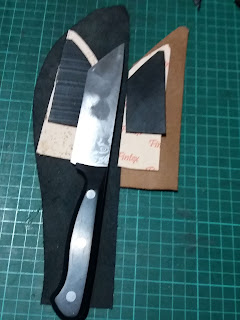
Add a protection layer inside for pairing knife sheath


Both side have a plastic material to protect the inner leather layer from the sharp paring knife.

These are special knife for skiving leather to required thickness. Useful for trimming certain leather product which requires edge to trim certain thickness.


The overall cost saving is achieve and satisfactory for leather craft project with this new parring knife..


            End of document 👶👷👴

Non Leather PART 1, Repair #19 (Aluminium Grill Gate door)

          My daughter rented house have it front  grill gate with defective lock.
      It took a while to prepare and at the same time looks for a professional lock smith to repair lock's mechanism.
This lock is very old model (lack spare part and only old timer know how to repair it).

Have spent some time to source for "good" locksmith to repair it.
** Also the tool required a riveter tool was defective, please see post Non Leather Repair #18 (Riveter tool repair)**


Check the internal door frame before proceeding further.


Removing the handle is a straight forward task,

Nex step is the remove the two big rivet with electric drill and correct drill bits size.

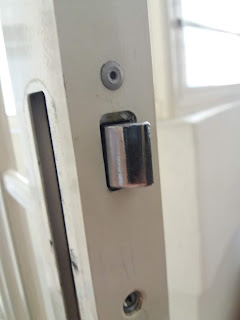
Problem is the button tongue mechanical is defective, hence need to remove the lock from the door frame is quite challenging.


Drill old rivet head to disassemble lock mechanism

Use the right drill bit to ensure clean removal of rivet head

Tools for this repair


Check ensure there is no other parts inside the grill gate door frame

Need to shift the grill gate door ,which conceal the rear passage for lock.

Discover later this is not required step, hence the riveter tool is important step to restore to original rivet


Once the conceal aluminium frame is clear the lock is removed from the rear of grill gate

Found there are broken part for the tongue, it cannot latch in position.

Found the lock need a professional lock smith to repair this old lock..


To be continue in future post.. happy reading.


                                   End of document 👴👷👶

Non Leather Repair #18 (Riveter tool repair)

  Recently try to use a big riveter gun BUT it was not working as it should be, (was using for repair another project for grill gate).

Hence need to get it fix before proceed with this tool for repair on grill gate. Anyway will publish the other repair project on this blog.spot soon.

The issue with this riveter tool it does not  allow the rivet pin to pass thru and pull the pin when insert the rivet to project.


Extreme top right 1) Outer casing
Mid center 2) Inner barrel to hold spring and adaptor to push two half shell.


Close up view of the various component for riveter tool.       


No. 1 = Outer barrel head
No. 2 = Inner barrel sleeve
No. 3 = Spring
No. 4 = Inner head rivet pin
No. 5 = Two split head grip rivet pin


 End of document 👴

Leather project #5 Scissor sheath PART #3 (Friend's scissor sheath try out)

 Leather project #5 Scissor sheath PART #3 (Friend's scissor sheath try out)

Finally have time to disassemble the original scissor sheath after carefully taking it apart.

* the owner was more than happy to pass this sheath for further analysis and what part that can be improve and add value to his current sheath.
 
Of  course if I think in term of improvement and change is unlimited and idea are abundant.

1) like example the pivot point of attachment,
2) add a more secure sleeve to minimize sharp point tools to pork thru at the tips,
3) how to fabricate a user friendlier and ease to keep and retrieve.
4) New idea for user to enjoy what other tools holder to add


Tools used to disassemble this sheath.
This original sheath is made in Japan as per end user description.

It looks very well fabricate and this sheath was in used for several years.
This owner have try it best to maintain condition, however due to wear and tear, it need to re condition to it best on my ability.

There are some cotton wool like fabric to protect inner layer. This is just a guessing game..

After removing original thread the owner handyman repair with small Gage wire. As he felt the easiest repair and what was available at that time and lasting effect by wire

Next to clean the leather layer and see how best to restore this sheath.
To be continue later, after some research to good method to restore to it original condition base on my best ability.


Please watch for more update... thank you for your support.


       End of Document.... 👴👲👷👶

Leather project #5 Scissor sheath PART #2 (Friend scissor sheath try out)

   Today meet friend and he share his original scissor sheath. The sheath was design specifically for staff to carry out their work efficiently and better productivity

The company provide this sheath to carry scissor and seeker knife.

Found the original sheath was worn off, broken thread and torn leather at the edge. For thread that was broken was temporary use wire to hold the leather piece together.


Rear view of sheath casing, if you look carefully the broken is replace with thin wire where the thread is broken.

Side view

Top view

Top side layer is worn off and tear at the edge.

 Close up view of the lower sheath casing, it is more visible on the wire use to stitch both layer.


Partial view of he top part front facing


               End of document 👴

Man shoe repair (stitching sewing) - 男性靴修理(ステッチ縫製)

 This is about my own shoe repair for the outer sole separated... This is a Clarks - Gore-tex . これは、剥がれてしまったアウターソールの靴の修理についてです。これは、クラークスのゴアテ...