Lady Shoe repair "KLEI"

             Lady shoe repair task


             This lady shoe with the bottom sole being defective. Most common problem found on most shoe repair is the separation of outer sole. Both the left and right shoe have the same issue of outer sole split wide open.

Based on my observation for some reason the outer sole have the glue " missing" or the adhesion surface on both the surface is lacking.

Hence the bondage between outer sole to the base is " disappear" and the result the sole just does not stick together.


This is a customize shoe have it outer sole separated, can see the felt material is also lifted off.

What most surprising is the shoe is hardly worn or stress out base on my observation.
For some reason this shoe is barely use or worn by user but have this defect appear so early.


After checking the inner sole and inner lining material it feel strange and later discovered the material use for lining inside gradually disintegrate when working on both shoe. 
Not sure why the material behave this way, base on observation and feedback this shoe was hardly worn. So not sure why the lining react this way.😂


Underside view of inner sole and notice the wrinkle toward the toe tip. It is not  even surface due to external transparent layer is lifted out. Not sure what is the reason for this surface.


The brand name imprint on inner sole as KLEI.


Notice the material use for this shoe is started to peel off. The clear transparent layer is separated with the black base. The black base where some it material is dropping off. Can see the broken black material is disintegrating, see the black spot on the cardboard surface.

Any way try to apply glue between them to see it work or not. The result is not very good as the glue have poor outcome.


Certain part of the felt material was lifted up is re attached with contact glue.
It best to ensure the glue is allow with sufficient time to cure before stick both piece together.

This the learning experience and and also trial an error over time.

If the glue is allow to cure it adhesion is better and your repair work is more satisfactory and enjoy the repair work.

As noted the old glue need to clean the outer sole surface, notice the old glue is best to remove and clean surface before apply glue.


This is to show what happen when try to lift off the inner
sole. The top layer disintegrate when touch it surface with bare hand.

Not sure why this material behave in this manner.


Allow glue to cure time before attached both layer together.


Try to do stitching for the toe side section . However because the inner lining and inner sole materials is very fragile just try out only to the toe to give strength .

Hence limited edge of the outer sole use the thread stitching because of this issue


This complete repair for this shoe.


                                                      👷  End of document 👴
Tote Bag # 15 (Canvas/Leather tote bag) - - トートバッグ#15(キャンバス/レザートートバッグ)

 Tote Bag # 15 (Canvas/Leather tote bag)

      This is another tote bag use canvas (front and rear) and leather (both side), with different tubular handle with two cord rope instead of one cord rope.

This tote bag pass to sister in law from Jelutong area on 6th Dec 2021.


こちらもキャンバス(表裏)とレザー(両面)を使用し、筒状のハンドルに1本のコードロープではなく2本のコードロープを使用したトートバッグです。

このトートバッグは、2021年12月6日にジェルトン地域から義理の妹に渡されました。


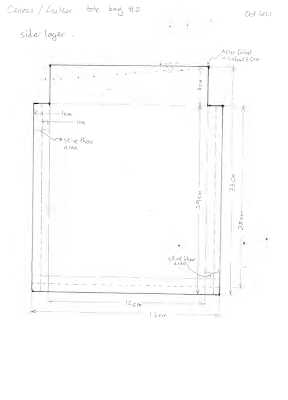
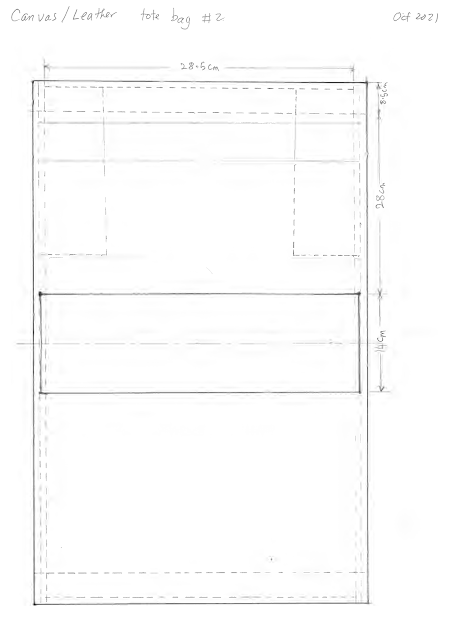
Verify side layer leather thickness.
This is also to determine how much to skive the edge for fold over. サイドレイヤーの革の厚さを確認します。
これは、折り返しのためにエッジをどの程度削るかを決定することにもなります。
Verify the side layer height to match the canvas layer (front and rear). サイド レイヤーの高さがキャンバス レイヤー (前面と背面) と一致することを確認します。

Confirm seam allowance which is to interface with the canvas layer. キャンバス レイヤーとインターフェイスする縫い代を確認します。


Remove corner which is not required. As it not part of the bag for the leather layer. This corner was blocking the flat part of the edge. 不要な角を取り除きます。革層のためのバッグの一部ではないため。この角は端の平らな部分をブロックしていました。

Skive the leather edge where it meet the canvas edge.
The purpose is to expose the leather edge which wrap over the canvas edge.
This is one way to cover over the canvas edge, so the sewing stitch is not visible.

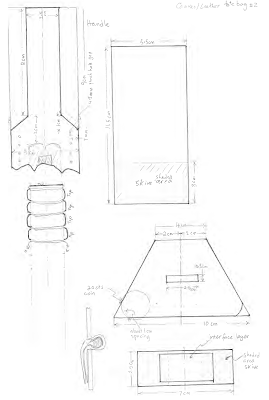
Refer to the above drawing for more details.

Do note to sharpen the skiving knife edge before use. It take a lot of effort to skive the edge.

革の端がキャンバスの端と接する部分を削ります。
目的は、キャンバスの端を包んでいる革の端を露出させることです。
これはキャンバスの端を覆う方法の 1 つで、縫い目が見えなくなります。

詳細については、上の図を参照してください。

使用前に、削りナイフの刃を研ぐことを忘れないでください。端を削るのには、かなりの労力が必要です。


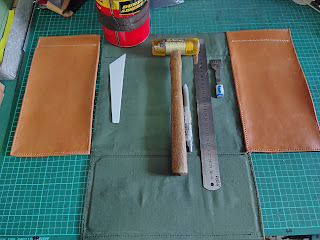
This is to shows some tools use for this skiving activity.
Verify the height for the leather side layer. It better to check the height match with the canvas layer.


Start punch hole between leather layer with canvas layer.
Use glue to hold the two layer in position, it better to ensure the glue is allow sufficient time to cure.

Do allow sufficient time for glue to set before start punch stitching hole, 
Tips:- it will be good to have a scarp leather underneath to minimize punch tips point are in good state. 
Try use a not so hard wood as the base to support the punch hole activity.
Shows tools for project. For this project have both side layer attached and punch hole in preparation for stitching.

Overview with both side layer ready to punch hole to canvas layer. Why do this way it is to ensure the leather layer match in height and align.
Hence the reference is the canvas top edge for leather layer to align ,same goes to the bottom side match to both side layer.

Measure thread length for stitching. The extra length is take into consideration for thickness and total length inclusive of the needle length.

Add glue to the edge of canvas.


Start stitch from the top and work to the bottom. To ensure the top edge are align between leather and canvas.
Because during stitching two different material it might stretch as both material have different properties. 

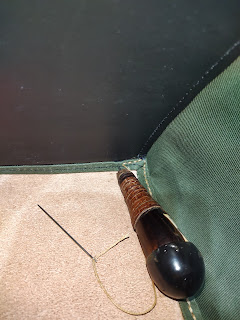
Manually use an awl to punch thru canvas, from leather side with pre punch hole.


Place the project on top of a wooden piece to assist in punch hole with awl.

At time a awl is use to verify the stitch hole are in correct position and alignment.

Take note the thread length is cut to ensure overlap.
Observe the thread have sufficient length to cover the whole path.
Once the stitch have reach the bottom section that where is it terminate at this position.
The other side it start to stitch from top edge and ensure thread is sufficient length and overlap the first termination.

Do note the bottom "black" leather is sew first before the side layer are stitch together.


Close up view to check stitch of both layer are at the seam zone.

Tools required for project for making tote bag handle pad.

Preparation to assemble the handle pad. Please refer to above drawing this pad

Rear view of the handle pad. An interface strip is inserted middle slot. This to give better support for the metal D ring surface.

Refer to drawing for more details. Do note there is a white strip of interface layer to help support the metal D ring.

The interface layer is help and provide better support to the metal surface and minimize tension between D ring surface and leather strip.


Some of the basic tools for handle pad.

It better to prepare punching hole for the edge and centre piece on handle pad.
Close up view when punch stitching hole.

Align both handle pad in their respective position.

Prepare to punch hole base on pre punch hole on leather handle pad as reference.

Check from time the handle pad is not moving during punch hole activity. 


=  = - - - - =  =   =  = - - - =  = - - - - =  =   =  = - - - =  = - - - - =  =

* Note: This is trail use of "Google Translate" application from ENGLISH to JAPANESE, sorry if this translation do not make sense or suitable word or sentence, please do let me know and thank you.

* 注: これは英語から日本語への「Google 翻訳」アプリケーションの試用です。この翻訳が意味をなさない、または適切な単語や文でない場合は、申し訳ありませんが、お知らせください。ありがとうございます。

                                          👦    End of  document   👴

                             End of document 👴

Drill-Press Stand-Pricking Iron - ボール盤スタンド・刺しごて

 Drill-Press Stand-Pricking Iron chisel . ボール盤・スタンド・刺し鉄ノミ。

Buy a new Drill Press Stand to hold leather craft pricking iron punch. レザークラフトの刺し鉄パンチを置くために新しいボール盤スタンドを購入します。

url link - https://www.amazon.com/Portable-Universal-Benchtop-Holder-Adjustable/dp/B08RBSZYZD

url link - https://www.pinterest.com/pin/783626403896258937/


 Drill press stand use to for leather craft tool to hold pricking iron tool.

レザークラフト用の穴あけアイロンツールを固定するボール盤スタンドです。


Top is a tripod stand base ( with three hole at the side), a rubber hose (to hold the other end chuck shaft) and drill chuck (size is 1.5mm to 13 mm chuck size, brand BRIED 1/2 - 20UNF).

上部は三脚スタンドベース(側面に3つの穴があります)、ゴムホース(もう一方の端のチャックシャフトを保持するため)、およびドリルチャック(サイズはチャックサイズ1.5mmから13mm、ブランドBRIED 1/2 - 20UNF)です。


Add a soft base materiel underneath the base plate to minimize uneven surface edge scratching table top surface.
ベースプレートの下に柔らかいベース素材を追加して、テーブルトップ表面の凹凸を最小限に抑えます。


Attached a tripod base to the drill press by using cable tie to hold and support it in position. ケーブルタイを使用して三脚ベースをボール盤に取り付け、所定の位置に保持し、支持します。

The reason the base of the tripod stand (underneath) is curve inward and help to support the chuck drill in position. 三脚スタンドのベース(下)が内側に曲がっているのは、チャックドリルを所定の位置にサポートするのに役立ちます。


Underneath view of the tripod stand attached to drill press stand.


Insert chuck drill into the tripod stand, you will see the other end of the chuck is a tapered shaft protruding out of the tripod base.


Use an old water hose and insert into the chuck shaft so that it can hold in position and prevent the chuck from dropping off.


Testing the tool after completion of project. プロジェクト完了後にツールをテストします。

Need to adjust the press position depend on tool attached to chuck head. チャックヘッドに取り付けるツールに応じてプレス位置を調整する必要があります。

Hope with this new tool less noise is generated with this pricking iron tool bench press.この新しいツールにより、この刺し鉄ツールベンチプレスで発生する騒音が少なくなることを願っています。


= = = = = = = = = = = =  Other idea for holding pricking iron = = = = = = = = = = = = 

url link - https://www.pinterest.com/pin/422634746289869209/


One way to hold pricking iron. 刺し鉄の持ち方の一つ。


url link - https://www.pinterest.com/pin/153896512257937879/


Alternative way to hold chuck head.
Note:- this method required very tight grip on chuck head. As the force generated during the process. チャックヘッドを保持する別の方法。
注: - この方法では、チャックヘッドを非常にしっかりと握る必要がありました。 プロセス中に発生する力として。


url link - https://www.pinterest.com/pin/780459810424212534/


One way to attached tool to drill press.


url link - https://www.pinterest.com/pin/320107486025318469/


Overall view of drill press with pricking iron.刺し鉄付きボール盤の全体図。


url link - https://www.pinterest.com/pin/115686284170235316/

 
For tool that is too big for chuck size use this method. チャックサイズに対して大きすぎるツールの場合は、この方法を使用してください。

= - = - = - = - = - = - = - = - = -- - - - - - - - - 

* Note: I am trying use "Google Translate" application from English to Japanese, sorry if this translation is not suitable please do let me know and thank you.

* 注: 英語から日本語への「Google 翻訳」アプリケーションを使用しようとしています。この翻訳が適切でない場合は、申し訳ありませんが、お知らせください。ありがとうございます。

If you have any comments or suggestion you are most welcome, please share with us. Learning experience is that the different sharpening angle for parang.

ご意見やご提案がございましたら、ぜひお知らせください。 学習経験は、パランの研ぎ角度の違いです。

                                        👷  End of document 👴

Repair rice cooker

 Was given a small rice cooker HANABISHI model HA1330, with problem cannot turn. Found this unit is due to power cord is defective (discover...