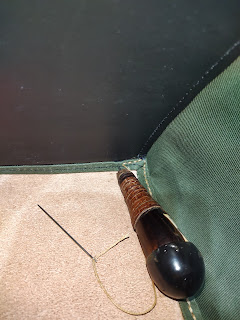
Tote Bag # 15 (Canvas/Leather tote bag)
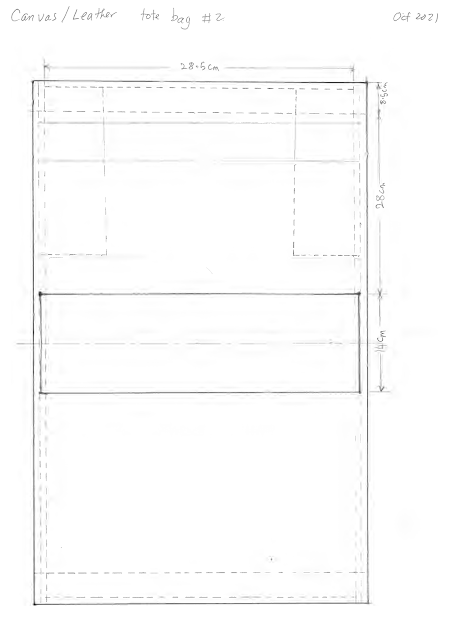
This is another tote bag use canvas (front and rear) and leather (both side), with different tubular handle with two cord rope instead of one cord rope.
This tote bag pass to sister in law from Jelutong area on 6th Dec 2021.
こちらもキャンバス(表裏)とレザー(両面)を使用し、筒状のハンドルに1本のコードロープではなく2本のコードロープを使用したトートバッグです。
このトートバッグは、2021年12月6日にジェルトン地域から義理の妹に渡されました。
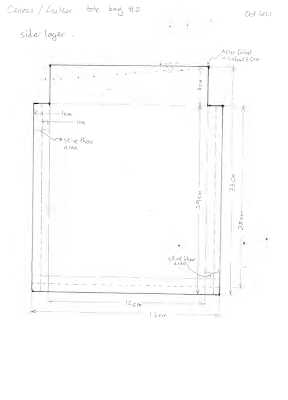
Verify side layer leather thickness.
This is also to determine how much to skive the edge for fold over. サイドレイヤーの革の厚さを確認します。
これは、折り返しのためにエッジをどの程度削るかを決定することにもなります。
Verify the side layer height to match the canvas layer (front and rear). サイド レイヤーの高さがキャンバス レイヤー (前面と背面) と一致することを確認します。
Confirm seam allowance which is to interface with the canvas layer. キャンバス レイヤーとインターフェイスする縫い代を確認します。
Remove corner which is not required. As it not part of the bag for the leather layer. This corner was blocking the flat part of the edge. 不要な角を取り除きます。革層のためのバッグの一部ではないため。この角は端の平らな部分をブロックしていました。
Skive the leather edge where it meet the canvas edge.
The purpose is to expose the leather edge which wrap over the canvas edge.
This is one way to cover over the canvas edge, so the sewing stitch is not visible.
Refer to the above drawing for more details.
Do note to sharpen the skiving knife edge before use. It take a lot of effort to skive the edge.
革の端がキャンバスの端と接する部分を削ります。
目的は、キャンバスの端を包んでいる革の端を露出させることです。
これはキャンバスの端を覆う方法の 1 つで、縫い目が見えなくなります。
詳細については、上の図を参照してください。
使用前に、削りナイフの刃を研ぐことを忘れないでください。端を削るのには、かなりの労力が必要です。
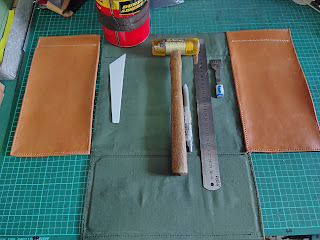
This is to shows some tools use for this skiving activity.
Verify the height for the leather side layer. It better to check the height match with the canvas layer.
Start punch hole between leather layer with canvas layer.
Use glue to hold the two layer in position, it better to ensure the glue is allow sufficient time to cure.
Do allow sufficient time for glue to set before start punch stitching hole,
Tips:- it will be good to have a scarp leather underneath to minimize punch tips point are in good state.
Try use a not so hard wood as the base to support the punch hole activity.
Shows tools for project. For this project have both side layer attached and punch hole in preparation for stitching.
Overview with both side layer ready to punch hole to canvas layer. Why do this way it is to ensure the leather layer match in height and align.
Hence the reference is the canvas top edge for leather layer to align ,same goes to the bottom side match to both side layer.
Measure thread length for stitching. The extra length is take into consideration for thickness and total length inclusive of the needle length.
Add glue to the edge of canvas.
Start stitch from the top and work to the bottom. To ensure the top edge are align between leather and canvas.
Because during stitching two different material it might stretch as both material have different properties.
Manually use an awl to punch thru canvas, from leather side with pre punch hole.
Place the project on top of a wooden piece to assist in punch hole with awl.
At time a awl is use to verify the stitch hole are in correct position and alignment.
Take note the thread length is cut to ensure overlap.
Observe the thread have sufficient length to cover the whole path.
Once the stitch have reach the bottom section that where is it terminate at this position.
The other side it start to stitch from top edge and ensure thread is sufficient length and overlap the first termination.
Do note the bottom "black" leather is sew first before the side layer are stitch together.
Close up view to check stitch of both layer are at the seam zone.
Tools required for project for making tote bag handle pad.
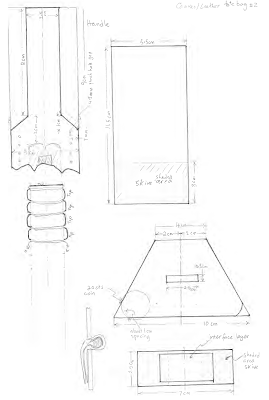
Preparation to assemble the handle pad. Please refer to above drawing this pad
Rear view of the handle pad. An interface strip is inserted middle slot. This to give better support for the metal D ring surface.
Refer to drawing for more details. Do note there is a white strip of interface layer to help support the metal D ring.
The interface layer is help and provide better support to the metal surface and minimize tension between D ring surface and leather strip.
Some of the basic tools for handle pad.
It better to prepare punching hole for the edge and centre piece on handle pad.
Close up view when punch stitching hole.
Align both handle pad in their respective position.
Prepare to punch hole base on pre punch hole on leather handle pad as reference.
Check from time the handle pad is not moving during punch hole activity.
= = - - - - = = = = - - - = = - - - - = = = = - - - = = - - - - = =
* Note: This is trail use of "Google Translate" application from ENGLISH to JAPANESE, sorry if this translation do not make sense or suitable word or sentence, please do let me know and thank you.
* 注: これは英語から日本語への「Google 翻訳」アプリケーションの試用です。この翻訳が意味をなさない、または適切な単語や文でない場合は、申し訳ありませんが、お知らせください。ありがとうございます。
👦 End of document 👴
End of document 👴
